 The Weapon's Refrain (Ultimate)
Credits
- Written Guide by Em Gram and Noz Leafhill
- Editing by Noz Leafhill
- Toolboxes by MUR
- PoVs by Kur Rumi
Table of Contents
Toolboxes
Toolboxes are an interactive guide that allows you to click through each phase indiviudally and review the mechanics in a easy to understand manner. UWU has multiple Toolboxes and each are listed here in order of phases in the fight.
Garuda Ifrit Titan Lahabrea Predation Annihilation Suppression
Waymarks
These can be imported using an XIV Launcher Plugin.
{"Name":"Imported","MapID":539,"A":{"X":100.061,"Y":0.0,"Z":92.092,"ID":0,"Active":true},"B":{"X":106.897,"Y":0.0,"Z":100.122,"ID":1,"Active":true},"C":{"X":100.219,"Y":0.0,"Z":107.013,"ID":2,"Active":true},"D":{"X":93.161,"Y":0.0,"Z":100.149,"ID":3,"Active":true},"One":{"X":100.119,"Y":0.0,"Z":100.181,"ID":4,"Active":true},"Two":{"X":100.138,"Y":0.0,"Z":81.841,"ID":6,"Active":true},"Three":{"X":87.332,"Y":0.0,"Z":87.27,"ID":5,"Active":true},"Four":{"X":107.157,"Y":0.0,"Z":107.792,"ID":7,"Active":true}}
PoV Videos
by Kur Rumi
DPS (D4) Healer (H2) Tank (OT)
Macros
View All Macros
Macro 1
==========================================
[GARUDA]
[Mistral Song]
■ - Healers East, ST Intercepts
[Friction]
■ - D1, D2, ST take 2 Thermal Low stacks
■ - D1 1st cleanse
■ - D2 2nd cleanse
■ - ST Mesohigh cleanse
[Wicked Wheel + Mistral Song]
■ - Center Garuda, Party Intercardinal
■ - MT > Anti-clockwise from 12 o'clock
■ - ST > Clockwise from 1 o'clock
[Mesohigh tethers]
■ - D4 East | ST West
Macro 2
[IFRIT]
[Nails]
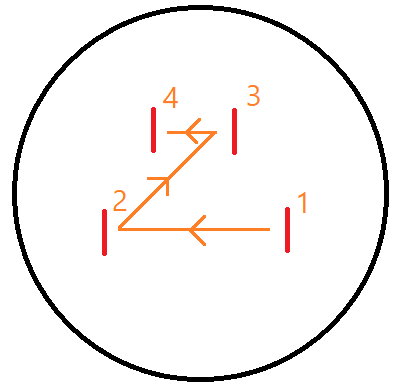
4 IFRIT 3
2 1
D3 D4
■ - Pull Ifrit to 3rd/4th Nail on intercardinal after nails
Macro 3
[TITAN]
[Gaols]
■ - Priority D1>D2>ST>H1>H2>D3>D4
[Weight of the Land + Awoken Landslides]
■ - Party moves clockwise
■ - First enmity Tank moves anti-clockwise
Macro 4
[Beyond Limits]
■ - D4 > H1 > D1
[ULTIMA]
■ - Line up in Supression spots during transition
[Annihilation]
■ - 2-2-1-1 Orb Soak
[Aetheric Boom]
■ - Tanks > Southwest
■ - Party > Southeast
[Primal Roulette]
■ - 1st Primal -> MT 90
■ - 2nd Primal -> D3 Mit
■ - 3rd Primal -> ST 90
■ - If Titan first, remember to move back to north for Ifrit
==========================================
Buff Timings
Written Guide
The Weapon’s Refrain is a multi-phase fight that covers an alternative retelling of the Warrior of Light’s fight against the Primals and the Ultima Weapon.
This fight is commonly referred to as UWU for Ultima Weapon: Ultimate, and frankly I agree its a better abbreviation than TWR too…
The fight will see you squaring off against Garuda, Ifrit and Titan before completing a LB3-filled intermission with Lahabrea, then facing the Ultima Weapon itself, angrier than ever.
This guide is based off the original and very detailed guide by Clees, which can be found below:
Awakening
Throughout the first 3 phases, you will be aiming to complete special requirements to Awaken all three Primals. Handling mechanics in a certain way gives the boss an Aetherically Charged buff - 4 stacks of this awakens the boss. Once awoken, their mechanics may change and they will drop a puddle (candy) when they die. This must be picked up as they provide extra LB3’s later, which are required to clear the fight.
We set this specific order to pick up the candies to keep things consistent and organised:
Healer (Garuda) > Caster (Ifrit) > Melee (Titan)
You will know who has the candy if they have the Beyond Limits buff.
The candy spawns where the boss dies - if it is not your role’s turn to pick up the candy, steer clear.
Phase 1: Garuda
Important Mechanics
Feather Rain A loud shriek noise is followed by AOE hits on all players, listen for the sound and then move immediately after. Garuda will make a shriek sound and without any castbar, feathers will drop on multiple players’ current position. Upon hearing the scream, move out to dodge. If hit by a feather, this will apply a DoT that requires heavy healing to survive. Being hit by 2 or more feathers is generally lethal. Feather Rain A loud shriek noise is followed by AOE hits on all players, listen for the sound and then move immediately after. will occur multiple times during the fight.
Friction Garuda casts a small heavy AoE on a single target that is to be soaked with the party, applying Thermal Low to anyone hit. This debuff can be stacked if hit by multiple Frictions without cleansing. Party needs to be tightly stacked for the AoE soak.
Slipstream A heavy hitting cleave attack targetted at the Tank, this can be dodged as the boss will not turn once the cast begins. A dodge-able frontal cleave, be careful not to face this into the party.
Downburst Heavy hitting tankbuster requiring mitigation. A heavy physical tankbuster which will require mitigation.
This summary is written to accompany the above toolbox - use it as a reference.
The phase starts with the MT Main Tank, typically the Tank holding the boss aggro the most. pulling Garuda to mid and facing her north. DPS should be behind the boss and OT Off Tank, the other tank. , alongside healers stay east with the OT Off Tank, the other tank. between healers and the boss. One healer will get Mistral Song Garuda targets players with a Green Marker, then either Garuda or Clones will launch a line AoE dealing more damage to the first player hit. and the boss will send a ranged attack to the marked healer, in which OT Off Tank, the other tank. will soak the hit for the healers (first hit takes more damage).
The Mistral Song Garuda targets players with a Green Marker, then either Garuda or Clones will launch a line AoE dealing more damage to the first player hit. leaves behind a large green AoE circle (tornado) which will instantly kill you if you remain within, so the MT Main Tank, typically the Tank holding the boss aggro the most. should drag the boss west (opposite of where the Mistral Song Garuda targets players with a Green Marker, then either Garuda or Clones will launch a line AoE dealing more damage to the first player hit. occurred), onto the D Waywark, then re-face the boss north. The party should follow, staying behind Garuda.
Plumes
Multiple Satin Plumes will spawn around the arena, plus a Spiny Plume just under Garuda. OT Off Tank, the other tank. needs to grab the Spiny Plume and be ready for heavy damage.
STOP AOE Area-of-Effect, typically used to describe any mechanic or ability which affects multiple enemies/players in an area. IMMEDIATELY. The Spiny Plume will become fixated on the first person to deal damage to it and this MUST be the OT Off Tank, the other tank. . It cannot be provoked after fixating on a target.
Garuda then casts Slipstream A heavy hitting cleave attack targetted at the Tank, this can be dodged as the boss will not turn once the cast begins. , into a Downburst Heavy hitting tankbuster requiring mitigation. . The plumes will then move to the party. Once the plumes have gathered on the party, AOE Area-of-Effect, typically used to describe any mechanic or ability which affects multiple enemies/players in an area. them down but being careful not to kill the Spiny Plume. The Spiny Plume will attack the OT Off Tank, the other tank. , giving them a stack of Thermal Low. This does tankbuster levels of damage so mitigation is necessary.
Garuda will then cast Feather Rain A loud shriek noise is followed by AOE hits on all players, listen for the sound and then move immediately after. . Move out. After Feather Rain A loud shriek noise is followed by AOE hits on all players, listen for the sound and then move immediately after. , wait for the OT Off Tank, the other tank. to take second a hit from the Spiny Plume (indicated by 2 stacks of Thermal Low), then kill the Spiny Plume to spawn a bubble. Be sure to dodge the AoE indicating the spawning of the bubble (ideally by moving towards the middle), then everyone except the OT Off Tank, the other tank. should walk into the edge, staying tightly stacked.
Cleanses
The following is a mechanic where we will take turns to gain and cleanse Thermal Low stacks that are applied from Friction, by entering and leaving the bubble. The order is very precise and required to be able to clear the fight as this contributes to the progression of awakening Garuda. If you fail the order but survive the mechanic, you can still progress further in the fight for prog, but you will not be able to see Phase 5: Ultima Weapon. You will gain Thermal Low stacks if you are outside the bubble when Friction hits you. You will cleanse your Thermal Low debuff when you enter the bubble - this deals a heavy raidwide damage. When a single player cleanses 2 stacks of Thermal Low at once, this gives Garuda a stack to progress her awakening.
OT Off Tank, the other tank. must have two stacks of Thermal Low before the Spiny Plume dies.
- Kill the Spiny Plume, everyone except OT Off Tank, the other tank. moves into the bubble.
- Garuda casts Mistral Shriek (raidwide damage). Healers should top players immediately.
- Once players are topped, OT Off Tank, the other tank. enters bubble to cleanse stacks. +1 awakening charge.
- OT Off Tank, the other tank. , D1 and D2 leave the bubble and wait outside. It is important to still be stacked close to the party.
- Friction 1: Heavy party damage, stacks applied to OT Off Tank, the other tank. and D1+D2. Party leaves bubble - heal up.
- Friction 2: Heavy party damage, Stacks applied to everyone. OT Off Tank, the other tank. , D1 and D2 should have 2 stacks while everyone else has 1.
- Wait for party to be healed, D1 cleanses stacks (enter bubble). +1 awakening charge.
- Wait for party to be healed, D2 cleanses stacks (enter bubble). +1 awakening charge.
This is one of the biggest damage checks in this phase, use your big mits/CDs and don’t be afraid to spam heal.
Stay relatively stacked during this mechanic, Friction has a small range and can miss people if you are too spread out.
If you did this mechanic correctly, the boss will now have 3 stacks of awakened and the OT Off Tank, the other tank. will be back on 2 stacks. The last stack to Awaken the boss will apply later.
As the bubble only lasts temporarily (~approximately 20 seconds), the mechanic must be completed in a timely manner. Afterwards, Garuda will cast Feather Rain A loud shriek noise is followed by AOE hits on all players, listen for the sound and then move immediately after. . Move out. She will momentarily become untargetable, before returning to the centre to cast Aerial Blast, which is raidwide damage to be mitigated and healed through. The party should stay stacked (except for MT Main Tank, typically the Tank holding the boss aggro the most. who is facing her northwards) for an upcoming Feather Rain A loud shriek noise is followed by AOE hits on all players, listen for the sound and then move immediately after. .
Twins
Garuda will then spawn 2 sisters, who cast Feather Rain A loud shriek noise is followed by AOE hits on all players, listen for the sound and then move immediately after. . Move out - all non-tank party members should head towards and stack on Waymark 4 to evade Eye of the Storm (AoE on the outer ring of the arena). Ensure Garuda is as centred as possible. Mistral Song Garuda targets players with a Green Marker, then either Garuda or Clones will launch a line AoE dealing more damage to the first player hit. will target two non-tanks from the 2 sisters, who will now be on 2 different cardinals. MT Main Tank, typically the Tank holding the boss aggro the most. and OT Off Tank, the other tank. need to dodge Wicked Wheel ( PBAOE Point-Blank Area-of-Effect, usually an enemy ability that causes a large AOE damage area centered on the enemy. centred around Garuda) and stand on a cardinal in-front of each sister against edge of the blue circle (Eye of the Storm), intercepting one of the Mistral Song Garuda targets players with a Green Marker, then either Garuda or Clones will launch a line AoE dealing more damage to the first player hit. s each.
Tanks will need to make sure they intercept one of the sisters’ Mistral Song Garuda targets players with a Green Marker, then either Garuda or Clones will launch a line AoE dealing more damage to the first player hit. s each. There are a few different ways commonly used to solve this, communicate with your cotank to make sure you understand which method you are using to solve it.
- MT Main Tank, typically the Tank holding the boss aggro the most. Prioritize North first
- OT Off Tank, the other tank. Prioritize South first
- If they spawn East/West, MT takes West, OT takes East
or…
- MT Main Tank, typically the Tank holding the boss aggro the most. CW from North
- OT Off Tank, the other tank. CCW from West
Generally you can kinda use-eyes and solve the positions pretty fast, you can stay near the middle of the room to allow fast adjustments.
The sisters will cast Feather Rain A loud shriek noise is followed by AOE hits on all players, listen for the sound and then move immediately after. again. While doing so, the party needs to avoid the large AoE tornado left behind by the Mistral Song Garuda targets players with a Green Marker, then either Garuda or Clones will launch a line AoE dealing more damage to the first player hit. (they spawn on where the tank soaked them) and then group up towards mid.
If tornadoes (Mistral Song puddles) are on SOUTH and EAST, ranged can dodge out towards the wall for safety.
Tethers
A second set of Satin Plumes will spawn - wait for them to gather and AOE Area-of-Effect, typically used to describe any mechanic or ability which affects multiple enemies/players in an area. them down as fast as possible. Garuda will cast Slipstream A heavy hitting cleave attack targetted at the Tank, this can be dodged as the boss will not turn once the cast begins. , so the MT Main Tank, typically the Tank holding the boss aggro the most. must maintain her facing north. The sisters spawn on the west and east cardinals with tethers. These tethers will cast Mesohigh, which cleanses Thermal Low, resulting in raidwide damage. Taking a Mesohigh tether without Thermal Low will instantly kill the player. OT Off Tank, the other tank. (who should have 2 stacks - this is essential to awaken Garuda!) takes WEST Tether (on D Waymark), D4 takes EAST Tether (on B waymark). As the Mesohigh tethers resolve, Garuda will awaken, there will be heavy raidwide damage and a Downburst Heavy hitting tankbuster requiring mitigation. on MT Main Tank, typically the Tank holding the boss aggro the most. , followed by Feather Rain A loud shriek noise is followed by AOE hits on all players, listen for the sound and then move immediately after. . Move out!
D4 - as your Satin Plume will be out of the party, you can single target damage your add. Other players can help you too if they kill the remaining adds early.
Failing to kill the adds in a timely manner will cause them to explode, putting everyone to sleep.
The party should then move behind Garuda and burn down the boss, who should be close to dying. Be careful not to kill Garuda before the Mesohigh tethers happen or she will not awaken - hold DPS if needed!
If you don’t phase, you will need to look out for Wicked Wheel, a quick donut/ AOE Area-of-Effect, typically used to describe any mechanic or ability which affects multiple enemies/players in an area. dodge, followed by repeated mechanics.
When you kill Garuda, DPS and tanks stack middle, healer grabs the Glowing Puddle (Candy).
By the end of this phase, these players should still have 1 stack of Thermal Low: MT, both healers and D3.
Phase Rotation
- Slipstream
- Mistral Song
- Satin Plume x4 + Spiny Plume Spawn
- Slipstream
- Downburst
- Feather Rain
- Mistral Shriek
- Friction
- Friction
- Feather Rain
- Aerial Blast
- Sisters Spawn
- Feather Rain (Sisters)
- Eye of the Storm + Mistral Song x2
- Wicked Wheel
- Feather Rain
- Satin Plume x4 Spawn
- Eye of the Storm
- Slipstream
- Mesohigh x2 + Downburst
- Feather Rain
- Slipstream
- Wicked Wheel + Wicked Tornado
- Downburst
- Slipstream
- Feather Rain
- Aerial Blast (Enrage)
Phase 2: Ifrit
Important Mechanics
Incinerate Untelegraphed Tankbuster, Triple tankbuster with no broadcast, typically use invlun, darkness damage. Untelegraphed triple tankbuster with no broadcast. Typically use invlunerability to resolve.
Searing Wind One of the two healers will be targetted with a debuff, this will last for some time and cause periodic explosions around you, anyone caught in this will die. One of the two healers will be targeted with a debuff. This will last for some time and cause periodic explosions around you. Anyone caught in this will be knocked back and likely die. When you have this, watch the debuff and ensure you are out of the party stack.
Vulcan Burst Large Low-Damage AOE with knockback, needs to be mitigated by applying shields. Large low-damage AOE Area-of-Effect, typically used to describe any mechanic or ability which affects multiple enemies/players in an area. with knockback. The knockback can be avoided by applying shields (preferred method) or an anti-knockback ability (backup method).
Eruptions Ifrit will target the furthest players and cast a series of large explosions Ifrit will target the furthest players and cast a series of large explosions beneath them. These will be baited by D3 and D4, and need to be baited away from the party. During Nails, you will use these to buff the nails for awakening.
This summary is written to accompany the above toolbox - use it as a reference.
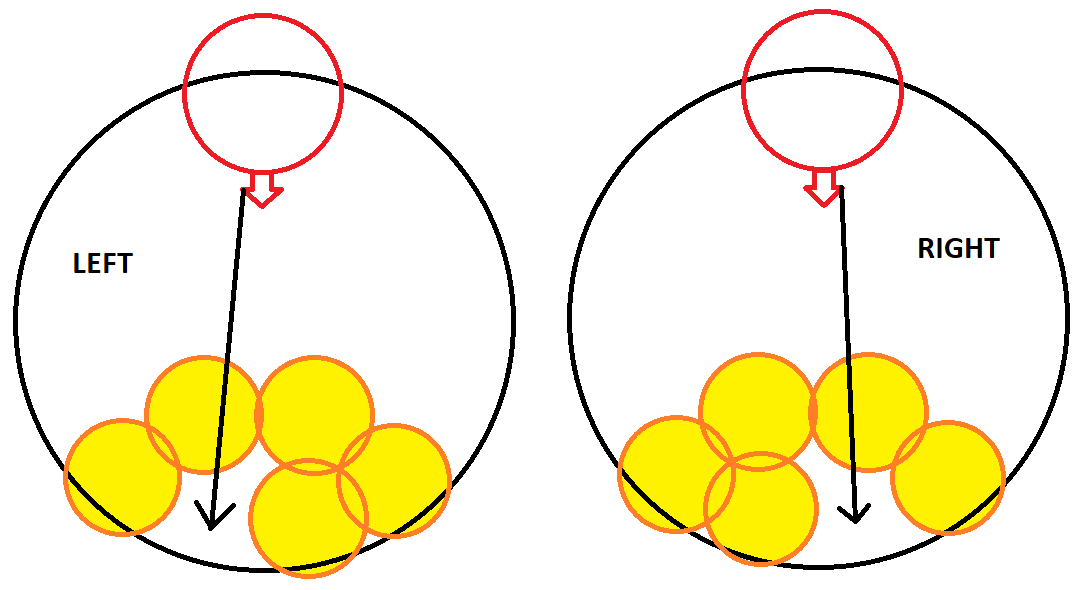
Once Garuda dies and the candy is collected, everyone should stack mid. Ifrit will spawn on a cardinal - orient your camera to face Ifrit and dodge directly left or right based on the available safe-spot (use sprint if you need more time to identify the safe spot).
The party should then stack at Waymark A with tanks facing the boss at Waymark C. The OT Off Tank, the other tank. should grab initial aggro to invuln the first tankbuster. Ifrit will cast Hellfire - raidwide damage.
The shield healer should prepare for Vulcan Burst Large Low-Damage AOE with knockback, needs to be mitigated by applying shields. with shields and OT Off Tank, the other tank. prepare for Incinerate Untelegraphed Tankbuster, Triple tankbuster with no broadcast, typically use invlun, darkness damage. with an invuln. After the third incinerate, MT Main Tank, typically the Tank holding the boss aggro the most. should provoke back.
If the shield healer is unavailable to shield (e.g. died during transition), use your anti-knockback after Hellfire. Tanks with party shields (e.g. Warrior Shake it Off) can be a good backup alternative, too.
Nails
Four nails will spawn in a trapezium formation - orient yourself so the closest two nails (tapering end) are the new relative north. One healer will get Searing Wind One of the two healers will be targetted with a debuff, this will last for some time and cause periodic explosions around you, anyone caught in this will die. and they are to take this to relative south and stay on the wall. As they will be isolated, this healer will use their resources to top themselves up as necessary and focus on attacking Ifrit. The non-Searing Wind healer needs to bear the responsbility of keeping the party alive for this section.
The OT Off Tank, the other tank. will be tethered to a random DPS - try to stay close to them, but focus on nails/Ifrit. This tether will reduce damage done based on stacks and stacks increase with distance.
Ranged players will split and bait 4 Eruptions Ifrit will target the furthest players and cast a series of large explosions at D3 SW and D4 SE, moving up to hit each nail twice with the AoE’s. The explosions will cause the nails to grow - once the nails have been hit twice, destroy them in the following order. Killing a nail that has grown twice gives Ifrit a stack to progress his awakening.
Non-Searing Wind healer - killing a nail results in raidwide damage that amps up with each nail killed. Stay towards the middle ensure the party is topped up.
The order in which Infernal Nails are destroyed will determine the order of Ifrit’s Crimson Cyclone charges (commonly referred to as dashes) in a later phase (i.e. the first Crimson Cyclone comes from the same location as the first nail that was killed). This is a very tight DPS window and you will need to ensure you weaken the nails to kill them quickly once they are fully grown. At the same time, you must avoid killing them before before they are fully grown. If killed before they are fully grown, you can still continue to prog - just bear in mind you will not make it to Phase 5: Ultima Weapon.
If this is done correctly, the boss will now be awakened.
Ifrit will briefly become untargetable and recentre. He will then cast Hellfire for raidwide damage to mitigate and heal through. If a nail survived before this raidwide, Hellfire will wipe the party.
The MT Main Tank, typically the Tank holding the boss aggro the most. will now pull the boss between the two waymarks closest to the relative north set during nails against the wall. D3 and D4 will go SE of relative north and begin baits for 4 Eruptions Ifrit will target the furthest players and cast a series of large explosions , rejoining the group counter-clockwise on the wall.
One healer will get Searing Wind One of the two healers will be targetted with a debuff, this will last for some time and cause periodic explosions around you, anyone caught in this will die. , go to relative WEST of the party and wait for the debuff to expire. You can rejoin the party when the debuff drops. Note: Searing Wind lasts longer when Ifrit is awakened.
Ifrit clones will prepare to Crimson Cyclone dash across the (relative) intercardinals of the arena. We are already in position to avoid them and they go off shortly after the final Eruption baits. Next, Ifrit afflicts the other healer with Searing Wind One of the two healers will be targetted with a debuff, this will last for some time and cause periodic explosions around you, anyone caught in this will die. (at this point, if the boss is awakened, there will still be ~15 seconds remaining on the first Searing Wind One of the two healers will be targetted with a debuff, this will last for some time and cause periodic explosions around you, anyone caught in this will die. ).
With good DPS, you will phase just as the second healer gets Searing Wind One of the two healers will be targetted with a debuff, this will last for some time and cause periodic explosions around you, anyone caught in this will die. . Second Searing Wind One of the two healers will be targetted with a debuff, this will last for some time and cause periodic explosions around you, anyone caught in this will die. should be run out of the party either south, or east if you are confident that the party will skip dashes.
Before dashes, Ifrit will mark a player with Flaming Crush, dealing AoE damage to be soaked by the party.
If Ifrit dies very shortly after Flaming Crush resolves, make your way back to the party ASAP along the wall (avoid running to the middle as a proximity AoE originating from the centre is incoming) and top everyone up.
Dashes
Ifrit is untargetable for the duration of this mechanic.
If you do not phase the boss, the party will remain stacked where they are with the first Searing Wind One of the two healers will be targetted with a debuff, this will last for some time and cause periodic explosions around you, anyone caught in this will die. healer joining them (as it should be expired at this point). The second Searing Wind One of the two healers will be targetted with a debuff, this will last for some time and cause periodic explosions around you, anyone caught in this will die. healer will be directly opposite the party on the other side (relative south).
When Ifrit spawns, rotate if needed to ensure you have empty spot to your right (no Ifrit). You will see one Ifrit glowing - ff this is on a cardinal relative to the party, you will dodge 2 places to the right, otherwise just one.
Afterwards, Ifrit will become targetable again. Kill the boss as quickly as you can after. There will be an Incinerate Untelegraphed Tankbuster, Triple tankbuster with no broadcast, typically use invlun, darkness damage. (which the MT will need to invuln) and more Eruptions Ifrit will target the furthest players and cast a series of large explosions coming which you want to skip if possible.
Upon death, move to the wall, ready for Titan to spawn as he will jump in the centre, dealing proximity-based damage. After Titan drops, D4 (or any magical DPS) should grab the candy from where Ifrit died. Everyone else - be sure not to run over it!
Phase Rotation
- Crimson Cyclone + Radiant Plumes
- Hellfire
- Vulcan Blast
- Incinerate x3
- Infernal Nail x4 Spawn
- Inferno Howl
- Eruption x2
- Hellfire
- Inferno Howl
- Eruption x2
- Crimson Cyclone (Cardinals)
- Inferno Howl
- Flaming Crush
- Crimson Cyclone x4 (Woken)
- Incinerate x3
- Eruption x2
- Flaming Crush
- Hellfire (Enrage)
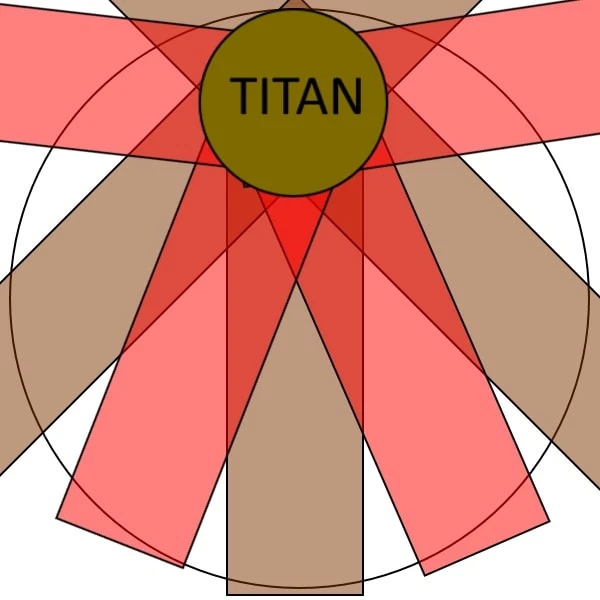
Phase 3: Titan
The following is written to accompany the diagrams in the above toolbox.
Important Mechanics
Weight of the Land Several large AOEs appear under all players one after another. Several large AoEs appear under players one after another.
Landslides Multiple Line AOEs radiating out from boss, when Awakened, these will happen much faster and need to be dodged into for safety. Multiple Line AoEs radiating out from boss. When Awakened, these will happen much faster and twice - dodge into the first set to avoid the second set.
Geocrush Titan will turn to a cardinal and jump, crashing down at the side he was facing, Heavy distance AOE based on his landing location. Room will shrink in size. Titan will turn to a cardinal and jump, crashing down at the side he was facing. This deals heavy proximity damage based on his landing location. The room will shrink in size.
Mountain Buster Heavy Tankbuster with Cleave Heavy Tankbuster with frontal cleave.
Summary
The fight starts with Earthern Fury, a heavy raidwide. Healers will need to be prepared for this at the end of Ifrit.
The OT Off Tank, the other tank. should take initial aggro of Titan and face him towards the C Waymark, as he will use Mountain Buster Heavy Tankbuster with Cleave . This should generally be kitchen sink mitigated. The MT Main Tank, typically the Tank holding the boss aggro the most. can provoke back after.
The party should be on the A Waymark, ready to dodge Weight of the Land Several large AOEs appear under all players one after another. . Afterwards, Titan will jump away for Geocrush. Pay attention to where he faced as he jumped, and walk to the edge opposite of where he looked.
Geocrush is very fast. You MUST watch Titan carefully to work out which cardinal he is jumping to. Tanks should always try move boss to the middle of the room before this happens otherwise it can be very difficult to tell which cardinal he is jumping to.
Granite Gaols
Once he lands, the party should stack directly in front of Titan. Look behind you to check where the bombs spawn at the back of the room - there are two possible combinations. Titan will knock you back (cannot be cancelled) and you must land in the safe spot.
Use the boss target marker as a reference for where to stand - you don’t need to move far at all.
After the knockback, 3 people will have a yellow ticking circle beneath them, indicating they will be trapped in a gaol. In Party Finder, we generally use the melon to order the gaol players with 1, 2 and 3 markers. Before they are trapped, Titan will use Landslides Multiple Line AOEs radiating out from boss, when Awakened, these will happen much faster and need to be dodged into for safety. , this is baited by a random player so it is imperative that everyone runs down the middle after being knocked back to avoid blocking people’s pathing, especially for gaol-afflicted players.
Players without Gaols
- Run up the middle until Landslides Multiple Line AOEs radiating out from boss, when Awakened, these will happen much faster and need to be dodged into for safety. spawn, then move to the left side of the room and stay out of the way.
Players with Gaols
- Check your number and work out your Waymark. In a straight line down from Titan, there will be 3 Waymarks lined up vertically - 1 goes closest to Titan, 2 being middle and 3 being furthest from Titan.
- Run up the middle until Landslides Multiple Line AOEs radiating out from boss, when Awakened, these will happen much faster and need to be dodged into for safety. spawn, sidestep to the edge of Landslides Multiple Line AOEs radiating out from boss, when Awakened, these will happen much faster and need to be dodged into for safety. next to your Waymark.
- As soon as the Landslides Multiple Line AOEs radiating out from boss, when Awakened, these will happen much faster and need to be dodged into for safety. animation disappears, immediately move towards your Waymark. You can use sprint if you think you won’t reach your Waymark in time. You should get stunned just as you arrive.
- There will be a bomb at the back of the room that explodes - if the gaols are positioned correctly, it will result in a chain explosion of all the gaols.
- The gaol explosions leave deadly puddles - exit to the left of your puddle immediately. Avoid moving diagonally as your puddles of your fellow gaolers overlap and you don’t want to run into those.
Gaols MUST be positioned in-line with the Waymarks. Generally players can stand towards the middle of the Waymark but to be safe, it is a good idea for (if we treat Titan as relative north): Gaol 3 to be a nudge more towards the northern part of their waymark, and Gaol 1 to be a nudge more towards the southern part of their waymark, so they are both closer a tad to Gaol 2 and ensure the chain explosion lands.
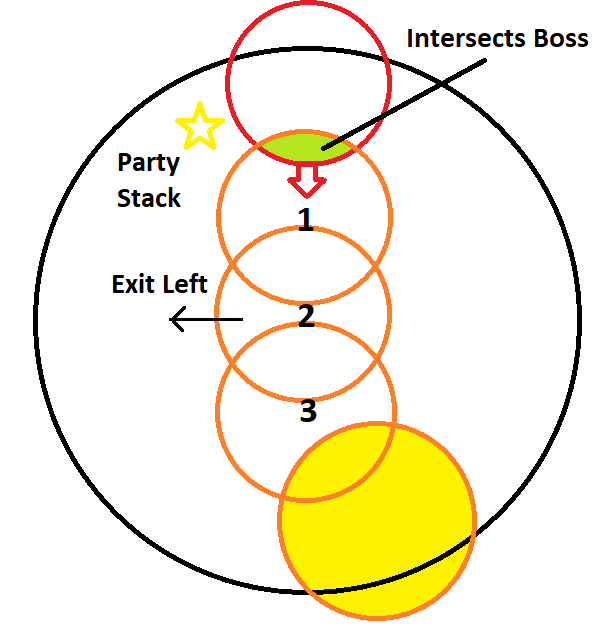
If all three bombs puddles are correctly overlapping, the puddle left by Gaol 1 will be within Titan’s hitbox, giving him stacks to progress his awakening. He will fully awaken by the time the puddles disappear. This will greatly increase the speed of mechanics and change their patterns throughout the rest of the fight.
Titan uses a set of 8 Tumults Raid-wide attack dealing moderate magic damage to all players. Usually happens multiple times in a row, in quick succession. and deals heavy party-wide damage, healers will need to be ready for this.
The party can move up to Titan on the left side of the puddles.
Landslides
The party will now stack on the left side looking at Titan, ready to move for Weight of the Land Several large AOEs appear under all players one after another. . Dodge through Titan and prepare for Landslides Multiple Line AOEs radiating out from boss, when Awakened, these will happen much faster and need to be dodged into for safety. . If awakened, each Landslide set will now be immediately followed by a second set of Landslides Multiple Line AOEs radiating out from boss, when Awakened, these will happen much faster and need to be dodged into for safety. between the first set.
Watch for the first set - as soon as you see the Landslide visual disappear, you want to immediately move into the first set of Landslides to avoid the second set. This is VERY fast.
Titan will once again face a direction and use Geocrush Titan will turn to a cardinal and jump, crashing down at the side he was facing, Heavy distance AOE based on his landing location. Room will shrink in size. . After the Landslides Multiple Line AOEs radiating out from boss, when Awakened, these will happen much faster and need to be dodged into for safety. , MT Main Tank, typically the Tank holding the boss aggro the most. should endeavour to recentre the boss to easily identify where Titan is jumping to.
After this, one healer will be targeted with a Granite Gaol. This healer should move to the middle of the room. Once the Gaol is active, the party will be able to target and damage the Gaol. Break the healer out of the Gaol before Titan begins a set of Landslides Multiple Line AOEs radiating out from boss, when Awakened, these will happen much faster and need to be dodged into for safety. followed shortly by 6 Tumults Raid-wide attack dealing moderate magic damage to all players. Usually happens multiple times in a row, in quick succession. . Remember to dodge into the first Landslide as he will do a double set.
From there on, the boss should be positioned far north, facing the wall. Everyone should be stacked behind Titan in the middle of the room.
After the final Tumult, Titan will follow up with a Mountain Buster Heavy Tankbuster with Cleave combo and summon 4 bomb boulders in the center of the room. The party will be stacked behind the boss and immediately after the Mountain Buster Heavy Tankbuster with Cleave cleave, move through the boss and meet at the wall.
This is a modification of the Mario Kart strategy which allows some uptime.
Ranged and healers will dodge clockwise along the wall, carefully avoid the Weight of the Land Several large AOEs appear under all players one after another. and Landslides Multiple Line AOEs radiating out from boss, when Awakened, these will happen much faster and need to be dodged into for safety. , continuing clockwise around the room.
Tanks and melee rotate counter-clockwise > clockwise > counter-clockwise for the Weight of the Land Several large AOEs appear under all players one after another. . This will allow uptime while providing enough space to avoid Landslides Multiple Line AOEs radiating out from boss, when Awakened, these will happen much faster and need to be dodged into for safety. .
Keep in mind - if nobody in your group is targeted for Weight of the Land Several large AOEs appear under all players one after another. , you will still need to move as if you’re dodging it. Remember to dodge into the Landslide!
Avoid the bombs going off in the centre - stay at the edge of the room.
The goal with this uptime strategy is for Landslides Multiple Line AOEs radiating out from boss, when Awakened, these will happen much faster and need to be dodged into for safety. to be baited on a ranged player, leaving a safe area behind Titan.
Typically Titan will die around this point depending on your party damage. If you have not finished Titan you will get a few more repeated mechanics until a final enrage.
-
Mountain Buster Heavy Tankbuster with Cleave
-
Weight of the Land Several large AOEs appear under all players one after another.
-
8x Tumults Raid-wide attack dealing moderate magic damage to all players. Usually happens multiple times in a row, in quick succession.
-
Earthen Fury Enrage
If you have correctly awoken Titan, he will drop a small candy puddle. This must be picked up by a Melee party member.
Phase Rotation
- Geocrush
- Earthen Fury
- Rock Buster
- Mountain Buster
- Weight of the Land
- Geocrush
- Upheaval + Rock Throw
- Granite Gaol x3
- Landslide
- Landslide
- Tumult x8
- Weight of the Land
- Landslide
- Geocrush
- Granite Gaol (Healer)
- Landslide
- Tumult x6
- Rock Buster
- Mountain Buster
- Rock Throw x4 (Middle) + Weight of the Land
- Landslide
- Rock Buster
- Mountain Buster
- Weight of the Land
- Tumult x8
- Earthen Fury (Enrage)
Phase 4: Lahabread Intermission
The following phase will be a set of 4x LB3s. To complete this, the players with the Beyond Limits (candy collectors) buff can use their LB3 and it will automatically regenerate.
You can leave any dead party members on the ground given they are not the caster or healer with the Beyond Limits buff, as they will be resurrected for free in this phase without head empty. However, if they are in the wall, they will need a proper resurrection otherwise they will die immediately.
Caster LB3
Four ships/pillars crash dealing heavy proximity AoE damage. Healers will need to ensure party members are healed up for this. Party stack middle to avoid unnecessary deaths.
6 Magitech bits spawn on the outside of the arena, casting Self-Destruct. Use Caster LB3 in the middle of the room to destroy all the bits. Players should be hitting the bits as the LB3 leaves them on 1 hit.
Use Caster LB3 when the freefire damage appears on your screen, the rest of the LBs can be used as soon as they are available.
Healer LB3
Lahabrea will cast blight, dropping all players to 1HP and applying Doom. Use Healer LB3 to dispel Doom and heal all players. This cannot be removed by normal dispel or healing to full.
Melee LB3
Lahabread becomes targetable and begins casting an instant-wipe Dark IV. Immediately use Melee LB3 when available to defeat Lahabread and prevent the cast. Other players can attack Lahabread and is a great chance to build job gauge if needed.
Tank LB3
The Ultima Weapon will appear and cast Ultima to wipe the party. A tank will need to use LB3 to mitigate the damage - activate it as soon as possible.
With all the LB3s complete, you will now begin the Ultima Weapon phases.
Phase 5: Ultima Weapon
The Ultima Weapon will spawn and use abilities absorbed from the Primals. This includes a number of new mechanics.
During the RP where the Ultima Weapon consumes the Primals, non tank players should fan out along the wall of the north-west quadrant of the room. This will become everyone’s designated position for Ultimate Suppression, a mechanic later in this phase. Once spots are confirmed, everyone can return to the centre of the arena.
During this phase, the Ultima Weapon will have a Duty Gauge bar (Ultima Aether) that slowly fills up, increasing with mechanics but also each death. When this bar fills, the Ultima Weapon gains a massive Damage Up buff which will likely result in a wipe. Increases by 4 with some mechanics and 4 for each death.
- Ultima Massive raidbuster dealing extremely heavy magic damage. Must be mitigated via the use of a Tank LB3. Massive raidbuster dealing extremely heavy magic damage. Must be mitigated via the use of a tank LB3.
- Tank Purge Heavy Raidwide Magic Damage. Heavy raidwide magic damage.
- Homing Lasers Very heavy tankbuster (~125k unimitigated) targeting the player with the second highest enmity, in a small circle around them. Very heavy tankbuster (~125k unimitigated) targeting the player with the second highest enmity, in a small circle around them.
- Viscous Aetheroplasm AOE Attack applying the Viscous Aetheroplasm debuff, which explodes after a short period of time for heavy magic damage that can be soaked with the party. AoE attack applying the Viscous Aetheroplasm debuff, which explodes after a short period of time for heavy magic damage that can be soaked with the party.
- Diffractive Laser Tankbuster with no cast time dealing moderate magic damage. Cleaves. Cleaving tankbuster with no cast time dealing moderate magic damage.
- Aetheric Boom Knockback originating from Ultima hitting all players. Is accompanied by 4 sets of Aetheroplasms. Knockback originating from the Ultima Weapon, hitting all players. It is accompanied by 4 sets of Aetheroplasms.
After consuming all Primals, the Ultima Weapon begins the phase at the north of the room.
If your class requires any preparation (e.g. prepping Standard Step or Earthly Star), note that when the Ultima Weapon ‘chomps’ Garuda, it is about ~15 seconds till the boss is targetable. For optimal pot timing, listen to the game music and use your pot when you hear the first drumroll.
You will need to have LB3 again towards the end of the fight. Do not use targeted mitigations (Feint, Addle, Reprisal, etc.) for the entire phase as this will reduce LB generation.
DPS and healers begin the phase stacked in the middle of the room. Open with burst phase and continue with damage.
MT Main Tank, typically the Tank holding the boss aggro the most. starts on the west side of the Ultima Weapon, with OT Off Tank, the other tank. on the east. The OT Off Tank, the other tank. will provoke the boss on the first GCD - MT Main Tank, typically the Tank holding the boss aggro the most. will then provoke on second GCD to ensure that MT is TOP aggro and OT is second.
The Ultima Weapon starts with Tank Purge Heavy Raidwide Magic Damage. . They will then apply Viscous Aetheroplasm AOE Attack applying the Viscous Aetheroplasm debuff, which explodes after a short period of time for heavy magic damage that can be soaked with the party. to the highest aggro target (MT). Ensure the MT Main Tank, typically the Tank holding the boss aggro the most. is NOT standing with the party as Viscous Aetheroplasm AOE Attack applying the Viscous Aetheroplasm debuff, which explodes after a short period of time for heavy magic damage that can be soaked with the party. is a small AoE. Normally, MT Main Tank, typically the Tank holding the boss aggro the most. can then rejoin party.
This is followed by Homing Lasers Very heavy tankbuster (~125k unimitigated) targeting the player with the second highest enmity, in a small circle around them. on OT Off Tank, the other tank. . Kitchen sink as it is heavy damage.
The Ultima Weapon will begin one of three sub-phases, each with a passive and active set of mechanics. The first is Ultimate Predation.
LB Cheesing
By the end of Ultimate Suppression, we need to have a full LB3 bar again to survive the next attack. We’ve already mentioned not to use any targeted mitigations - but sometimes this is not enough. LB cheesing the first Tank Purge (i.e. generating extra LB by having less HP than the damage of the raidwide when it occurs, but surviving due to shields and party mitigations) is a good way to maximise LB generation.
There’s no single set-in-stone way to do it and you may need to adjust what abilities you use based on your tank composition. Use the below as a GUIDELINE. There is a lot of time during the RP of the Ultima Weapon consuming the Primals and this is a good opportunity for supports to discuss what abilities they will use, should the party opt for LB cheesing.
After the Ultima raidwide during the intermission, the regen healer is NOT to use any healing abilities. Then:
If Scholar: After the Ultima Weapon chomps Garuda, begin using Adloquium on a tank to try an get a crit shield proc. Once achieved, deploy/spread the shield. If you find a crit shield before the boss becomes targetable, spread it anyway. Pop down Sacred Soil. If you do not have the support of tank shields, you can use a Succor (WITHOUT Emergency Tactics) for a small party heal just to be safe. Don’t stress about your fairy passive healing - it will not single-handedly top your party up but if desired, you can optionally dismiss the fairy until the beginning of the phase.
If Sage: After the Ultima raidwide, use 1 Prognosis. Then, before the Ultima Weapon becomes targetable, use Zoe + Eukrasian Prognosis and Kerachole. If you have the support of tank shields (e.g. Shake it Off) from a tank, you can omit the Prognosis.
Tanks: you can use Divine Veil / Heart of Light. If using Shake it Off, it must be used JUST before the raidwide due to its heal over time effect. The MT can optionally solo the Viscous Aetheroplasm stack with kitchen sinked mitigations instead of sharing it with the party to built a little bit of extra LB.
Phase 5.1: Ultimate Predation
Passive Phase
The Ultima Weapon is untargetable for this section.
Ultimate Predation begins with a dodge mechanic - all Primals and the Ultima Weapon will appear around the arena. You will need to find one of several safe-spots to survive this mechanic.
- The Ultima Weapon will perform a large AoE on one quadrant of the arena.
- Ifrit will first dash across the arena, before executing a Crimson Cyclone which covers all cardinals.
- Garuda will use a Wicked Wheel, covering almost half the arena.
- Titan will appear on a cardinal and use an awoken Landslide with two sets.
This mechanic can be very overwhelming but it is simplest to break it down into a few logical steps to resolve.
- First, look for Garuda who will be off-centre and avoid either cardinal on her side of the room - these are out-of-bounds.
- Run to either of the one or two remaining cardinals that do NOT have Titan on them. Take note of where the Ultima Weapon is, as you will need to avoid them later.
- Wait at the wall. Titan will begin Landslides Multiple Line AOEs radiating out from boss, when Awakened, these will happen much faster and need to be dodged into for safety. , you may need to dodge these near the cardinal.
- After the first Landslide, immediately dodge into a clear intercardinal, making sure not to dodge towards the Ultima Weapon.
- When dodging into an intercardinal you MUST stop at the wall using the pattern on the outside of the room to stop at the 4th visible rune. See the image below:
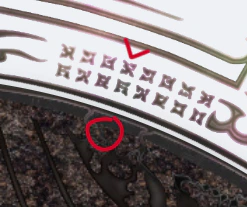
Your final goal is to reach one of several possible safespots. Some of the options are VERY tight so make sure you stay close to the wall and use the runes on the wall to find the safe spot accurately.
After the main mechanics resolve, Garuda will perform another Feather Rain A loud shriek noise is followed by AOE hits on all players, listen for the sound and then move immediately after. . Do not move until you hear the shriek to avoid dropping AoE’s on your party members.
Active Phase
The Ultima Weapon becomes targetable in the middle of the room. The MT Main Tank, typically the Tank holding the boss aggro the most. will pull the Ultima Weapon slightly northwest at the A Waymark, then join the party stacking north on the visible second-line on the floor. D3 and D4 will stay towards the south to bait 4 Eruptions Ifrit will target the furthest players and cast a series of large explosions from Ifrit. If there is a death from the first section of Ultimate Predation, back-up baiters should be prepared (ideally healers or any other ranged player). During this section, the autoattacks on the MT Main Tank, typically the Tank holding the boss aggro the most. hurt, so healers keep an eye on their HP.
After the Eruption baits, the Ultima Weapon surrounds the outside of the arena with Radiant Plumes (large deadly AoEs). Boulders will be falling on the centre, leaving you very little room between the plumes and boulders. Stay on the 2nd line and move out to the 3 Waymark as soon as plumes resolve. Titan is also baited to the southeast intercardinal as he drops at the furthest intercardinal from the Ultima Weapon. This sets up Titan for a consistent Landslides Multiple Line AOEs radiating out from boss, when Awakened, these will happen much faster and need to be dodged into for safety. pattern.
Landslides Multiple Line AOEs radiating out from boss, when Awakened, these will happen much faster and need to be dodged into for safety. will be baited as soon as plumes resolve by moving north to the wall, then clockwise into the safe spot. The Ultima Weapopn will also cast a Landslide - however only Titan’s will be awoken, hitting a 2nd time after the Ultima Weapon’s Landslide resolves. Titan’s Landslide resolves, then the Ultima Weapon’s Landslide resolves. Titan readies an untelegraphed 2nd hit, in which the party will need to dodge back to immediate north.
The MT Main Tank, typically the Tank holding the boss aggro the most. will go to the left side of the Ultima Weapon facing in (east), and the rest of the party will stack on the right (west) facing the boss. The OT Off Tank, the other tank. will be tethered to a random DPS - this is just like the one during Ifrit nails, where they must stay grouped together. With the party minus the MT Main Tank, typically the Tank holding the boss aggro the most. stacked together, it will naturally resolve.
The Ultima Weapon will cast a series of 7x Tumults Raid-wide attack dealing moderate magic damage to all players. Usually happens multiple times in a row, in quick succession. while the MT Main Tank, typically the Tank holding the boss aggro the most. will be targeted for Viscous Aetheroplasm AOE Attack applying the Viscous Aetheroplasm debuff, which explodes after a short period of time for heavy magic damage that can be soaked with the party. and will need to take this away from the party. Once MT Main Tank, typically the Tank holding the boss aggro the most. receives the aetheroplasm, the OT Off Tank, the other tank. needs to provoke. This ensures that MT Main Tank, typically the Tank holding the boss aggro the most. will take both the Viscous Aetheroplasm AOE Attack applying the Viscous Aetheroplasm debuff, which explodes after a short period of time for heavy magic damage that can be soaked with the party. and the Homing Lasers Very heavy tankbuster (~125k unimitigated) targeting the player with the second highest enmity, in a small circle around them. (as they are now 2nd aggro) and this will be taken with their invulnerability. The timing for the invulnerability is just after the upcoming scream for Feather Rain A loud shriek noise is followed by AOE hits on all players, listen for the sound and then move immediately after. .
Garuda and her sisters spawn - Garuda will use Mistral Shriek dealing heavy raidwide damage, followed by her sisters with two sets of Feather Rain A loud shriek noise is followed by AOE hits on all players, listen for the sound and then move immediately after. . This is very high damage output and healers will need to spend heavily to ensure the party survives. The party should stay stacked together and dodge Feather Rain A loud shriek noise is followed by AOE hits on all players, listen for the sound and then move immediately after. by moving counter-clockwise around the boss. Being careful to avoid the MT Main Tank, typically the Tank holding the boss aggro the most. side of the boss.
After the first set of Feather Rain A loud shriek noise is followed by AOE hits on all players, listen for the sound and then move immediately after. , the Viscous Aetheroplasm AOE Attack applying the Viscous Aetheroplasm debuff, which explodes after a short period of time for heavy magic damage that can be soaked with the party. pops, then after the second set, Homing Lasers Very heavy tankbuster (~125k unimitigated) targeting the player with the second highest enmity, in a small circle around them. resolves. Both are fully handled by the MT Main Tank, typically the Tank holding the boss aggro the most. with invulnerability.
The Ultima Weapon will teleport to the north side of the arena. Facing the boss, stack tight on the SW side (his right foot) in preparation for Ultimate Annihilation.
Phase 5.2: Ultimate Annihilation
Passive Phase
Although this is considered a passive phase, the Ultima Weapon will be targetable for this section. Stack up tight on the southwest side of boss hitbox.
This mechanic starts with a series of 3 Weight of the Land Several large AOEs appear under all players one after another. AoE’s. The party needs to remain stacked together - a player will be marked with Flaming Crush, a party stack. The AoE of the attack is very small, so it is important to stay as tightly grouped as possible. For the first 2 Weight of the Land Several large AOEs appear under all players one after another. sets, firstly dodge right, then left, back to where you started. For the third set - the party will now split up as all 3 Primals will begin a variety of attacks.
Here’s what will actually happen starting from the third set of Weight of the Land Several large AOEs appear under all players one after another. . We will explain after how we resolve them - depending on your role, some mechanics may not be your responsibility to handle but it’s always good to be aware of them:
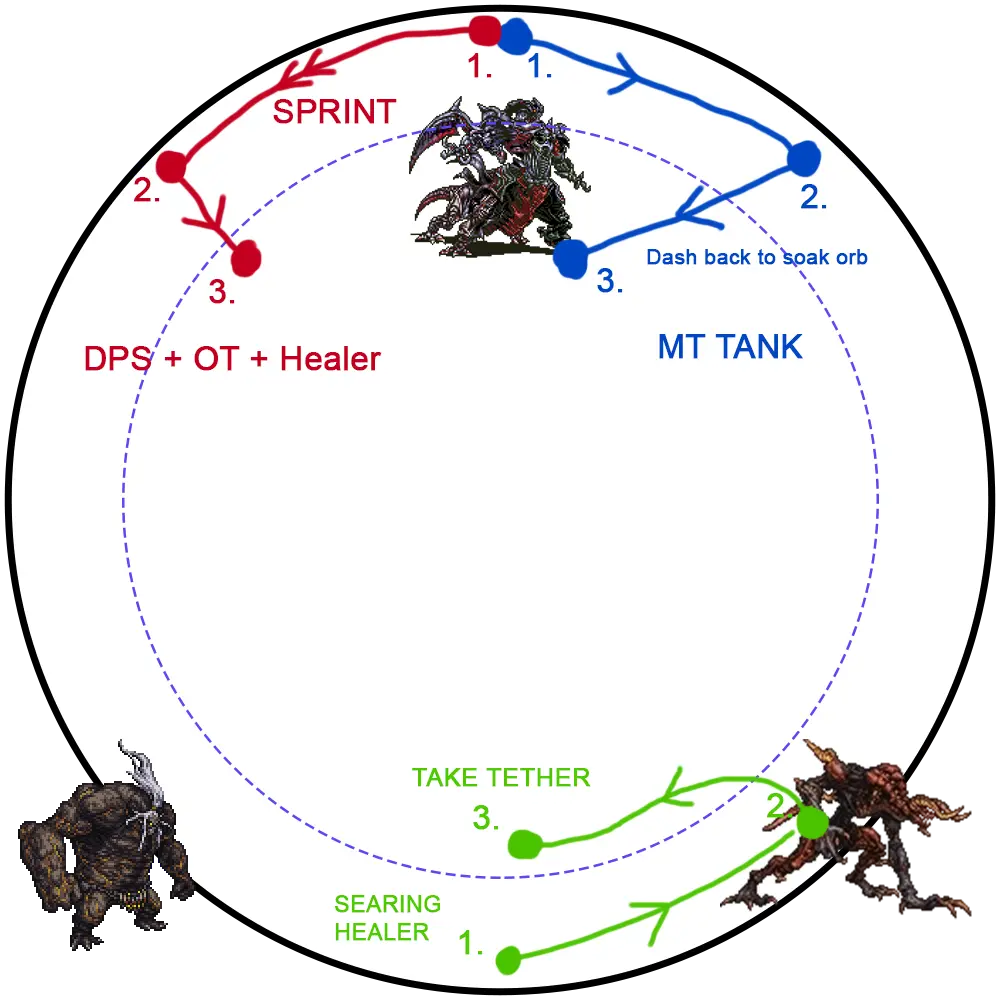
- An Aetheroplasm orb spawns just southeast of the boss that must be soaked. Garuda spawns a Mesohigh tether, then uses Eye of the Storm into Feather Rain A loud shriek noise is followed by AOE hits on all players, listen for the sound and then move immediately after. . Ifrit afflicts a healer with Searing Wind One of the two healers will be targetted with a debuff, this will last for some time and cause periodic explosions around you, anyone caught in this will die. .
- Another orb spawns, same location. Titan will perform a double Landslide (not baited - fixed location for this one) from a southern intercardinal and Ifrit dashes across the arena from an intercardinal into a Crimson Cyclone on the cardinals.
- A third orb spawns, same location. Garuda will use Eye of the Storm again, and spawn another Mesohigh tether. After the tether resolves, there is another Feather Rain A loud shriek noise is followed by AOE hits on all players, listen for the sound and then move immediately after. .
- A fourth orb spawns, same location. The Ultima Weapon casts Tank Purge Heavy Raidwide Magic Damage. .
Below is how we resolve all these mechanics, depending on your role.
After the third Weight of the Land, move east and soak the orb together. Move towards the boss’s left flank to bait Feather Rain A loud shriek noise is followed by AOE hits on all players, listen for the sound and then move immediately after. and once Garuda shrieks, dodge back to where you soaked the orb, then soak the second orb together. After, stack dead north (3 Waymark) with the DPS and NON-Searing Wind healer. Your next step depends on which tank role you are:
OT Off Tank, the other tank. once Ifrit dashes across the arena from an intercardinal, immediately run counter-clockwise to the 2 Waymark (it is worthwhile to use sprint) to not only avoid Crimson Cyclone, but also dodge Titan’s double Landslides Multiple Line AOEs radiating out from boss, when Awakened, these will happen much faster and need to be dodged into for safety. . After the Crimson Cyclone, run inwards to avoid Garuda’s Eye of the Storm (donut AoE) and remain with the party. You don’t need to soak the last 2 orbs. Dodge the last Feather Rain A loud shriek noise is followed by AOE hits on all players, listen for the sound and then move immediately after. .
MT Main Tank, typically the Tank holding the boss aggro the most. once Ifrit dashes across the arena from an intercardinal, immediately run clockwise, reaching where Titan’s first Landslide was to avoid Crimson Cyclone and the second Landslide. Once the Crimson Cyclone resolves, you can dash back into the Ultima Weapon to avoid Eye of the Storm (donut AoE) and solo soak the third orb. Stay there, and just as the fourth orb appears and is solo soaked, move for Feather Rain A loud shriek noise is followed by AOE hits on all players, listen for the sound and then move immediately after. .
Tank Purge Heavy Raidwide Magic Damage. occurs at the end.
After the third Weight of the Land, move west. One of you will be afflicted with Searing Wind One of the two healers will be targetted with a debuff, this will last for some time and cause periodic explosions around you, anyone caught in this will die. .
NON-Searing Wind make your way dead north (3 Waymark) to group with the other DPS and OT Off Tank, the other tank. . Be mindful that Feather Rain A loud shriek noise is followed by AOE hits on all players, listen for the sound and then move immediately after. occurs during this time so watch where other DPS have walked, avoiding their path. As the other healer with Searing Wind One of the two healers will be targetted with a debuff, this will last for some time and cause periodic explosions around you, anyone caught in this will die. needs to distance themselves from the party, it will be your job to solo-heal everyone for the remainder of Ultimate Annihilation. Once north, wait for Ifrit to dash across the intercardinal - once he does, immediately run counter-clockwise to the 2 Waymark (it is worthwhile to use sprint) to not only avoid Crimson Cyclone, but also dodge Titan’s double Landslides Multiple Line AOEs radiating out from boss, when Awakened, these will happen much faster and need to be dodged into for safety. . After the Crimson Cyclone, run inwards to avoid Garuda’s Eye of the Storm (donut AoE). Just be on the safe edge and do not run too inwards - tanks will be soaking orbs, and your Searing Wind cohealer will be exploding south. The Ultima Weapon will then cast Tank Purge Heavy Raidwide Magic Damage. . As this goes off, Garuda will also Feather Rain A loud shriek noise is followed by AOE hits on all players, listen for the sound and then move immediately after. . Dodge and heal the party.
Searing Wind One of the two healers will be targetted with a debuff, this will last for some time and cause periodic explosions around you, anyone caught in this will die. make your way hard south, away from the party - you will have Titan and Ifrit beside you. When Titan casts his first Landslide, pop sprint. Ifrit’s dash and Titan’s Landslide go off fairly simultaneously - run into where Ifrit was to avoid Crimson Cyclone and Titan’s second Landslide. Immediately after, run inwards just enough to be safe from Eye of the Storm and take Garuda’s Mesohigh tether. Do not run too far inwards as you are exploding with Searing Wind. Once the tether resolves, ensure you are topped as Tank Purge Heavy Raidwide Magic Damage. is coming and dodge Feather Rain A loud shriek noise is followed by AOE hits on all players, listen for the sound and then move immediately after. . Use your resources to keep yourself alive and do not worry about healing the party - leave this to your NON-Searing Wind cohealer.
After the third Weight of the Land and if you are D3, move south and take Garuda’s Mesohigh tether around the C Waymark. Once it resolves, make your way dead north (3 Waymark), keeping in mind that Feather Rain A loud shriek noise is followed by AOE hits on all players, listen for the sound and then move immediately after. occurs during this time so watch where other DPS have walked, avoiding their parth.
If you are not D3, i.e. every other DPS, move north from the third Weight of the Land and stay beside the boss’s flank. Wait for Feather Rain A loud shriek noise is followed by AOE hits on all players, listen for the sound and then move immediately after. to occur, then move dead north (3 Waymark).
Once we are all north, wait for Ifrit to dash across through the intercardinal - once he does, immediately run to the 2 Waymark (it is worthwhile to use sprint) to not only avoid Crimson Cyclone, but also dodge Titan’s double Landslides Multiple Line AOEs radiating out from boss, when Awakened, these will happen much faster and need to be dodged into for safety. . After the Crimson Cyclone, run inwards to avoid Garuda’s Eye of the Storm (donut AoE). Just be on the safe edge and do not run too inwards - tanks will be soaking orbs, and there will be a Searing Wind One of the two healers will be targetted with a debuff, this will last for some time and cause periodic explosions around you, anyone caught in this will die. healer exploding south. The Ultima Weapon will then cast Tank Purge Heavy Raidwide Magic Damage. . As this goes off, Garuda will also Feather Rain A loud shriek noise is followed by AOE hits on all players, listen for the sound and then move immediately after. . Dodge.
Active Phase
After Tank Purge Heavy Raidwide Magic Damage. , the Ultima Weapon will briefly become untargetable and reappear in the centre with Garuda casing Eye of the Storm. The Searing Wind One of the two healers will be targetted with a debuff, this will last for some time and cause periodic explosions around you, anyone caught in this will die. still has one more explosion to go before their debuff expires so the afflicted healer must stay in the south part of the safe spot. MT Main Tank, typically the Tank holding the boss aggro the most. stays north, OT Off Tank, the other tank. moves northeast (double check the OT Off Tank, the other tank. is 2nd in aggro here) and the rest of the party remains northwest.
Once Eye of the Storm resolves, the searing healer should be safe to return to the party at northwest and the Ultima Weapon will use Homing Lasers Very heavy tankbuster (~125k unimitigated) targeting the player with the second highest enmity, in a small circle around them. , targeted at the OT Off Tank, the other tank. , given they are 2nd in aggro. Use invulnerability.
If the boss is below 50% HP at this point (which they should be given the run has gone smoothly so far), they will begin casting Ultimate Suppression.
If not, they will continue to repeat the following mechanics until below 50% HP:
- Eye of the Storm (donut AoE) into Radiant Plumes (middle becomes unsafe). Wait till Eye of the Storm resolves before moving out.
- Diffractive Laser Tankbuster with no cast time dealing moderate magic damage. Cleaves. will be targeted on current aggro, which will be the MT Main Tank, typically the Tank holding the boss aggro the most. .
- Eye of the Storm with Vulcan Burst Large Low-Damage AOE with knockback, needs to be mitigated by applying shields. , PRE-SHIELD or use anti-knockback.
- Homing Lasers Very heavy tankbuster (~125k unimitigated) targeting the player with the second highest enmity, in a small circle around them. . The boss should really be below 50% at this point.
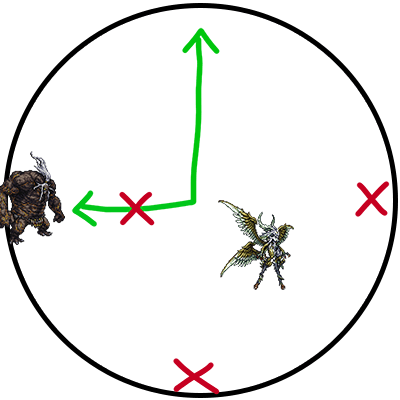
Phase 5.3: Ultimate Suppression
Passive Phase
The Ultima Weapon will become untargetable for this section.
Non-tank players should make their way to their positions that they predetermined during the RP transition to this phase.
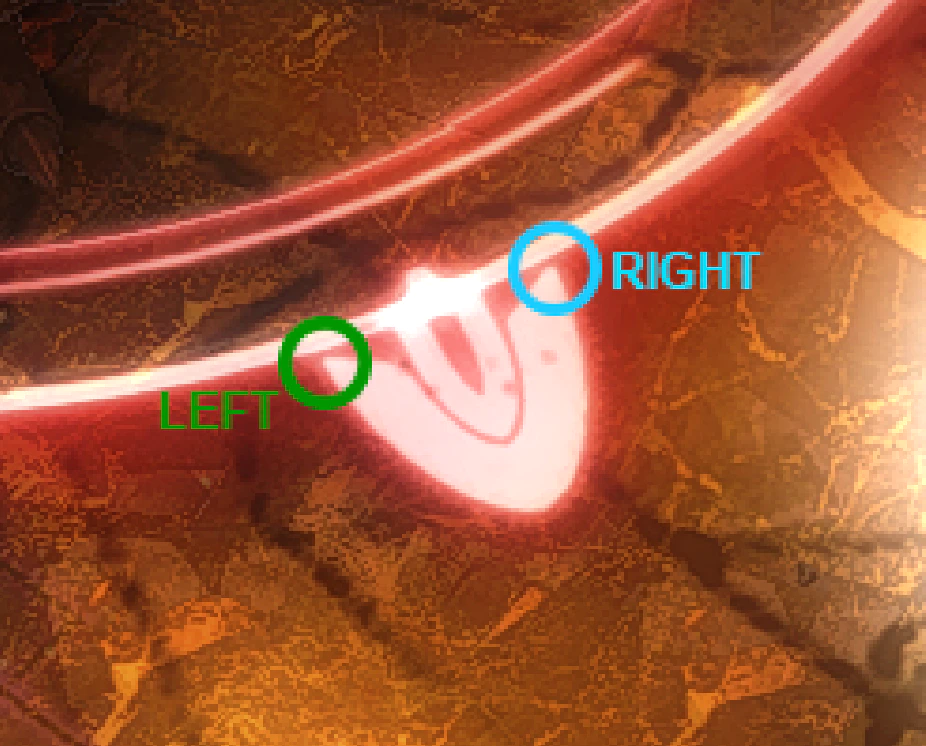
Meanwhile, tanks should stand slightly apart in the middle of the southwest quadrant. Note the Garuda sisters standing behind the D and C Waymarks - your job is to intercept the Mistral Song Garuda targets players with a Green Marker, then either Garuda or Clones will launch a line AoE dealing more damage to the first player hit. they will cast on other players. Below is a screenshot taken from Kur Rumi’s OT POV:
See how when Mistral Song Garuda targets players with a Green Marker, then either Garuda or Clones will launch a line AoE dealing more damage to the first player hit. affected players stand on the yellow spot, both tanks will successfully intercept the attack - this best describes how and why tanks should stand slightly apart within the southwest quadrant.
When the mechanic begins, Ifrit will cast Eruptions Ifrit will target the furthest players and cast a series of large explosions on 3 players. Double check your feet to see if you are one of these players. Everyone should then begin to converge towards the centre.
From this point, make a big deal of never running to the wall at any point. There will be feathers rotating around the perimeters of the arena that simply mean death if you touch them.
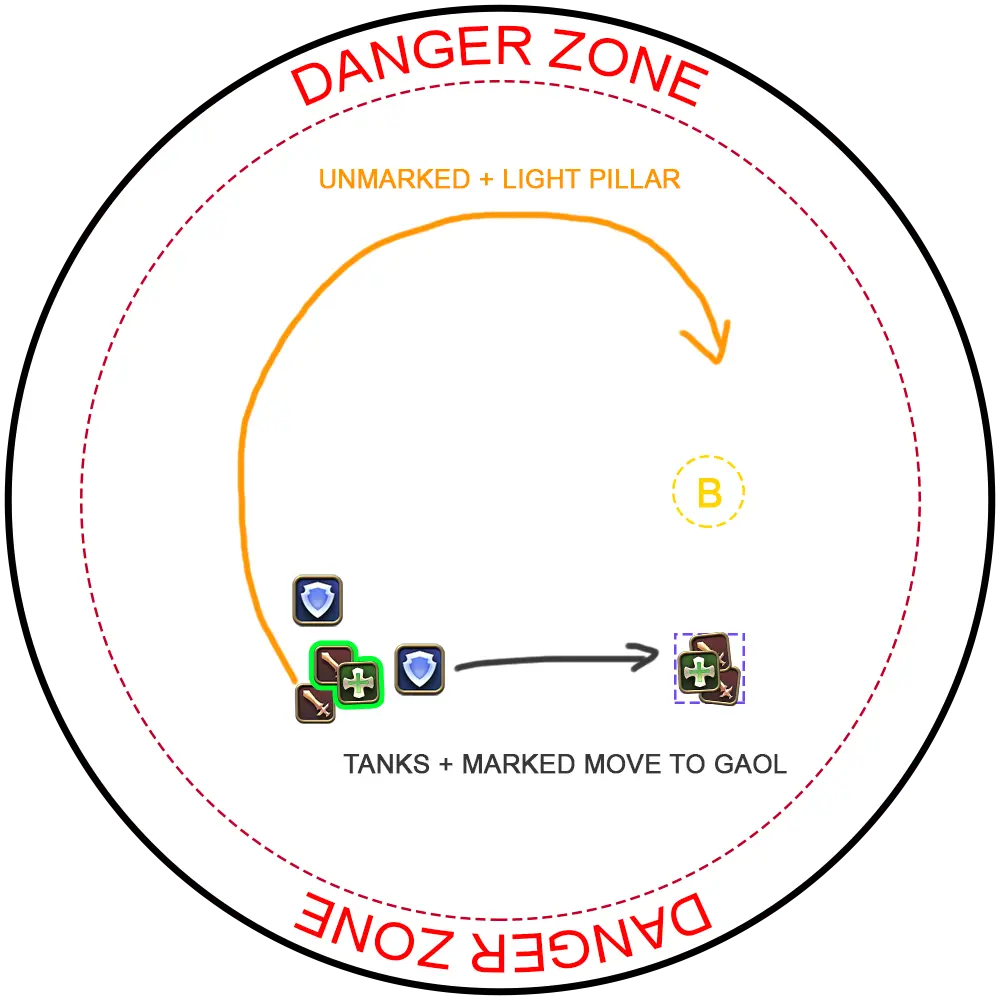
Those with Eruptions Ifrit will target the furthest players and cast a series of large explosions , continue passing through the middle. One of the players with Eruptions Ifrit will target the furthest players and cast a series of large explosions will be targeted to be stunned in a Granite Gaol (yellow ticking marker beneath feet) - this player needs to move to Waymark 4 and stay there (the Eruption will not kill you so don’t stress).
The remaining 2 players will reach Waymark 4, but then move northwards to avoid the Eruption AoE and not walk into the wall. The Granite Gaol will become targetable and begin casting Granite Impact. This is a DPS check - take down the add before the cast, otherwise it will result in wipe-causing raid damage. As you attack the gaol, there will be 2 sets of Feather Rain A loud shriek noise is followed by AOE hits on all players, listen for the sound and then move immediately after. to dodge.
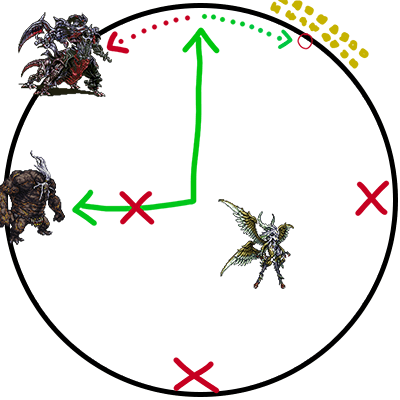
For the 3 non-Eruption players: shortly after, 2 players will receive the Mistral Song Garuda targets players with a Green Marker, then either Garuda or Clones will launch a line AoE dealing more damage to the first player hit. marker above their ahead and 1 last player will still have nothing. The 2 Mistral Song Garuda targets players with a Green Marker, then either Garuda or Clones will launch a line AoE dealing more damage to the first player hit. players, plus the nothing player, will make a right turn and stand behind the tanks (see the yellow spot in the above screenshot). Once the Mistral Song Garuda targets players with a Green Marker, then either Garuda or Clones will launch a line AoE dealing more damage to the first player hit. s resolve, stay standing and WAIT for that first Feather Rain to occur.
When you hear the first Feather Rain A loud shriek noise is followed by AOE hits on all players, listen for the sound and then move immediately after. , the 2 Mistral Song Garuda targets players with a Green Marker, then either Garuda or Clones will launch a line AoE dealing more damage to the first player hit. players and 2 tanks should make their way towards the gaol to assist in killing it. They will naturally avoid the second Feather Rain A loud shriek noise is followed by AOE hits on all players, listen for the sound and then move immediately after. during their short journey to the gaol.
On the other hand, the remaining player who had nothing (who stood with the Mistral Song Garuda targets players with a Green Marker, then either Garuda or Clones will launch a line AoE dealing more damage to the first player hit. players) will be targeted for Light Pillar. For a brief period, they will drop small puddles beneath them that are lethal if hit by. So, once that first Feather Rain A loud shriek noise is followed by AOE hits on all players, listen for the sound and then move immediately after. occurs, they will do a clockwise loop around the arena (WITHOUT GOING TO THE WALL) to keep these away from the party. By the time they reach the B Waymark, the gaol should be dead and they are safe to rejoin the party.
During all of these mechanics, the Ultima Weapon will be casting Aetherochemical Lasers (green rectangular AoEs) from their hitbox. These are not baited by anyone and will be aimed at the boss’s front or diagonals, and generally insignificant to dodge.
Once the gaol is dead, everyone will stack on the B Waymark, ready to bait upcoming Titan Landslides Multiple Line AOEs radiating out from boss, when Awakened, these will happen much faster and need to be dodged into for safety. . There will also be a Mesohigh tether and a Flame Crush (party stack).
- When the first Landslide set appears, the MT Main Tank, typically the Tank holding the boss aggro the most. runs northwards to take the Mesohigh tether. They should then dodge into where that west-most Landslide telegraph was to avoid the second Landslide set. Stay and wait for the Mesohigh to resolve.
- For everyone else, when that Landslide telegraph appears - run to Waymark 4 just below. Then, once the first Landslide telegraph disappears, move back to the B Waymark to avoid the second Landslide set and stay grouped for the Flaming Crush stack.
When the stack resolves, healers must top everyone ASAP as a raidwide is coming. Stay grouped - there will be a Feather Rain A loud shriek noise is followed by AOE hits on all players, listen for the sound and then move immediately after. . Once the Feather Rain A loud shriek noise is followed by AOE hits on all players, listen for the sound and then move immediately after. occurs, players can move out and the Ultima Weapon casts Tank Purge Heavy Raidwide Magic Damage. . Heal up again.
Active Phase
The Ultima Weapon becomes targetable in the centre of the arena and casts Ultima Massive raidbuster dealing extremely heavy magic damage. Must be mitigated via the use of a Tank LB3. . This requires a tank LB3 to survive, so if you haven’t recharged all of your LB since intermission, it’s unfortunately GG.
If you died during Ultimate Suppression and are being resurrected, only take the resurrection if you know you will be up to receive the tank LB3. If not, stay dead until Ultima Massive raidbuster dealing extremely heavy magic damage. Must be mitigated via the use of a Tank LB3. finishes casting otherwise you will just die again.
Once topped from the heavy raidwide, tanks will then stand southwest of the boss hitbox (on their right foot), while everyone else stands southeast of the boss hitbox (on their left foot) in preparation for the next mechanic.
Afterwards, the Ultima Weapon will cast Aetheric Boom Knockback originating from Ultima hitting all players. Is accompanied by 4 sets of Aetheroplasms. , knocking all players back and spawning 4 sets of Aetheroplasm Orbs on the intercardinals. We should have LB1 available due to the amount of damage taken from Ultima Massive raidbuster dealing extremely heavy magic damage. Must be mitigated via the use of a Tank LB3. and a tank should cast LB1 just before the knockback. If not - healers should be ready to pop a few extra party mitigations and healing.
Each set includes 2 orbs tethered to each other that will gradually come together - if they collide, the party will wipe. Thus, the orbs need to be soaked, dealing party-split damage.
Tanks will take the southwest, then the northwest set of orbs. Kitchen sink mitigations are essential.
The rest of the party will take the southeast, then the northeast set of orbs.
Healing between each set is mandatory and party members should ensure they have enough health before taking the second set of orbs.
Once completed, top players up and everyone will gather dead north on Waymark 3, in preparation for the final mechanic of the fight.
If you are curious on how the orbs work…
The length of the tethers between orbs in Aetheric Boom Knockback originating from Ultima hitting all players. Is accompanied by 4 sets of Aetheroplasms. is based on how many players soaked the orbs in Ultimate Annihilation. The more players that soaked, the longer the tether.
The first 2 orbs were tanked by 2 players (both tanks), which is why the northern orbs in this current mechanic are slightly longer. This gives us some time to reach them. Meanwhile, the orbs that we were knocked back into are already almost touching, because the MT solo soaked them. We soak those orbs straight away so it doesn’t matter that the tether length is shorter.
Phase 5.4: Primal Roulette
During Primal Roulette, the 3 Primals will one-by-one execute attacks. Firstly, the Ultima Weapon will afflict 3 players with Viscous Aetheroplasm AOE Attack applying the Viscous Aetheroplasm debuff, which explodes after a short period of time for heavy magic damage that can be soaked with the party. with 3 different timers. When the timer expires, they will explode for party stack damage. It is timed such that there will be 1 party stack per Primal. Therefore, for each Primal attack, the party must remained as tightly stacked as possible.
Here is what each Primal does, then after we will detail what possible orders they can attack in:
Garuda: she will cast Wicked Wheel ( PBAOE Point-Blank Area-of-Effect, usually an enemy ability that causes a large AOE damage area centered on the enemy. ), into a donut AoE. As a group, be on the edge of the point blank AoE, and immediately take a step in as soon as the telegraph disappears. The Viscous Aetheroplasm AOE Attack applying the Viscous Aetheroplasm debuff, which explodes after a short period of time for heavy magic damage that can be soaked with the party. stack occurs as you walk in for the donut. After, Garuda casts Aerial Blast for raidwide damage, then Feather Rain A loud shriek noise is followed by AOE hits on all players, listen for the sound and then move immediately after. .
Ifrit: he will cast a set of Eruptions Ifrit will target the furthest players and cast a series of large explosions , then shortly after Crimson Cyclone (dash across the arena) on cardinals. The Viscous Aetheroplasm AOE Attack applying the Viscous Aetheroplasm debuff, which explodes after a short period of time for heavy magic damage that can be soaked with the party. stack occurs after Crimson Cyclone goes off. After, Ifrit casts Hellfire for raidwide damage.
Titan: he will cast 3 sets of Weight of the Land Several large AOEs appear under all players one after another. . The Viscous Aetheroplasm AOE Attack applying the Viscous Aetheroplasm debuff, which explodes after a short period of time for heavy magic damage that can be soaked with the party. stack occurs as the 3rd set of AoE’s appear. After, Titan casts Earthern Fury for raidwide damage.
As all the raidwide damage at the end of each Primal attack is from the Primal and not the Ultima Weapon themself, targeted mitigation (Feint, Addle, Reprisal, etc.) do not reduce its damage. You will need to rely on party mitigation for the raidwides.
There are 3 possible orders in which they attack. The main thing to note for each order is which way we move to dodge Titan’s Weight of the Land Several large AOEs appear under all players one after another. but basically, dodge in the direction that will keep you within the quadrant between Waymarks 2 and 3 (north west, if you look at the map)
- Garuda -> Ifrit -> Titan
Resolve Garuda as described above. Then, importantly, WAIT FOR FEATHER RAIN TO HAPPEN before immediately making your way dead north (on the 3 Waymark).
Once north, as the entire party will be stacked together, Eruptions Ifrit will target the furthest players and cast a series of large explosions all go on the one spot - run to the 2 Waymark (intercardinal) to dodge Crimson Cyclone. Stay at 2, ready for Titan.
When the Weight of the Land Several large AOEs appear under all players one after another. sets appear, dodge CW -> CCW -> CW. After the raidwide, move towards north, ready to finish off the Ultima Weapon.
- Ifrit -> Garuda -> Titan
As everyone will be tightly stacked north, Eruptions Ifrit will target the furthest players and cast a series of large explosions all go on the one spot - run to the 2 Waymark (intercardinal) to dodge Crimson Cyclone.
After, move towards the middle to resolve Garuda’s out->in AoE. Then, importantly, WAIT FOR FEATHER RAIN TO HAPPEN before immediately making your way dead north (on the 3 Waymark), ready for Titan’s attack
When the Weight of the Land Several large AOEs appear under all players one after another. sets appear, dodge CCW -> CW -> CCW. After the raidwide, move towards north, ready to finish off the Ultima Weapon.
- Titan -> Ifrit -> Garuda
When the Weight of the Land Several large AOEs appear under all players one after another. sets appear, dodge CCW -> CW -> CCW. After the last dodge, make sure to return dead on the 3 Waymark (north).
Eruptions Ifrit will target the furthest players and cast a series of large explosions all go on the one spot - run to the 2 Waymark (intercardinal) to dodge Crimson Cyclone.
After, move towards the middle to resolve Garuda’s out->in AoE. Then, importantly, WAIT FOR FEATHER RAIN TO HAPPEN before moving north, ready to finish off the Ultima Weapon.
For safety, it is recommended to use sprint during Ifrit’s section.
The Ultima Weapon Enrage
After Primal Roulette, the Ultima Weapon teleports north to begin their enrage sequence. They will charge the duty gauge Ultima Aether much more rapidly. Once it hits 100, the Ultima Weapon will remove party members from the fight one by one, starting from lowest damage dealt to most damage dealt during this entire phase.
Should you reach this stage - refresh any DoTs before your turn. Depending on how your run has gone, it may still be an LB2 or has recharged to LB3. If you can afford to wait till it’s LB3, do so before using it - however, once the enrage sequence starts, players are removed in fairly quick succession so if it can only be an LB2 - just send it!
Good luck!