Visitors Guide to Oceanic Raiding
G’day and welcome to the Oceanic datacenter, Here in the land Down Under (and surrounding regions), we do things a bit differently when it comes to ultimate and savage raids. It’s not just about throwing another shrimp on the barbie; it’s about mastering the unique strategies that our local raiding community swears by. We’ll explore how Oceanic raiders tackle the toughest challenges with a fair dinkum approach and what sets us apart from the rest of the FF14 world. So, let’s crack on and delve into the nitty-gritty of Oceanic’s raiding scene!
This guide is aimed to help raiders with previous experience in current Ultimate and Savage fights transition over to OCE strats and join PFs in Materia. If you are new to Ultimate Raiding in OCE, we suggest exploring our full guides on this website using the navigation on the left-hand side of this page!
You can also find parties and other like-minded raiders in our OCE raiding community servers:
Materia Raiding Discord Materia Ultimate Raiding Discord
Table of Contents
Raid Roles
In OCE we typically use the MT, OT, H1, H2, D1, D2, D3, D4 notation to indicate who’s who in any raid party, this means…
- MT - Main Tank
- OT/ST - Off-Tank
- H1 - Pure/Regen Healer
- H2 - Shield Healer
- D1 - Melee DPS
- D2 - Melee DPS (or fake Melee)
- D3 - Phys Ranged DPS
- D4 - Caster
You will typically see these mentioned in Party Finder when looking for specific roles and in Macros to indicate positions in certain Mechanics.
Macros
Macro Guides exist in some regions but are apparently foreign in others. In OCE we often share macros to indicate which strategy we are using and to share the details/refresh ourselves on a strategy during a lockout.
Macros use the same Role notation above to explain positions and mechs in a visual way, for example, here is a macro for P11S:
■【Overruling】
 D3 MT D4     MTD3   Light:
 H1  ▲  H2  H1D1 ▲ H2D4  West: G1 (MTH1D1D3)
 D1  ST D2      STD2    East: G2 (STH2D2D4)
■【Arcane Revelation】    Dark: DPS CW (Coloured WM)
 G1: West (1/4) G2: East (2/3)
    Dark: Tank Pair Left | Healer Pair Right
■【Shadowed Messengers】
 G1: West G2: East
    ※ MT points boss in same lane as light clone
   ※ Dark tether: closest card/intercardinal ※ Light tether: middle
■【Lightstream】
 G1: CW  G2: CCW
...
...
You will often see macros shared in party chat when you get into your Party Finder group, if your not sure what strat is being used for a fight, don’t be afraid to ask the party leader for a Macro.
Savage
Current Savage Tier raid resources are compiled on our Savage page, which you can find at the button below. This includes our Macros, Images and Toolboxes made for OCE specific strategies.
UCOB
Primarily, Materia follows Clees’ UCOB guide, this is common in some other regions so may not be too unfamiliar to most, see here: Clees’ Guide
One key difference is due to being in the southern hemisphere, we flip the arena upside down and drop the Hatch puddles in a V shape, obviously. This looks something like this:
For all of Bahamut, we use the following toolboxes:
Potential differences to double check may include:
- Neurolinks: See above.
- Nael Lightnings: These are not resolved using AMs; bringing AMs for this mechanic will cause you to get laughed at and ignored. Use eyes.
- Tenstrike Trio: A lineup is not used for this mechanic nowadays; instead spread out into clock spots and adjust.
- Grand Octet: Use anti-KB skills for towers as some parties may not bait Twintania while under tank LB3.
UWU
Materia also follows Clees’ Guide for UWU. Potential differences to double check may include:
- Titan Jails: These are resolved using AMs.
- Ultimate Suppression: Most PFs will use Clees’ method for this.
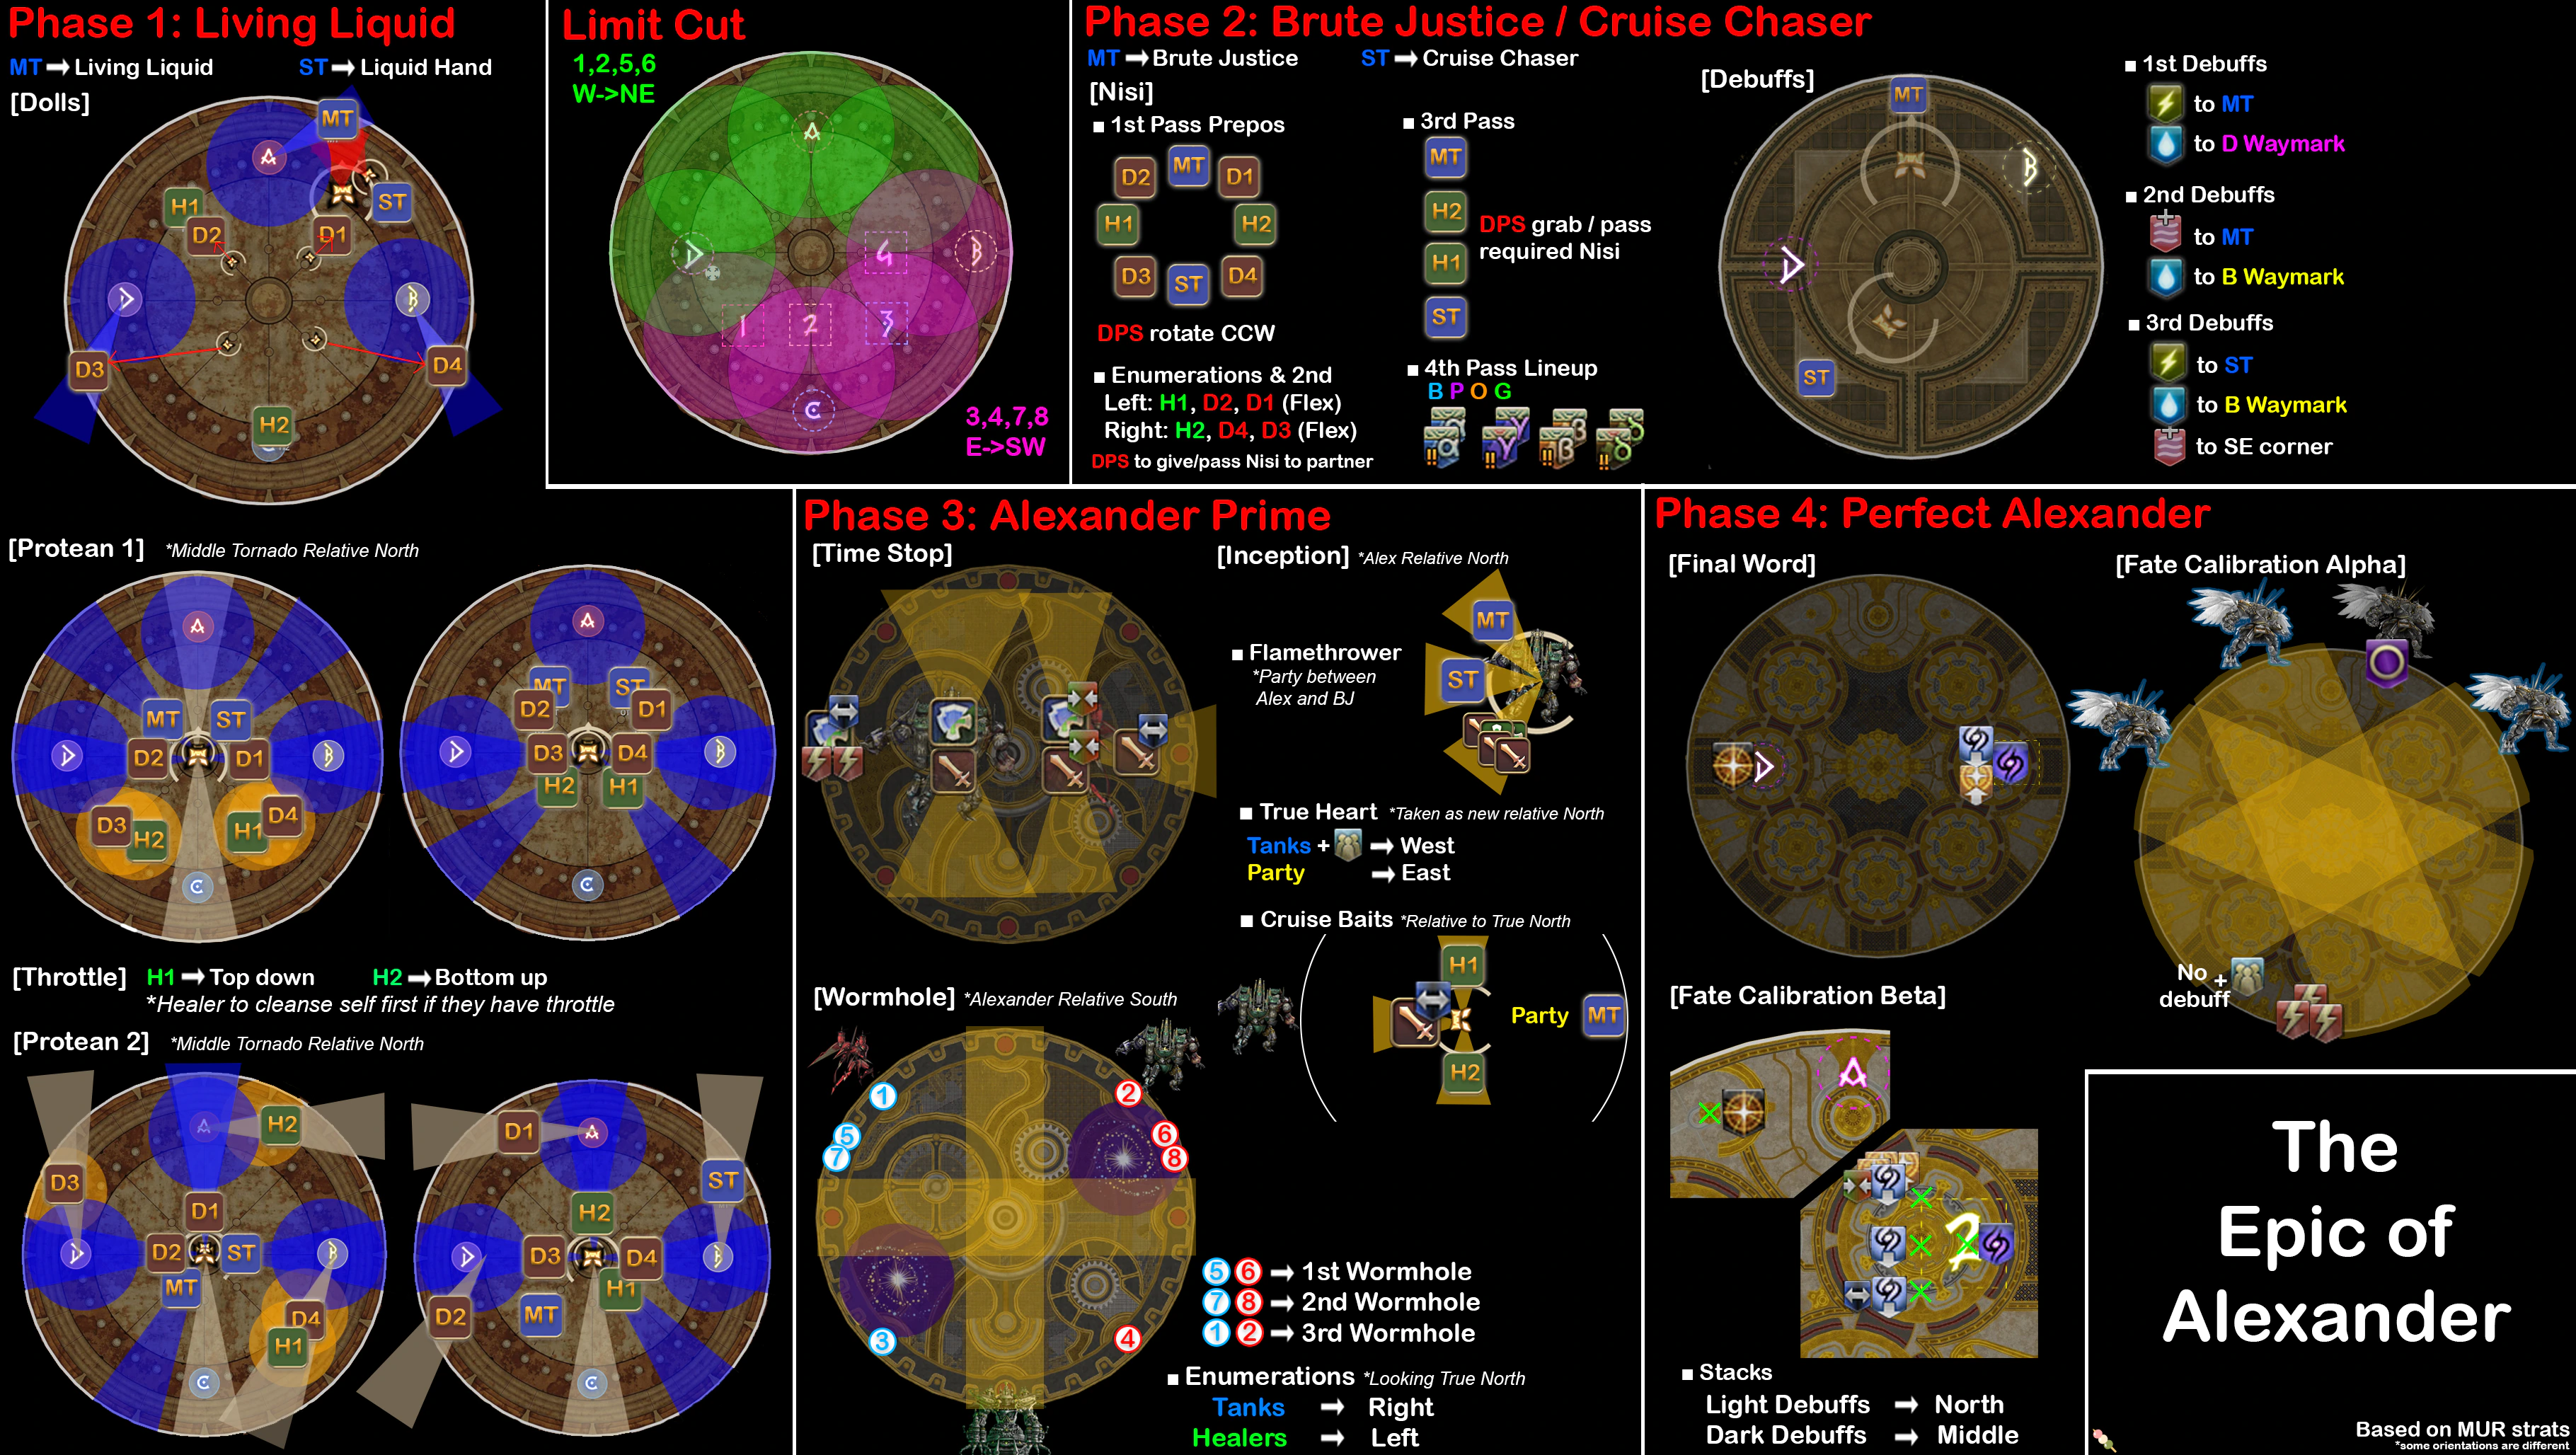
TEA
Materia DC follows the oldbin TEA strats that are present on the NA DC’s, this means that for BJ/CC, we do the split BJ/CC strat. this is very different to the Tollgate strat that is present in JP. Similarly, OCE prefers the 1256 method for Limit Cut rather than 1211 which is prevalent for JP. It is best to review the toolboxes for the initial phases (Living Liquid, Limit Cut, BJ/CC) and make sure the positions for everything else is the same.
This can also be compared to the strats covered in Tessan Twintails video guide, (see EU differences to compare to this guide):
NA Differences
General Notes
As mentioned in raid roles section: D1 = M1/DRG pos D2 = M2/NIN pos D3 = Phys Range/R1 D4 = Caster/R2
H1 = Regen Healer H2 = Shield Healer Esuna Prio is default assumed to be H1 self + top -> bottom, and H2 self + bottom -> top
OT sometimes referenced as ST
Temporal Stasis
During Temporal Stasis mech after Phase 2, instead of FFA, supports prio left, and DPS right for long tethers, rest is the same (short tether is on the add to the right and no tether is to the add on the left).
Inception Formation
Everything is mostly the same: Tanks and Stack go LEFT relative to the heart, and everyone else goes RIGHT. The MT will usually bait the Super Jump (communicate if you prefer OT to take).
Wormhole
No differences, we follow the KR sim strat on the most part. KR Simulator
Final Word
Standard positions are rotated about 90 degrees and start from east side of the room, Dark Beacon plants in the middle of the 2 Marker (EAST) and light beacon middle placed in D Marker west.
For an extended explanation you can see the complete TEA OCE Guide below by Noz Leafhill,
EU Differences
General Notes
As mentioned in raid roles section: D1 = M1/DRG pos D2 = M2/NIN pos D3 = Phys Range/R1 D4 = Caster/R2
H1 = Regen Healer H2 = Shield Healer Esuna Prio is default assumed to be H1 self + top -> bottom, and H2 self + bottom -> top
OT sometimes referenced as ST
Temporal Stasis
During Temporal Stasis mech after Phase 2, blue tether prio is flipped, supports prio left, and DPS right, rest is the same (short tether is on the add to the right and no tether is to the add on the left).
Inception Formation
Everything after flarethrowers is flipped left to right, up until the blue tether finishes resolving. This means Tanks and Stack go LEFT relative to the heart, and everyone else goes RIGHT. The MT will usually bait the Super Jump (communicate if you prefer OT to take).
Wormhole
No differences, we follow the KR sim strat. KR Simulator
Final Word
Standard positions are rotated about 90 degrees and start from east side of the room, Dark Beacon plants in the middle of the 2 Marker (EAST) and light beacon middle placed in D Marker west.
For an extended explanation you can see the complete TEA OCE Guide below by Noz Leafhill,
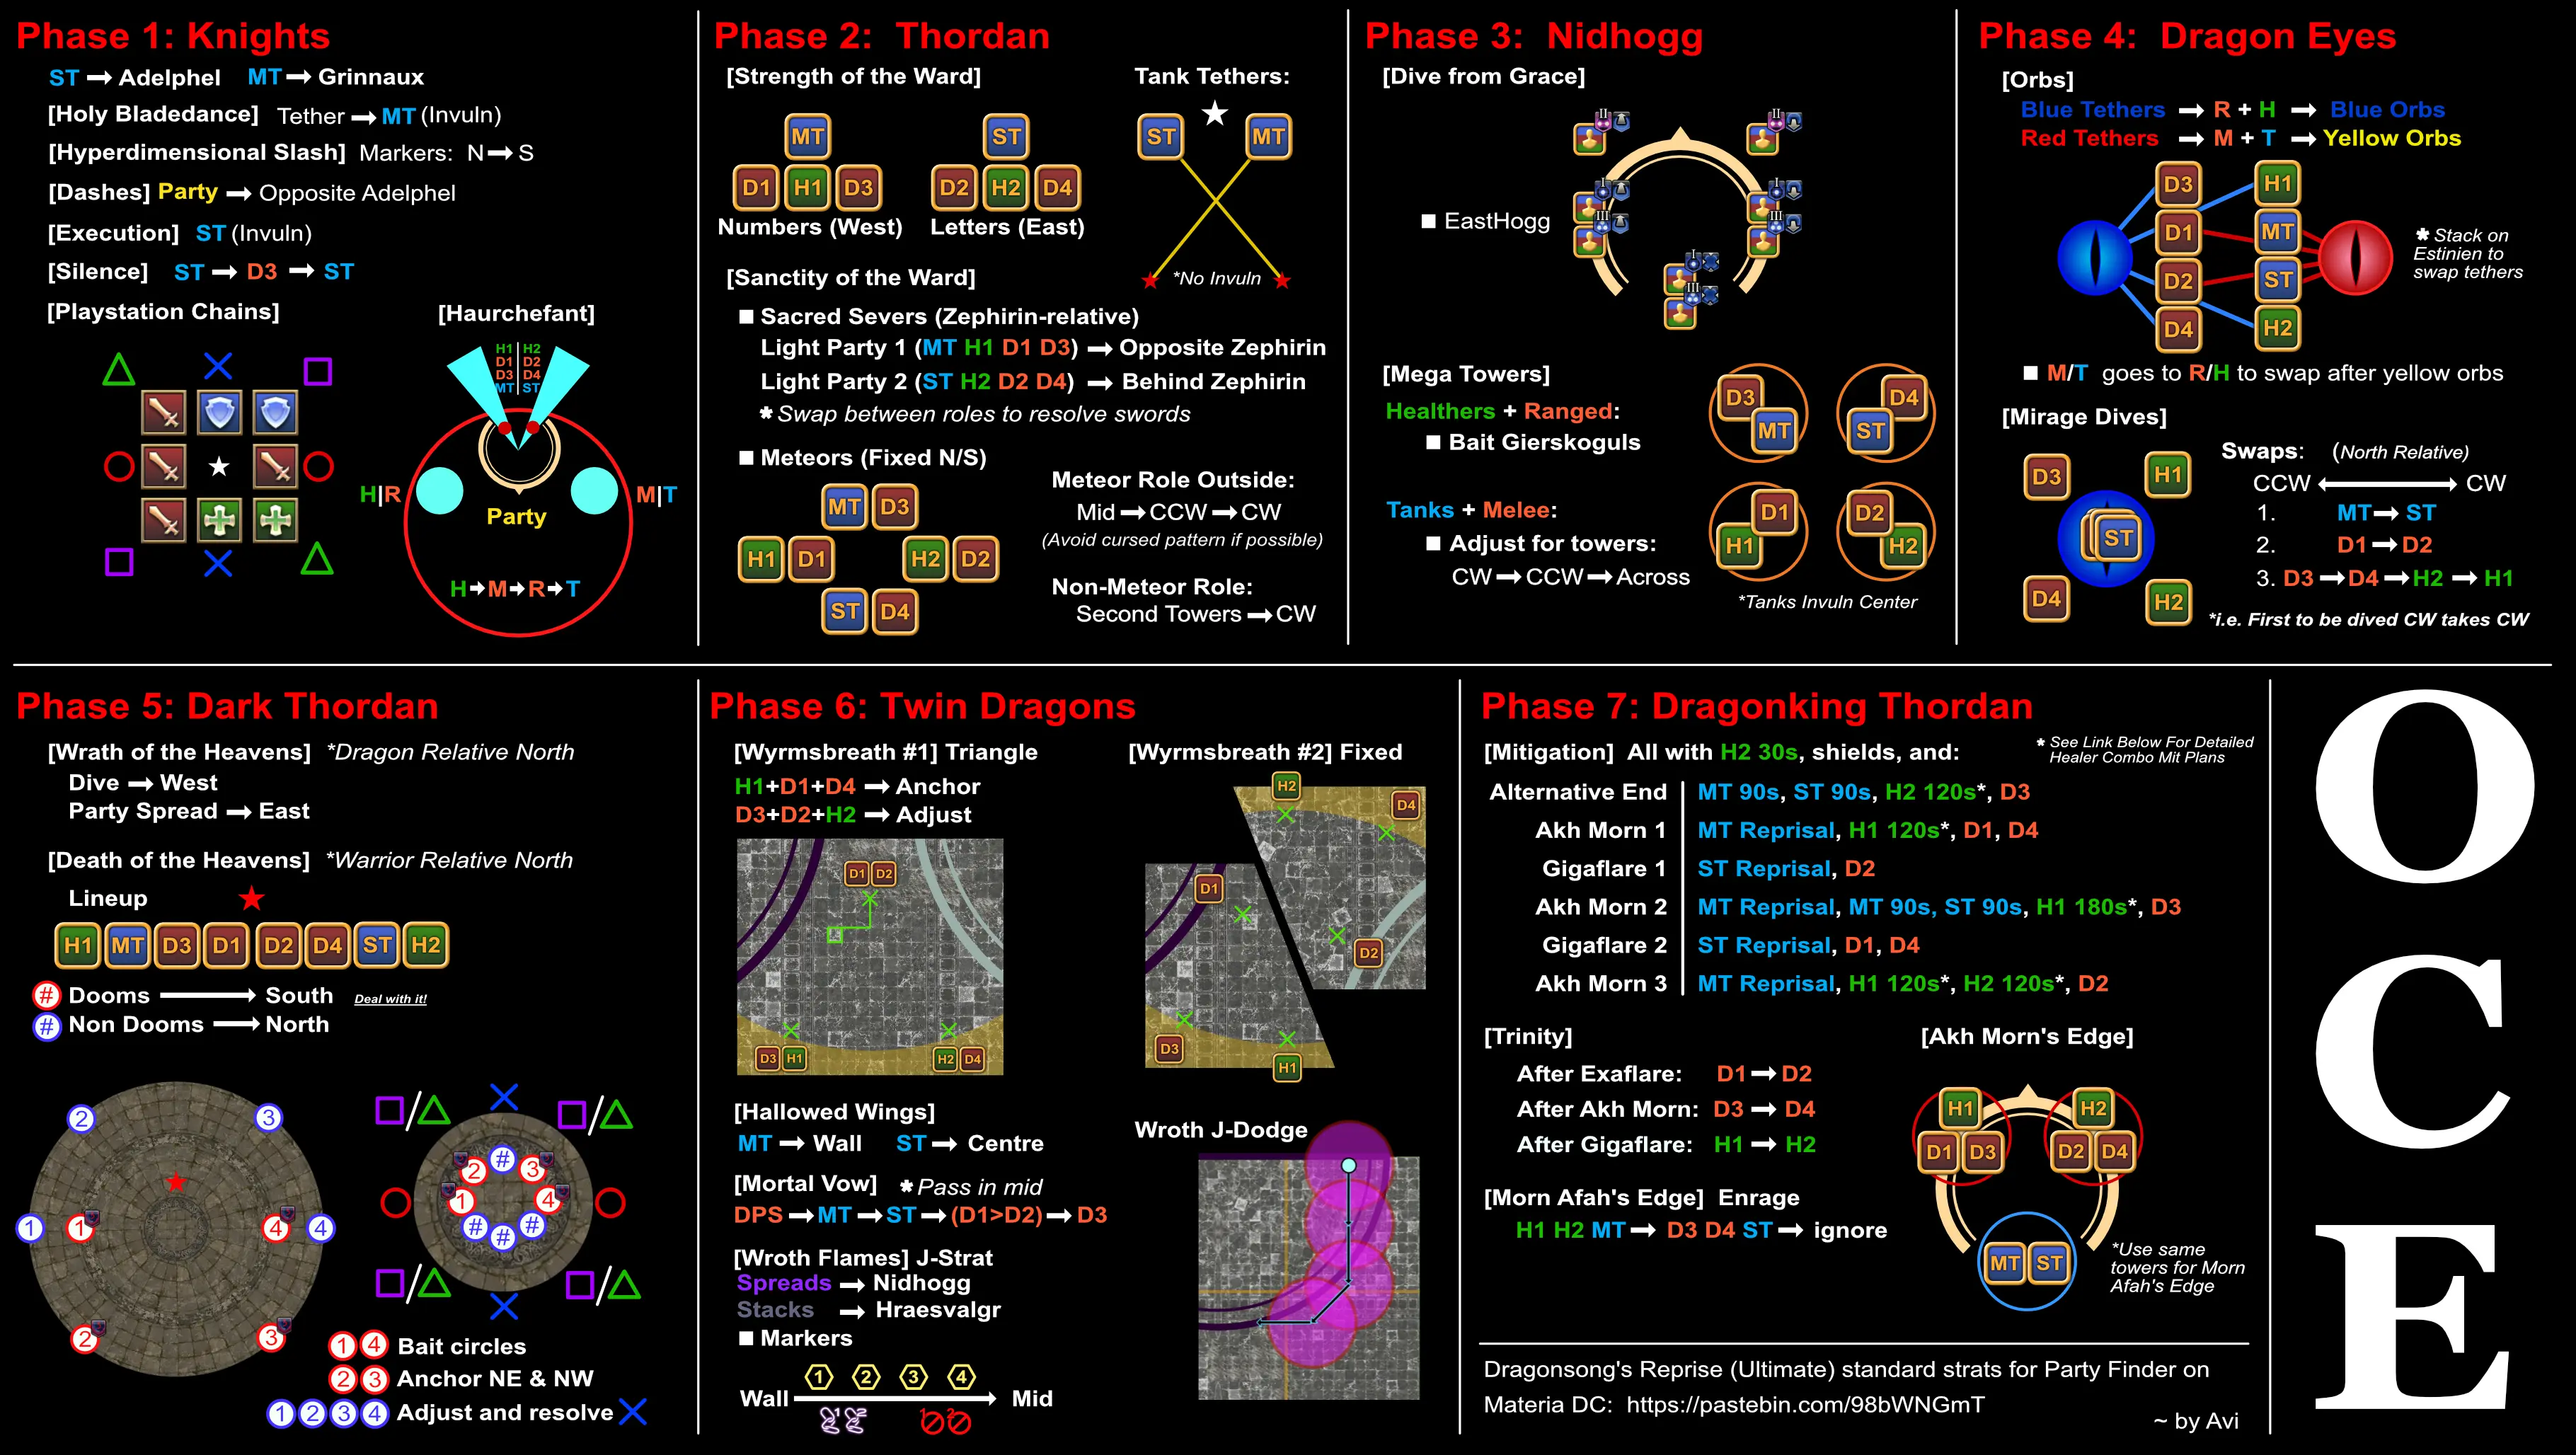
DSR
OCE DSR Strats are a variation on NA PF strats.
NA Differences
Phase 2 onwards, Waymarks are positioned along the walls rather than in the middle.
Phase 3: Materia does Easthogg. Niddstinien is faced north, and we resolve all arrows by facing our character east. Easthogg Video Guide
Death of the Heavens in Dark Thordan: base positioning before the mech starts is a lineup in the middle of the room H1>MT>D3>D1>D2>D4>ST>H2, dooms are positioned along the south side rather than north, and they are knocked back north to soak their puddles.
Double dragons: we may resolve wroth AM’s somewhat differently NA strats. like with NA we also do fixed wyrmsbreath 1 + 2 which is different than how it is done in Elemental. tanks are also using their invuln’s on cautrize at the end of double dragons.
In Dragon King Thordan, all 3 akh morn edge stacks are handled with 3-3-2 rather than 6-1-1.
For an extended explanation you can see the complete DSR OCE Guide below by Juno Dax,
JP Differences
There are a number of differences between OCE and JP for DSR. Please review this list for specific mechanics, using the language in Tuufless’ guide. It is recommended that you are familiar with these differences before you join clear/reclear parties.
- General: From Phase 2 onwards, waymarks are positioned along the walls rather than in the middle.
- 1. The Holy See
- Hyperdimensional Slash: Initial marked players spread along the north side.
- 2. King Thordan
- Strength of the Ward: When spreading, MT/H1 and ST/H2 positions are swapped.
- 4. Eyes
- Orbs
- Initial lineup is different; check cheat sheet for details.
- Tanks and melees take yellow orbs, and move to ranged and healers to pass tethers afterwards.
- Mirage Dives
- Ranged and healers take dives first, using the positions in the cheat sheet.
- The order of swaps are tanks, melees, then ranged and healers again.
- Orbs
- 5. Alternate Thordan
- Wrath of the Heavens: AMs are not used to mark lightnings; using AMs here will cause you to get laughed at and ignored.
- Death of the Heavens:
- Dooms are south, so positioning for tethers afterwards is flipped from JP.
- The line up from left to right is H1 MT D3 D1 D2 D4 ST H2.
- 6. Double Dragons
- Wyrmsbreath #1: Anchors are H1, D1 and D4.
- Hallowed Wings: For both Hallowed Wings, MT moves to the wall while ST stays centre.
- Wroth Flames: AM meanings may be different to JP - binds are towards the wall while ignores are towards the centre.
- Wyrmsbreath #2: OCE uses the fixed strat; consult the cheat sheet or Tuufless’ FAQ in P6 for details.
- 7. Dragonking Thordan
- General: Mitigations are different from JP; consult the cheat sheet for details.
- Enrage: MT takes towers first instead of ST.
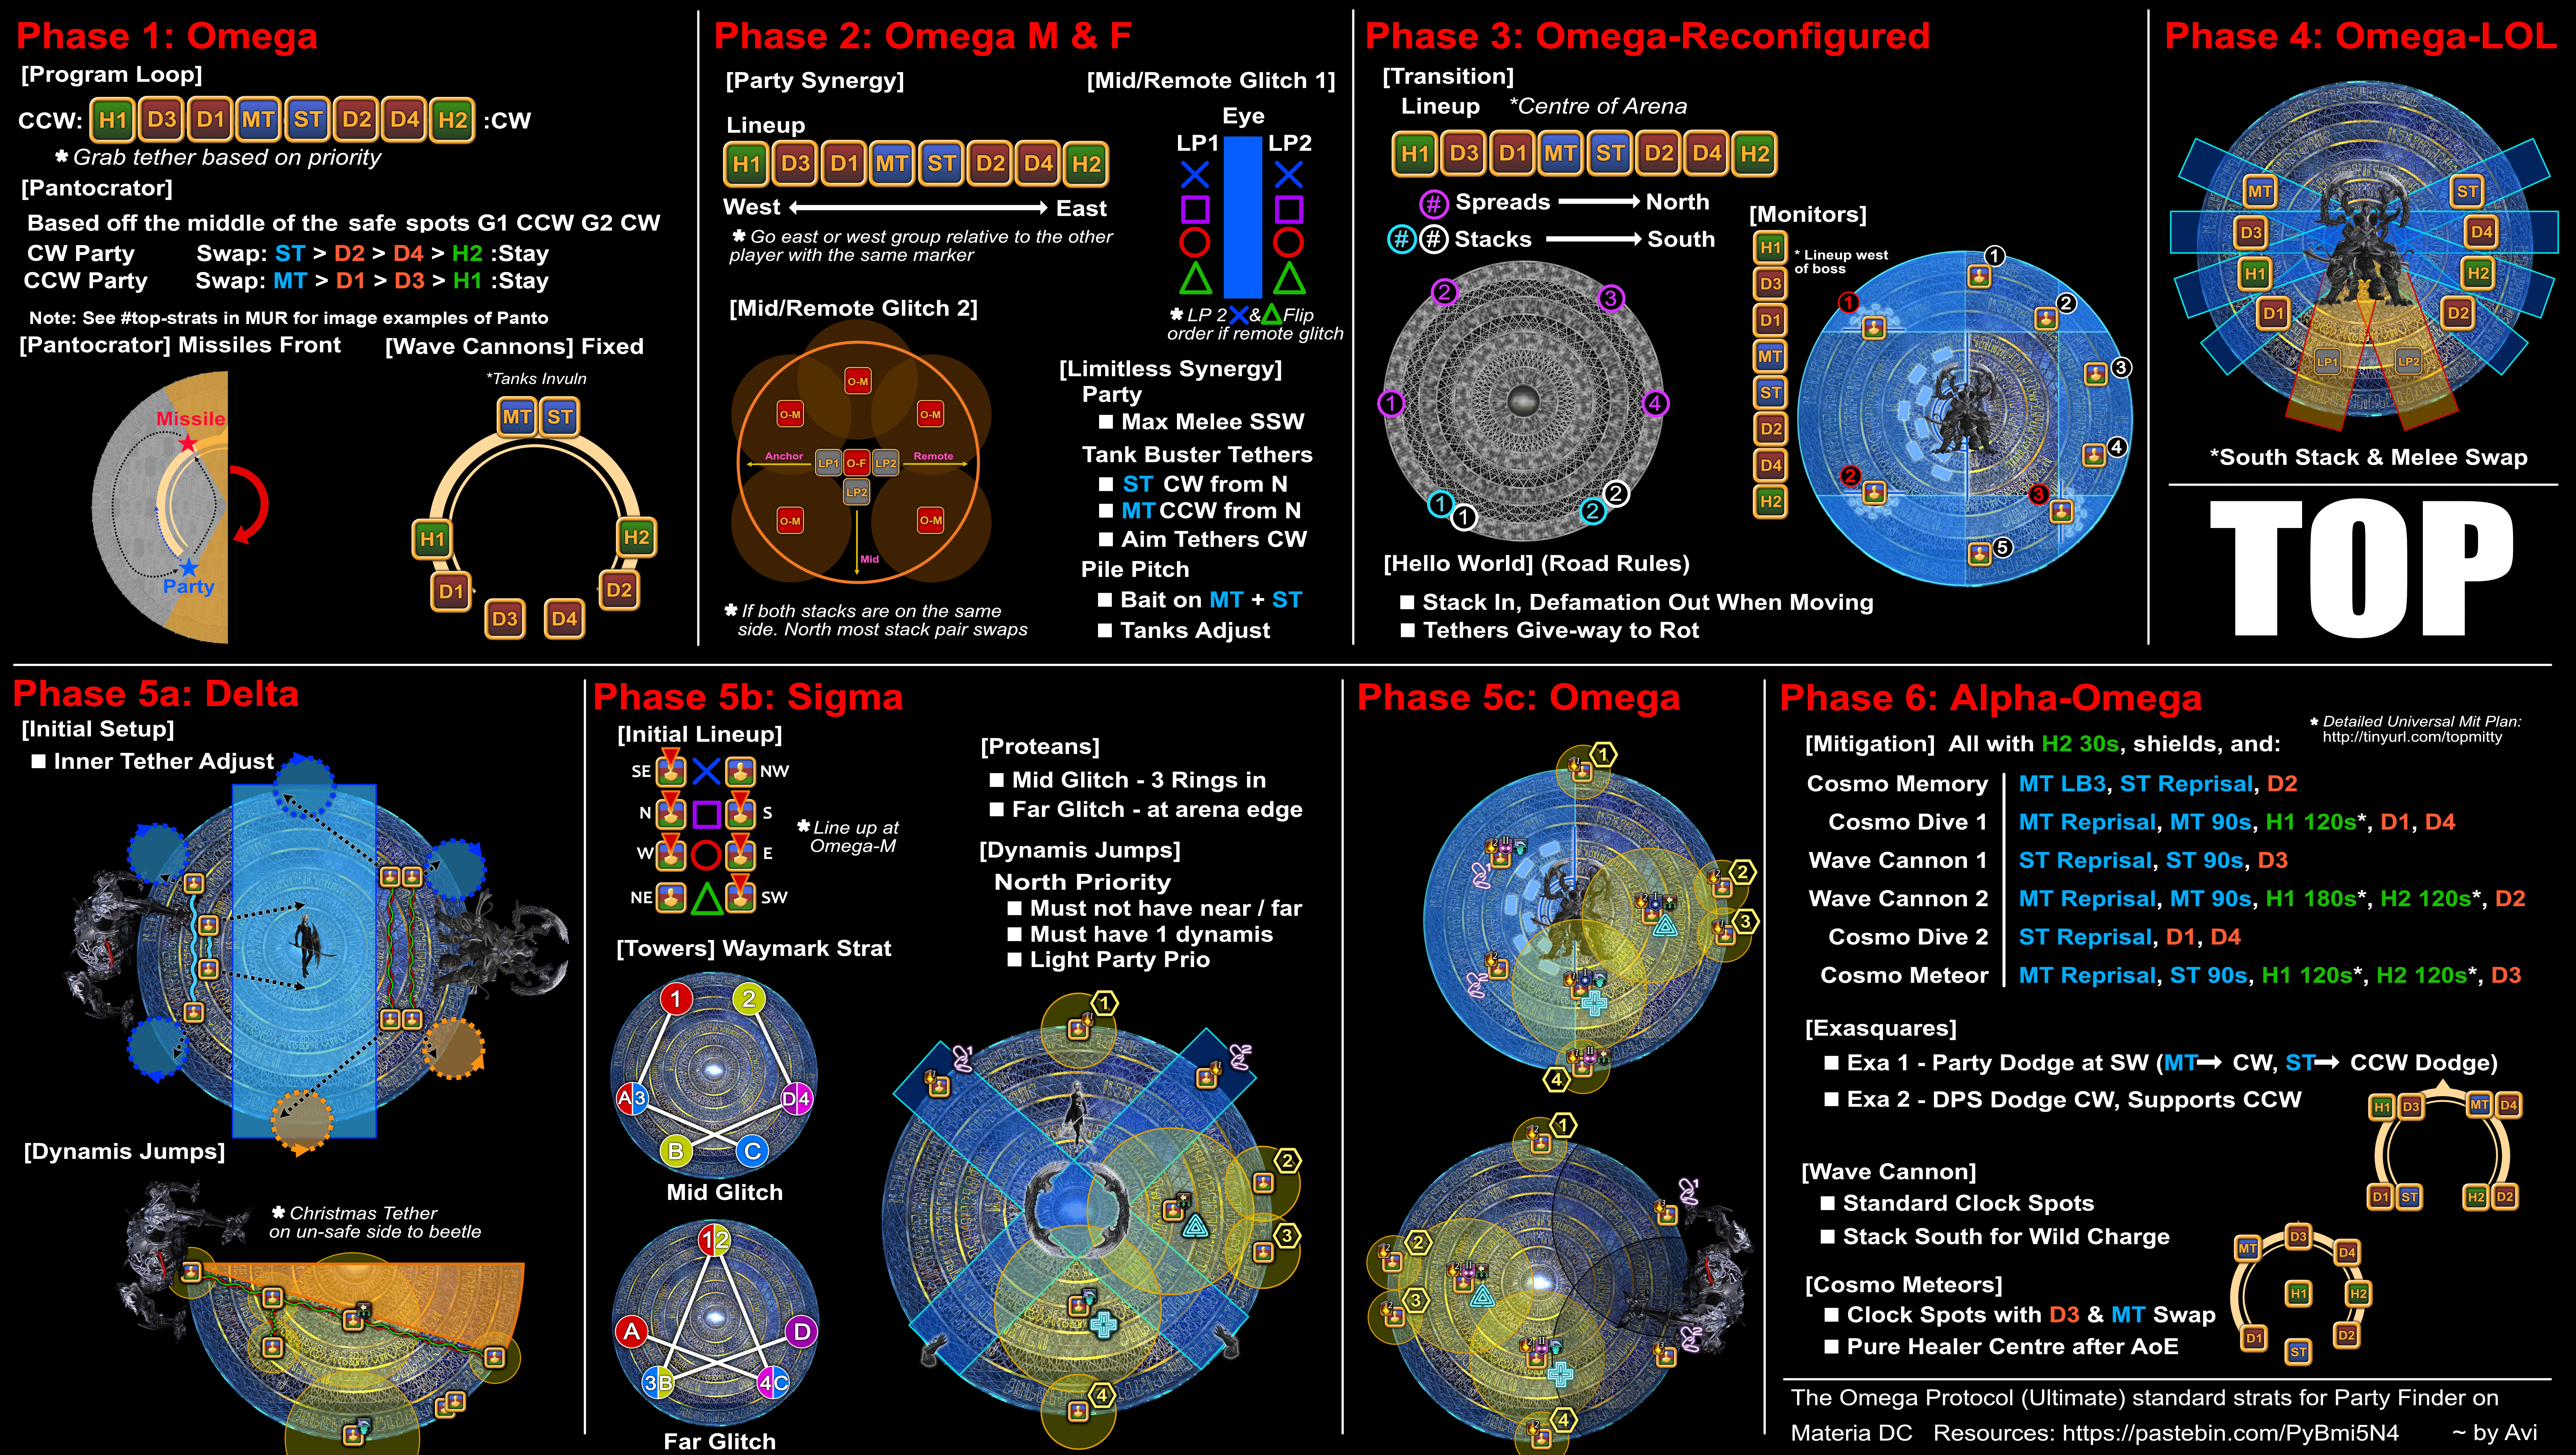
TOP
TOP strats are similar (but not identical!) to NA, which are substantially different to JP. For an extended explanation you can see the complete TOP OCE Guide below by Juno Dax,
NA Differences
For NA players, both DPS and supports move during P6 WC2 instead of DPS not moving. DPS dodge CW, supports CCW. 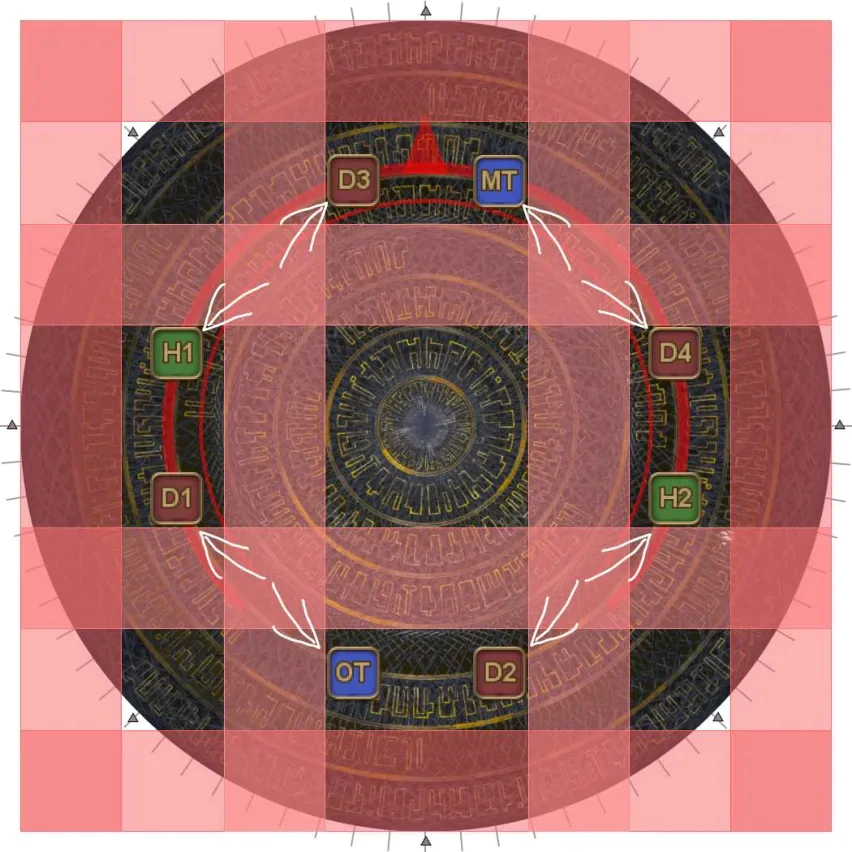
JP Differences
For JP players, please review this list of differences, using the language in Tuufless’ guide. It is recommended you do not join clear/reclear parties before adapting to these differences.
- General: OCE will use the TOP Mitty sheet for mitigations, heals and tankbusters.
- 1. Omega
- Program Loop
- CCW from NW, the priority is H1 D3 D1 MT ST D2 D4 H2.
- If this priority is flipped, this is equivalent to CW from NW.
- Pantokrator
- Light parties reference SW and NE. If the Flamethrowers hit the SW and NE points, rotate clockwise to the next safe sector.
- Priority order is SW: H1 D3 D1 MT ST D2 D4 H2 :NE.
- Program Loop
- 2. Omega M/F
- Party Synergy
- OCE uses BPOG for this mechanic. North to south, this is ×□〇▽. Flip × and ▽ if Remote Glitch.
- To determine who is moving left and right of the eye, line up before the start of the mechanic from left to right in the following priority: H1 D3 D1 MT ST D2 D4 H2.
- If both stacks are on one side, the pair closest to the eye swaps.
- Limitless Synergy
- MT takes the tankbuster tether CCW from N, ST takes the tankbuster CW from N.
- Party Synergy
- 3. Omega Reconfigured
- Transition
- Spreads are north.
- Before the transition, line up from left to right in the following priority: H1 D3 D1 MT ST D2 D4 H2.
- AMs are not used for this mechanic; using AMs here will cause you to get laughed at and ignored.
- Hello, World
- Stack in, Defamation out when moving. Tethers give way to Rot.
- MT will hold emnity during this mechanic, while the ST should assist with mits during autos.
- Monitors
- Before the transition, line up vertically west of the boss in the following priority: H1 D3 D1 MT ST D2 D4 H2.
- Monitor positions are completely different to JP; consult the cheat sheet for details. In particular, monitor 3 should be at the SE corner of their waymark, while non-monitor 2 should be at the NW corner.
- AMs are not used for this mechanic; using AMs here will cause you to get laughed at and ignored.
- Transition
- 5. Run: Dynamis
- Delta
- The positions for players taking Hello, Near World are different to JP, consult the cheat sheet for details.
- AMs are not used to mark initial Hello, Near/Distant Worlds.
- Sigma
- The initial lineup uses BPOG, and is positioned under Omega-M. Omega-M is still relative North for the tether mechanic.
- AM icons may be different to JP. In particular, bind 1/2 is used for lasers (left to right, with Omega-F as north), while attack 1-4 is used for players taking Hello, Near/Distant World from north to south.
- Omega
- AM icons are the same as before for this mechanic, with binds being used for monitors and beetle tethers.
- Delta
- 6. Alpha Omega
- General: Review the cheat sheet for mitigations; tanks should also make sure to confirm their invuln/LB order.
- Unlimited Wave Cannon: the party moves 1 waymark from the first Exaflare.
- Wave Cannon is resolved south.
- Cosmo Arrow 2: initial spread positions are different; consult the cheat sheet below. Both DPS and supports move for exasquares: DPS CW, supports CCW (see the diagram at the start of the section). Do not move all the way to the cardinal waymark.
- Cosmo Meteor: H1 will move to the centre by default.