 AAC Light-heavyweight M4 (Savage)
Credits
- Materia Raiding (macros/waymarks)
- Evansith (toolbox)
- Liminal Space (toolbox)
- Kobe (video guide)
Table of Contents
General Resources
Macro
■ Electrifying ■ Witch Hunt (Fixed Baits)
Spread MT
D3 D4 D3 D4
MT ST D1 D2
D1 D2 H1 H2
H1 H2 ST
※ TH DPS
※ Melee close, Ranged far
■ Electrope Edge 1 (Boss Relative)
Spread Stack
MT D2 D4 ★ STD2
D1 ST H2 MTD1 H2D4
D3 H1 D3H1
■ Electrope Edge 2 (Uptime T Shape)
※TH West ※DPS East
Spread Stack
D1 MT D2 (TH) Close (TH) Far (DPS) Close
H1 ST D4 (DPS) Far
H2 D3
■ Electron Stream
TH DPS
Far/Close ※ Stand infront of Purple
Purple ※ Stand on
■ Transition (True North)
H2 H1
D2 D1
ST MT
D4 D3
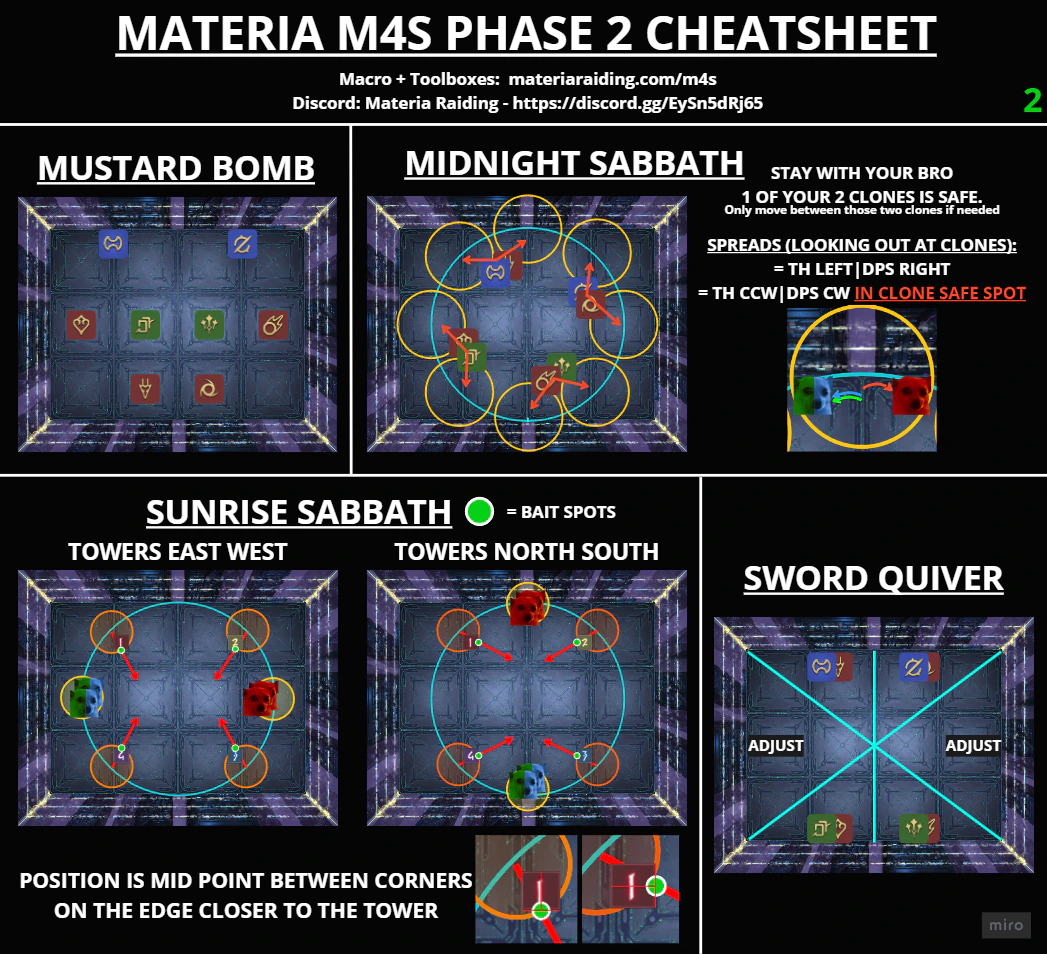
■ Mustard ■ Raining Swords
MT ST MT ST
D3 H1 H2 D4 D1 D2
D1 D2 H1 H2
D3 D4
■ Midnight Sabbath
MT D1 N+NW ※ Spread
ST D2 E+NE TH CCW
H1 D3 W+SW DPS CW
H2 D4 S+SE in Clone Safe Spots
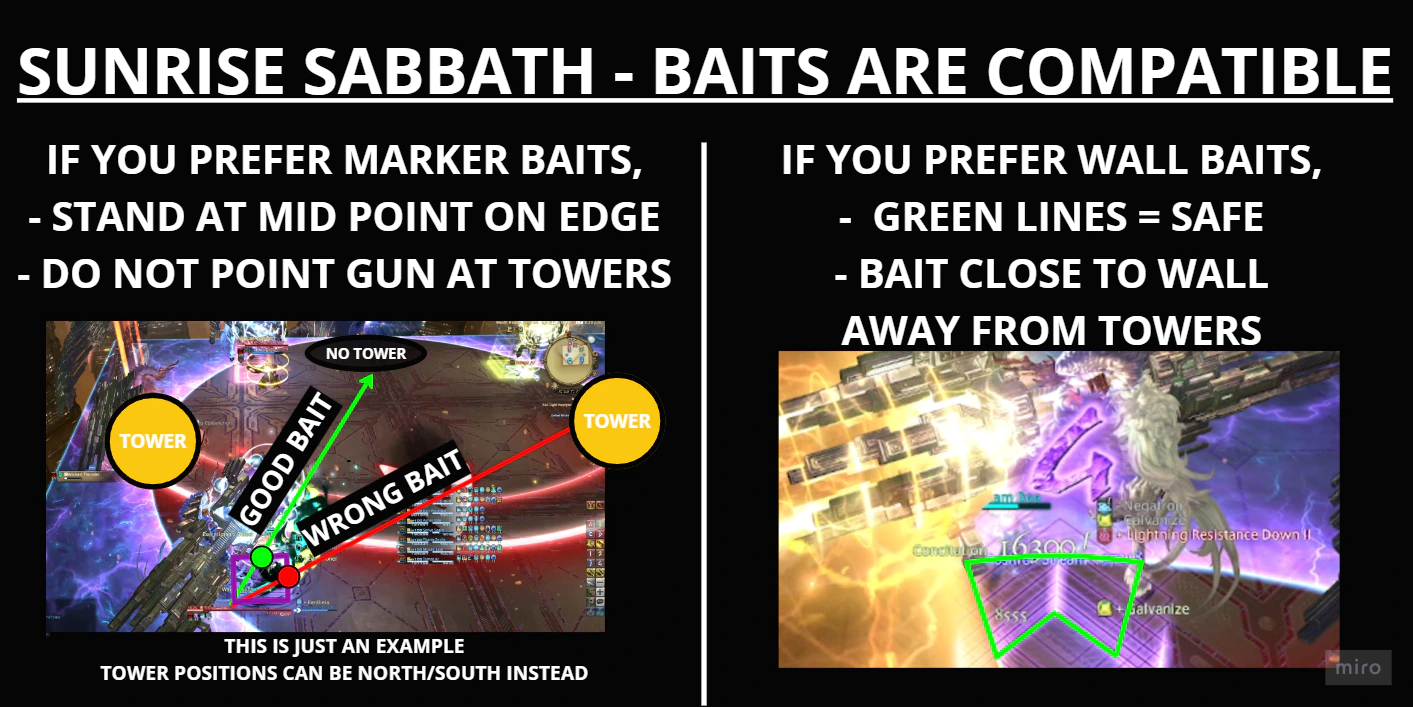
■ Sunrise Sabbath (Guns & Towers)
DPS North CW
TH NW CCW
■ Sword Quiver
MTD1 STD2
H1D3 H2D4
Video Guide
By Kobe
PoV Videos
Toolbox
Toolboxes are an interactive guide that allows you to click through each phase indiviudally and review the mechanics in a easy to understand manner.
Twilight/Midnight Sabbath Toolbox
Cheatsheets
Updated as of 13/08/24
Recent Changes
- No strat updates from previous version. PHASE 1:
- Removed Downtime EE2 Pairs. This was added without knowing how tight uptime Pairs was. AOE is smaller than expected so uptime is easy.
- Added diagram displaying typical max melee / unsafe ranges for uptime.
PHASE 2:
- Added clarification to Midnight Sabbath with spread positions (added CCW/CW directions, still resolves the exact same)
- Wall baits are compatible with marker baits (wasn’t added to the cheatsheet. Linked is a quick guide showing where you can wall bait and still live with both strats)
ETC:
- Minor clarifications + strat name changes to hopefully match other guides out there.
Not looking to make any more updates unless true braindead strats start popping up.
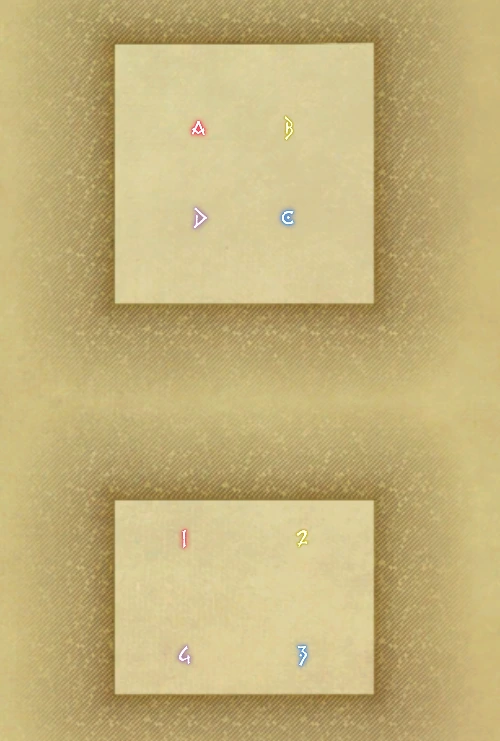
Waymarks
Waymarks can be imported to the game using the Waymark Import addon, or you can ask a friend to import them for you and save a copy for yourself.
A B C D are exactly on the middle of in/out dodges for witch hunt 1 2 3 4 are where to stand to aim cannons
{"Name":"M4S OCE","MapID":992,"A":{"X":93.125,"Y":0.001,"Z":93.125,"ID":0,"Active":true},"B":{"X":106.875,"Y":0.001,"Z":93.125,"ID":1,"Active":true},"C":{"X":106.875,"Y":0.0,"Z":106.875,"ID":2,"Active":true},"D":{"X":93.125,"Y":0.0,"Z":106.875,"ID":3,"Active":true},"One":{"X":90.8,"Y":0.0,"Z":155.8,"ID":4,"Active":true},"Two":{"X":109.2,"Y":0.0,"Z":155.8,"ID":5,"Active":true},"Three":{"X":109.2,"Y":0.0,"Z":174.2,"ID":6,"Active":true},"Four":{"X":90.8,"Y":0.001,"Z":174.2,"ID":7,"Active":true}}
Written Guide
By Pipiro Piro
Debuffs & Status Effects
This fight contains several recurring and new status effects. It is important that you DO know what these debuffs look like as the guide will make frequent reference to them. You DO NOT necessarily need to know their effects to complete the fight but I have included them below for completeness.
| Debuff Name | Icon | Effect |
|---|---|---|
| Physical Vulnerability Up |  | Prevents you from receiving any other physical damage until this debuff wears off. Doing so kills you. |
| Forked Lightning |  | Causes a point blank (PB) AOE around the affected player. This AOE does not do damage to you but will kill anyone else who is hit by it. |
| Magic Vulnerability Up |  | Prevents you from receiving any other magic damage until this debuff wears off. Doing so kills you. |
| Electrical Condenser |  | Causes tiles in a R-tile radius around the player to explode dealing lightning damage and inflicting Lightning Resistance Down II. R here is the number of times the player receives lightning damage from the boss while the debuff is up from either Witchgleam or Eight/Four Star. |
| Lightning Resistance Down II |  | Prevents you from receiving any other lightning damage until this debuff wears off. Doing so kills you. |
| Positron |  | Stacks up to 6. Will instantly kill the player once the timer reaches zero. Getting hit by a cannon of the opposite colour/polarity (blue) will cleanse a stack. |
| Negatron |  | Stacks up to 6. Will instantly kill the player once the timer reaches zero. Getting hit by a cannon of the opposite colour/polarity (yellow) will cleanse a stack. |
| Spinning Conductor |  | Causes a tiny PB AOE round the player that will kill any other players hit. |
| Roundhouse Conductor |  | Causes a massive donut around the player that will kill any other players hit. |
| Collider Conductor |  | Will cause a player to explode if not resolved before the timer reaches zero, inflicting Damage Down and Sustained Damage on the entire party. Can be cleansed by taking damage from cleaves from Remote/Proximate Current. |
| Remote Current |  | Fires a narrow lightning cone at the farthest player. |
| Proximate Current |  | Fires a narrow lightning cone at the closest player. |
| Fire Resistance Down II |  | Prevents you from receiving any other fire damage until this debuff wears off. Doing so kills you. |
| Mustard Bomb |  | Causes a delayed PB AOE around the affected player dealing fire damage and inflicting Fire Resistance Down II.. Can be passed to other players via physical contact. |
| Mustard Bombproof |  | Granted when passing Mustard Bomb to another player and prevents you from being able to receive it. |
Getting hit by any avoidable mechanics in this fight will incur a Damage Down debuff that will reduce damage dealt by 25% for 30s. Some mechanics will also inflict Sustained Damage , which is a heavy bleed that cannot be mitigated.
Phase 1
The fight begins with two autos and a hard-hitting raidwide Wrath of Zeus. Wicked Thunder will then spawn a pair of wings before jumping north to the wall and casting:
As the bosses jump will put her out of melee range for tanks and melee DPS, the MT should start the fight by pulling the boss north.
Bewitching Flight
Wicked Thunder will spawn a pair of wings and electrope cubes on the west side of the arena. Her wings will telegraph five line cleaves vertically and the cubes will telegraph four line cleaves horizontally, leaving a checkerboard pattern of safe spots. These cleaves are half a tile wide.
The arena tiles in this fight are very important and will be frequently referenced throughout this guide. Use the floor markings to help you determine where to stand. With Bewitching Flight, the vertical cleaves are random but the horizontal cleaves will always either cleave the top or bottom half of each row of tiles.
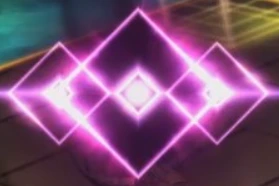
Following this, the vertical cleaves will each leave behind a glowing line of lightning.
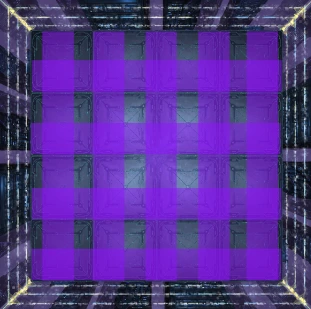 |  |
The boss will then teleport back to the centre and immediately begin casting Electrifying Witch Hunt.
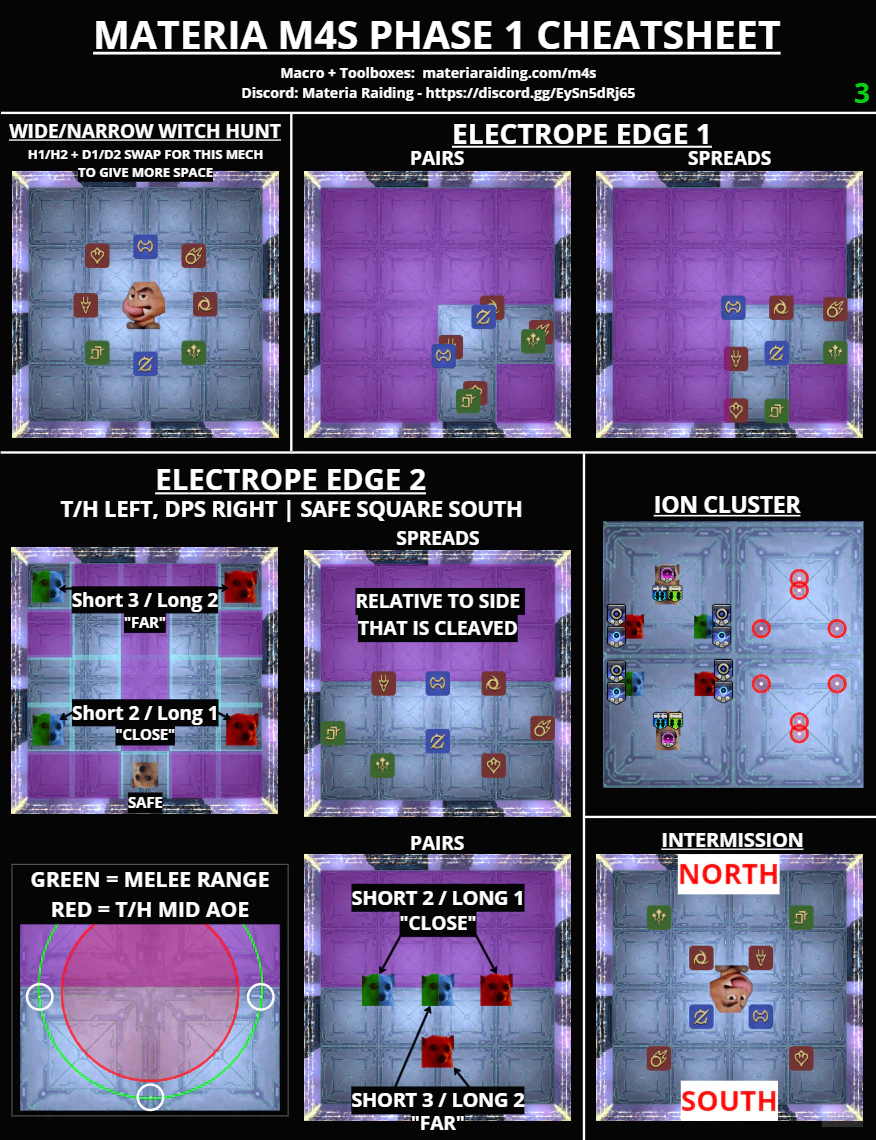
Electrifying Witch Hunt
The following mechanics will occur as the boss is casting Electrifying Witch Hunt.
- Four more cubes will spawn on the east side of the arena telegraphing more horizontal line cleaves.
- A single cube will spawn directly north and perform a single vertical line cleave directly through the centre of the arena.
- The lines of lightning left on the floor will begin to glow and expand, indicating they are about to explode. This will always occur in one of two patterns:
- The middle three lines will explode leaving the left and right edges of the arena safe.
- The outer 2 lines will explode leaving the centre of the arena safe.
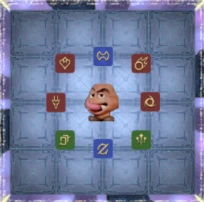
- The boss will prepare to randomly target four players with clone dives dealing physical damage, inflicting Physical Vulnerability Up for 13s and Forked Lightning for 8s. These will always either target all supports (T/H) or all DPS and so the party must stay spread.
Combined, these overlapping mechanics will leave 8 small squares safe in which the party can spread as shown below.
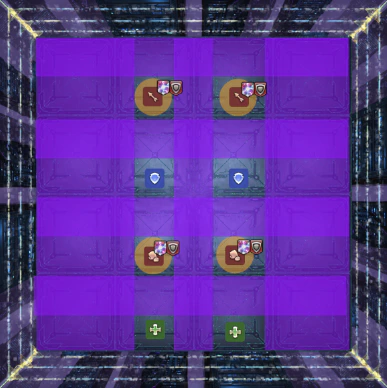 | 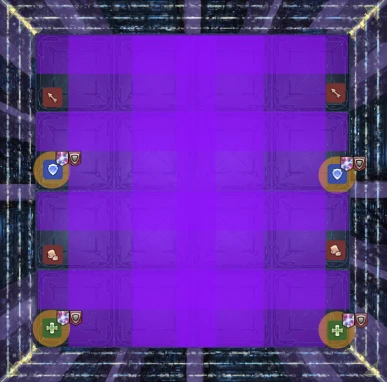 |
Following this, the remaining lightning lines on the floor will begin to glow and expand leaving the opposite area of the arena safe. Wicked Thunder will also cast Witch Hunt, which will target either the four closest or farthest players with a clone dive. This is determined by the symbol she shows on her chest during the castbar.
Given four players have already been dived and cannot be hit again, the opposite role group (supports/DPS) will step in or out take these baits. Wicked Thunder will then begin casting her next major mechanic Widening/Narrowing Witch Hunt.
 | 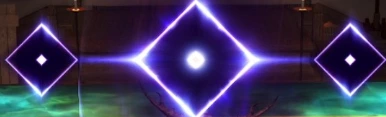 |
|---|---|
| Close Bait | Far Bait |
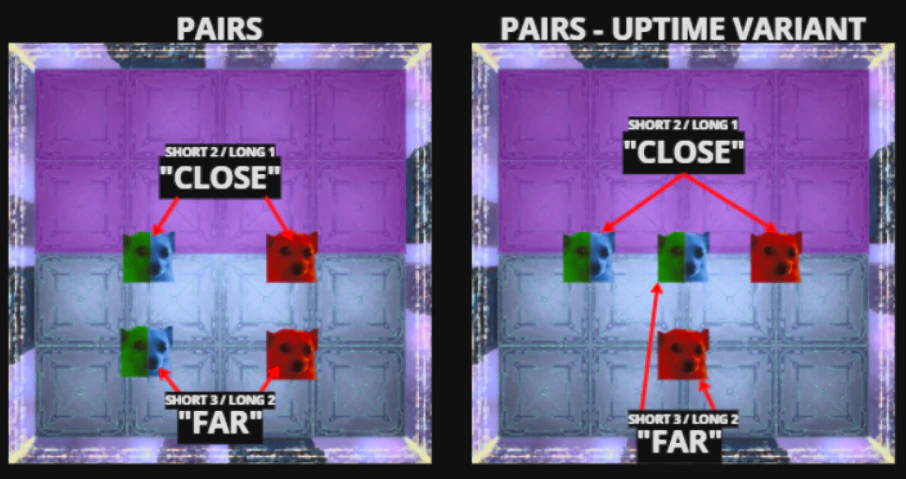
Widening/Narrowing Witch Hunt
The boss will begin a long cast bar, either casting Widening Witch Hunt or Narrowing Witch Hunt which will indicate the type of AOE she will perform FIRST. This will either be a large point blank AOE (PBs) or donut.
At the same time, she will show one of the previously mentioned close or far baits. This will indicate whether her clone dives will target the two closest or farthest players with a clone dive FIRST.
You might notice that the cast bar for this mechanic is quite long and the boss will show 3 other telegraphs than the one mentioned above. Ignore these.
Instead, focus on only the first telegraph you see as every subsequent mechanic will alternate from the initial telegraph.
Once the cast bar is complete, the boss will perform both the AOE and the dives simultaneously. The boss will then alternate from the initial telegraph, switching between PB AOEs and donuts, and between far baits and close baits for a total of four iterations.
To resolve this mechanic, we have the party stand in their clock spots and dodge the in/out. At the same time, we have supports bait the first two sets of double dives followed by DPS.
- Melees will take the close baits either at the edge of the PB AOE or on the edge of the boss’s hitbox.
- Ranged will take the far baits either at the edge of the donut or farther out than the waymarks.
Ultimately, one of two bait patterns will be observed. You can make these into a macro to help you while progging.
 |  |
|---|---|
| Tanks > Healers > Melee > Ranged (Close > Far > Close > Far) | Healers > Tanks > Ranged > Melee (Far > Close > Far > Close) |
To allow for better uptime and to prevent melees accidentally killing each other with close baits, this mechanic will be resolved with modified clock spots.
The waymarks and floor markings here are also very useful to help you determine the size of the upcoming point-blank AOE. The PB AOE and donut cleave directly through the middle of the waymarks and the intersection of the cardinal tiles (green arrows).
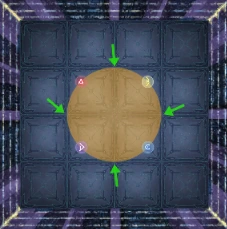
Wicked Thunder will end this mechanic with another Wrath of Zeus raidwide before beginning the next major mechanic Electrope Edge.
Electrope Edge 1
The boss will spawn four electrope cubes in the corners of the arena. She will then cast Witchgleam and begin charging the cubes by firing untelegraphed line AOEs into the cubes in sets of two. She will do this three times, leaving two cubes with 1 hit and two cubes with 2 hits. The cubes with 2 hits will cause a 3x3 explosion centred around the cube, leaving that quadrant unsafe. The cubes with 1 hit will cause a 1x1 explosion on their tile, but leave the rest of the quadrant safe.
The party should first stand on the cardinals to avoid the line AOEs, while keeping track of which two cubes are only hit once.
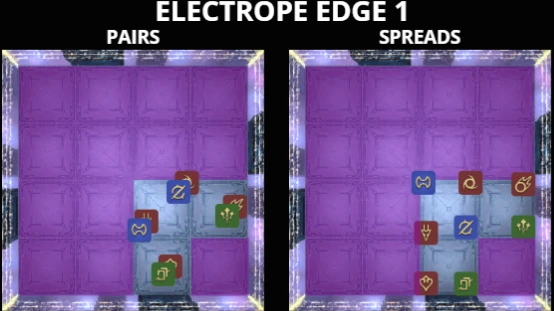
The boss will then cast Symphony Fantastique, telegraphing either eight small orbs indicating a spread (Eight Star) or four large orbs indicating pair stacks (Four Star). This stack/spread will be resolved together with the following Sidewise Spark which is a half room cleave indicated by her raised arm, as well as the previous exploding cubes.
The half room cleave and exploding cubes will render a single quadrant safe in which the stack/spreads must be resolved. This will be done relative to the boss as a result and with fixed positions according to the cheatsheet/macro.
These spread AOEs are very big. Melees should ensure they are max melee from the boss in order to avoid clipping the MT. The ST may need to take a GCD of downtime to do the same.
Wicked Thunder immediately follows this with Wicked Jolt, a hard-hitting line tankbuster that inflicts Magic Vulnerability Up for 5s, forcing either a tankswap or a tank invuln.
Wicked Thunder’s autos also deal magic damage. As such, if using a tank invuln here, make sure to use it as late as possible to cover the auto after the tank buster.
With the Magic Vulnerability Up, Wicked Thunder’s autos will deal massive damage. With WAR and DRK, make sure to delay any healing until the last auto before the debuff falls off or it will be wasted.
Following the tank buster, the boss will begin to cast another Electrope Edge.
Electrope Edge 2
All players will receive the Electrical Condenser debuff with a timer of either 22s (SHORT) or 42s (LONG). Wicked Thunder will then cast Witchgleam again, this time targeting four players with untelegraphed line AOEs, ‘charging them up’. This will happen four times totalling 16 separate hits. All SHORT players will be hit two or three times, while all LONG players will be hit one or two times. These are completely random and are not role based. The party should begin by standing in their normal clock spots and taking note of if they are short/long and how many times they are hit.
The number of times a player is hit while the debuff is active indicates the size of the explosion centred on them when the debuff timer expires. Players hit three times will explode in a 5x5 grid, while players hit two times will explode in a 3x3 grid.
The boss will now cast Lightning Cage spawning the following grid pattern on the floor. This pattern is always the same but can spawn in any orientation. Here, we will take the square at the base of the ‘T’ as the new relative south for this mechanic.
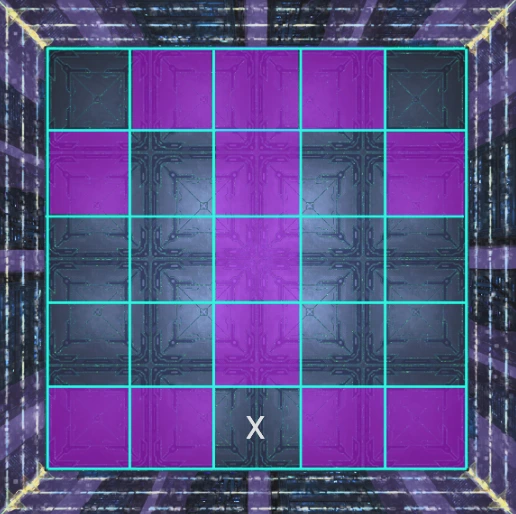
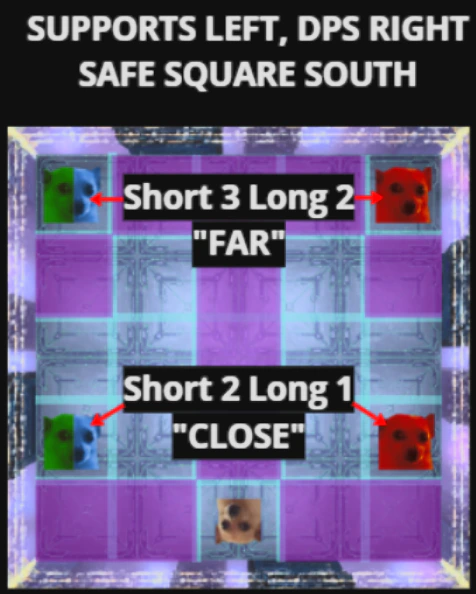
To resolve this mechanic, the LONG players need to stack on the safe spot at south. SHORT players need to head to their respective spots based on the number of times they were hit. To make this easier, we have the 3 hits go far to the corners and the 2 hits close, against the south set of AOEs at the wall. Supports will always go to the left and DPS will always go to the right, facing relative north. See the macro/cheatsheet for these exact spots.
LONG players should add one to the number of times they are hit as the upcoming spread/stack mechanic will count as damage taken while the debuff is active. As such long 2 hit players will be going far and long 1 hit players will be going short. This is important for the upcoming mechanic if it is stack.
Wicked Thunder will start casting Sideways Spark again, telegraphing a half room cleave. At the same time either 8 small orbs or 4 large orbs will be telegraphed on her body indicating either a spread (Eight Star) or pair stacks (Four Star) respectively. If it is spreads, players can go to their assigned positions and let the mechanic resolve.
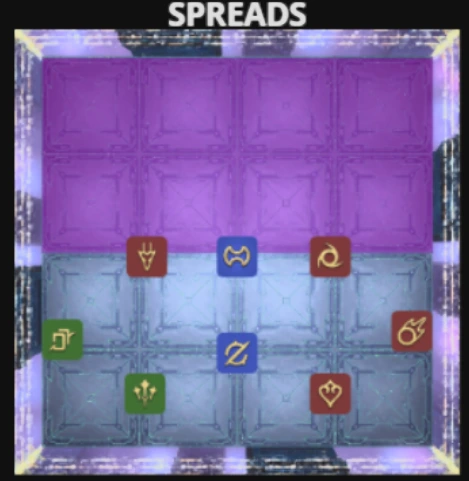
If it is pairs, the pair stacks will target the long players meaning regular pair stacks cannot be used. Instead, static pair stack positions are assigned based on whether players were far or close as this guarantees a short and long player will be stacked.
Following this, the boss will spawn the Lightning Cage grid pattern on the floor again, potentially in a different orientation. To resolve this, have the short players move to the safe square south and have long players resolve their debuffs in the same way as before.
Wicked Thunder will then cast Wicked Bolt, a five-hit party stack dealing heavy damage, before starting the next major mechanic Ion Cluster.
Ion Cluster
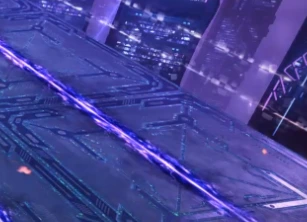
The boss will assign four players with 3 stacks of Positron and the other four with 3 stacks of Negatron, both with a 62s timer. She will then jump north and begin spawning a massive cannon.
As the bosses jump will put her out of melee range for tanks and melee DPS, the MT should start pulling the boss north after Wicked Bolt.
Once the cannon is fully formed, she will turn to one side and begin cleaving four columns five times eventually breaking the platform, leaving only one safe column of tiles.
The boss’s cannon shots Stampeding Thunder do insanely high amounts of damage. Without mitigation, DPS can only survive 2 hits and tanks 3 hits. DO NOT greed.
You can tell early on which direction the boss will be cleaving by watching her hitbox, rather than her model. Her hitbox will always turn about a second before her gun.
Wicked Thunder will then jump to the middle of this platform and begin casting Electron Stream. She will point a cannon in front of and behind her, with one cannon being blue and the other yellow. The ultimate goal of this mechanic is to cleanse all three stacks of Positron/Negatron by getting hit by the opposite coloured cannon three times.
This mechanic is made complicated by additional debuffs that are applied with each hit, each with a 5s or 7s timer. With each hit, four players will receive Spinning/Roundhouse Conductor, two players will receive Collider Conductor and the remaining two players will receive Remote/Proximate Current. The four players with the donut/PB AOE want to avoid hitting any other players, while the two players with currents must position themselves so that the Collider Conductor players are hit by their conal cleave.
Each source of damage from these debuffs applies a short 2s Magic Vulnerability Up which will kill anyone who is hit by more than one debuff. If anyone dies during this mechanic or a Collider Conductor debuff is not resolved, that player will explode applying Damage Down and Sustained Damage on the entire party.
While this mechanic sounds complicated, resolving it is fairly simple. Following each cannon hit, identify which debuff you have and stand in the correct position according to the cheatsheet.
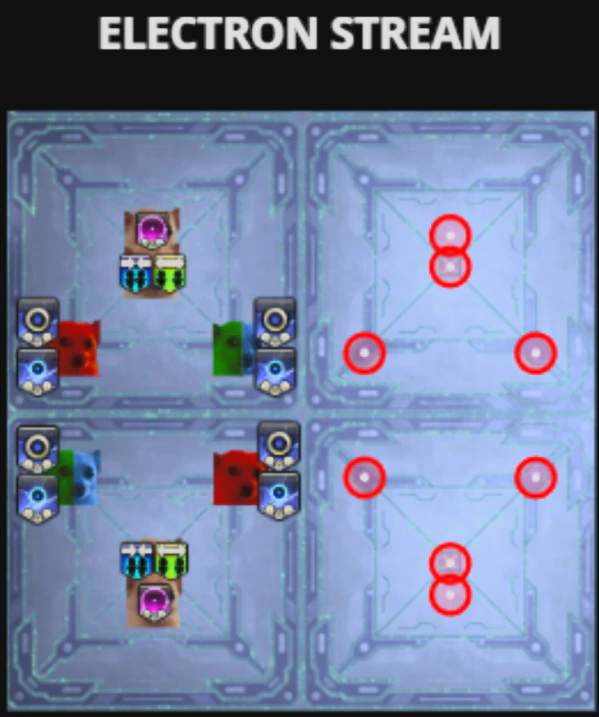
There are several floor markings which can be used to help you position yourself. Additionally, Spinning/Roundhouse Conductor players will all have the same buff and stand in the same spots regardless of which debuff they receive. The same applies to players with Remote/Proximate Current.
This set of mechanics repeats twice more until all debuffs are cleansed and the arena is restored. The boss does one final Wicked Jolt tankbuster before jumping back to the middle of the arena and beginning the Transition Phase.
Ion Cluster is an incredibly hard-hitting set of mechanics requiring a fairly solid mitigation plan. During early weeks of the tier, a super ether may be required here to help you manage MP.
Transition
Wicked Thunder will cast Electrope Transplant, beginning the transition phase. Transition is a fast-paced phase that while mechanically simple, is quite execution heavy. She will be facing south this entire phase. As such, new spread spots are assigned for this entire phase.
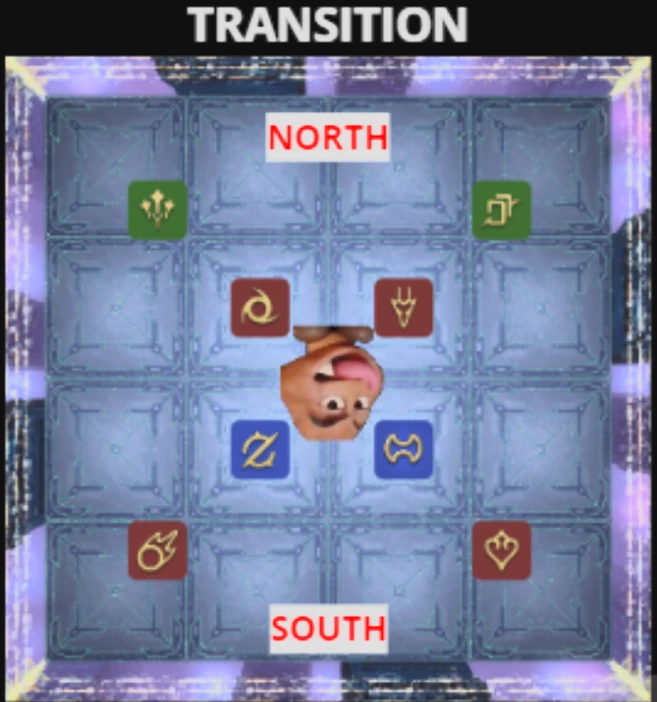
Wicked Thunder begins by telegraphing narrow proteans targeted at the cardinals and intercardinals. She will cleave these proteans before cleaving the safe spots. This will alternate back and forth, however only the initial cleave is telegraphed, each subsequent cleave is untelegraphed.
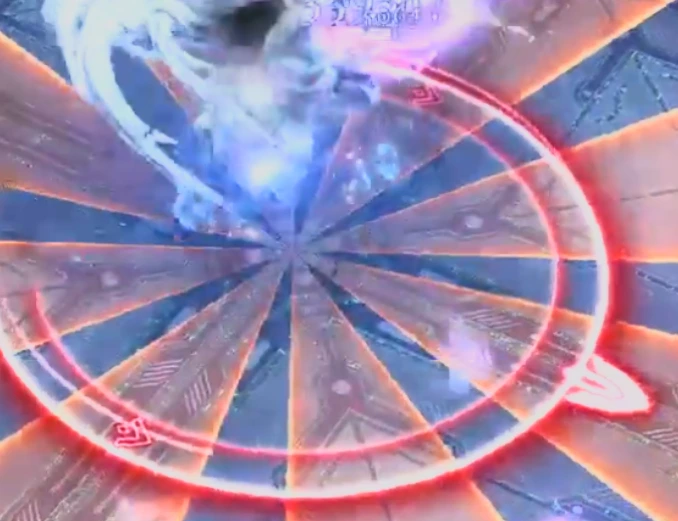
All players want to be fairly spread while doing these dodges. To ensure this, every pair should be dodging these cleaves in the same manner. To resolve this, start at the safe spot directly clockwise of your assigned waymark with your partner - melees should be close to the boss at max melee while ranged should be further out. Rotate counterclockwise into the marker, dodge the cleave and then rotate clockwise back into the initial safe spot. Rinse and repeat.
With the 5th protean, Wicked Thunder will either hit all supports or all DPS with Conduction Point which will inflict them with Magic Vulnerability Up for 6s.
With the 6th protean, she will then target each of the players previously hit with Forked Fissures, a 90 degree wide cone. Forked Fissures is a shared cleave inflicting Lightning Resistance Down II for 2s meaning no two pairs can be overlapped. Furthermore this cleave is a wild charge, forcing the player who was without the magic vuln to stand in front of their partner to take this hit.
During the dodges, do not to be too close to one another as it risks players clipping each other with Conduction Point.
With how the proteans spawn, Forked Fissures should always be taken in line with a waymark.
The boss will do one final 7th protean before pausing shortly, and repeating the entire sequence of mechanics again. At the end of the second set of Forked Fissures, the boss will begin slamming and stomping the arena before eventually breaking the floor and knocking all players back, directly away from her, dealing massive damage.
Players must stack south outside her hitbox to ride the knockback onto the second platform.
Take care not to forget the last dodge after Forked Fissures. It can be helpful to count out the proteans as they come out to keep track and remember this last dodge.