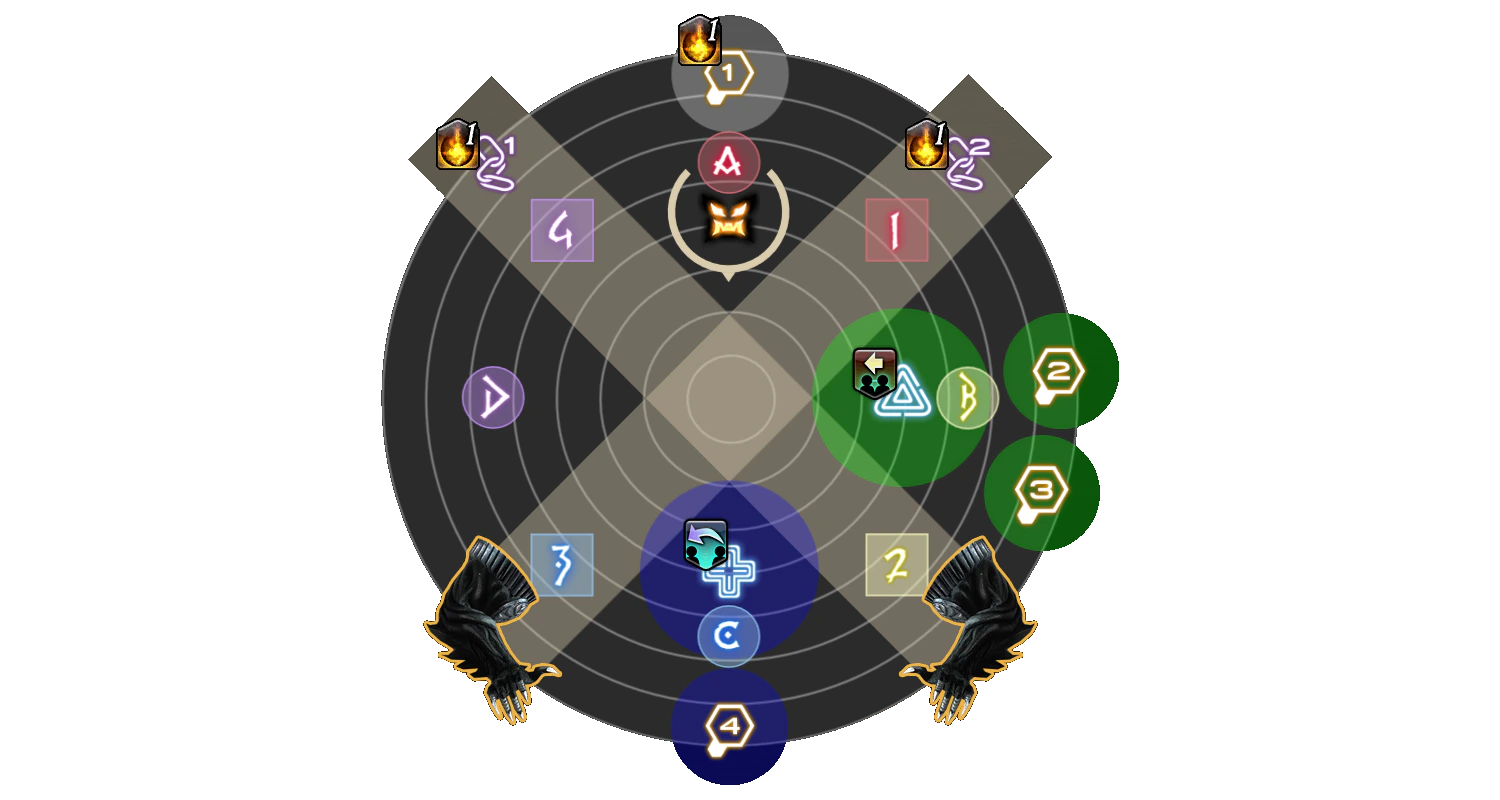
Program loop begins with each player being assigned a number from 1 to 4, with two of each across the party. This mechanic requires 4 sets of 2 towers to be soaked in a sequential order → → → that will deal significant damage to the player inside.
For each set of towers that needs to be soaked, two tethers must be taken by two players and taken away from the towers in the order → → → .
These tethers will explode in a large AOE on the targeted player and inflict a HP penalty debuff which will wear off after 10 seconds.
HEALER
The 3 and 4 players will have their HP penalty falling off as they need to soak their towers, so a priority system between the healers is used to heal both players.
TANK
Personal mitigations can be used to help heal up the 3 and 4 players.
As this mechanic can become messy with players grabbing tethers from others and taking different towers, a priority system is used to facilitate the movement of players. The priority used by MUR PF is seen in the cheatsheet.
Pantokrator has a lot of damage going out from the stacks and spreads, and requires heavy mitigation before spreading into your light parties.
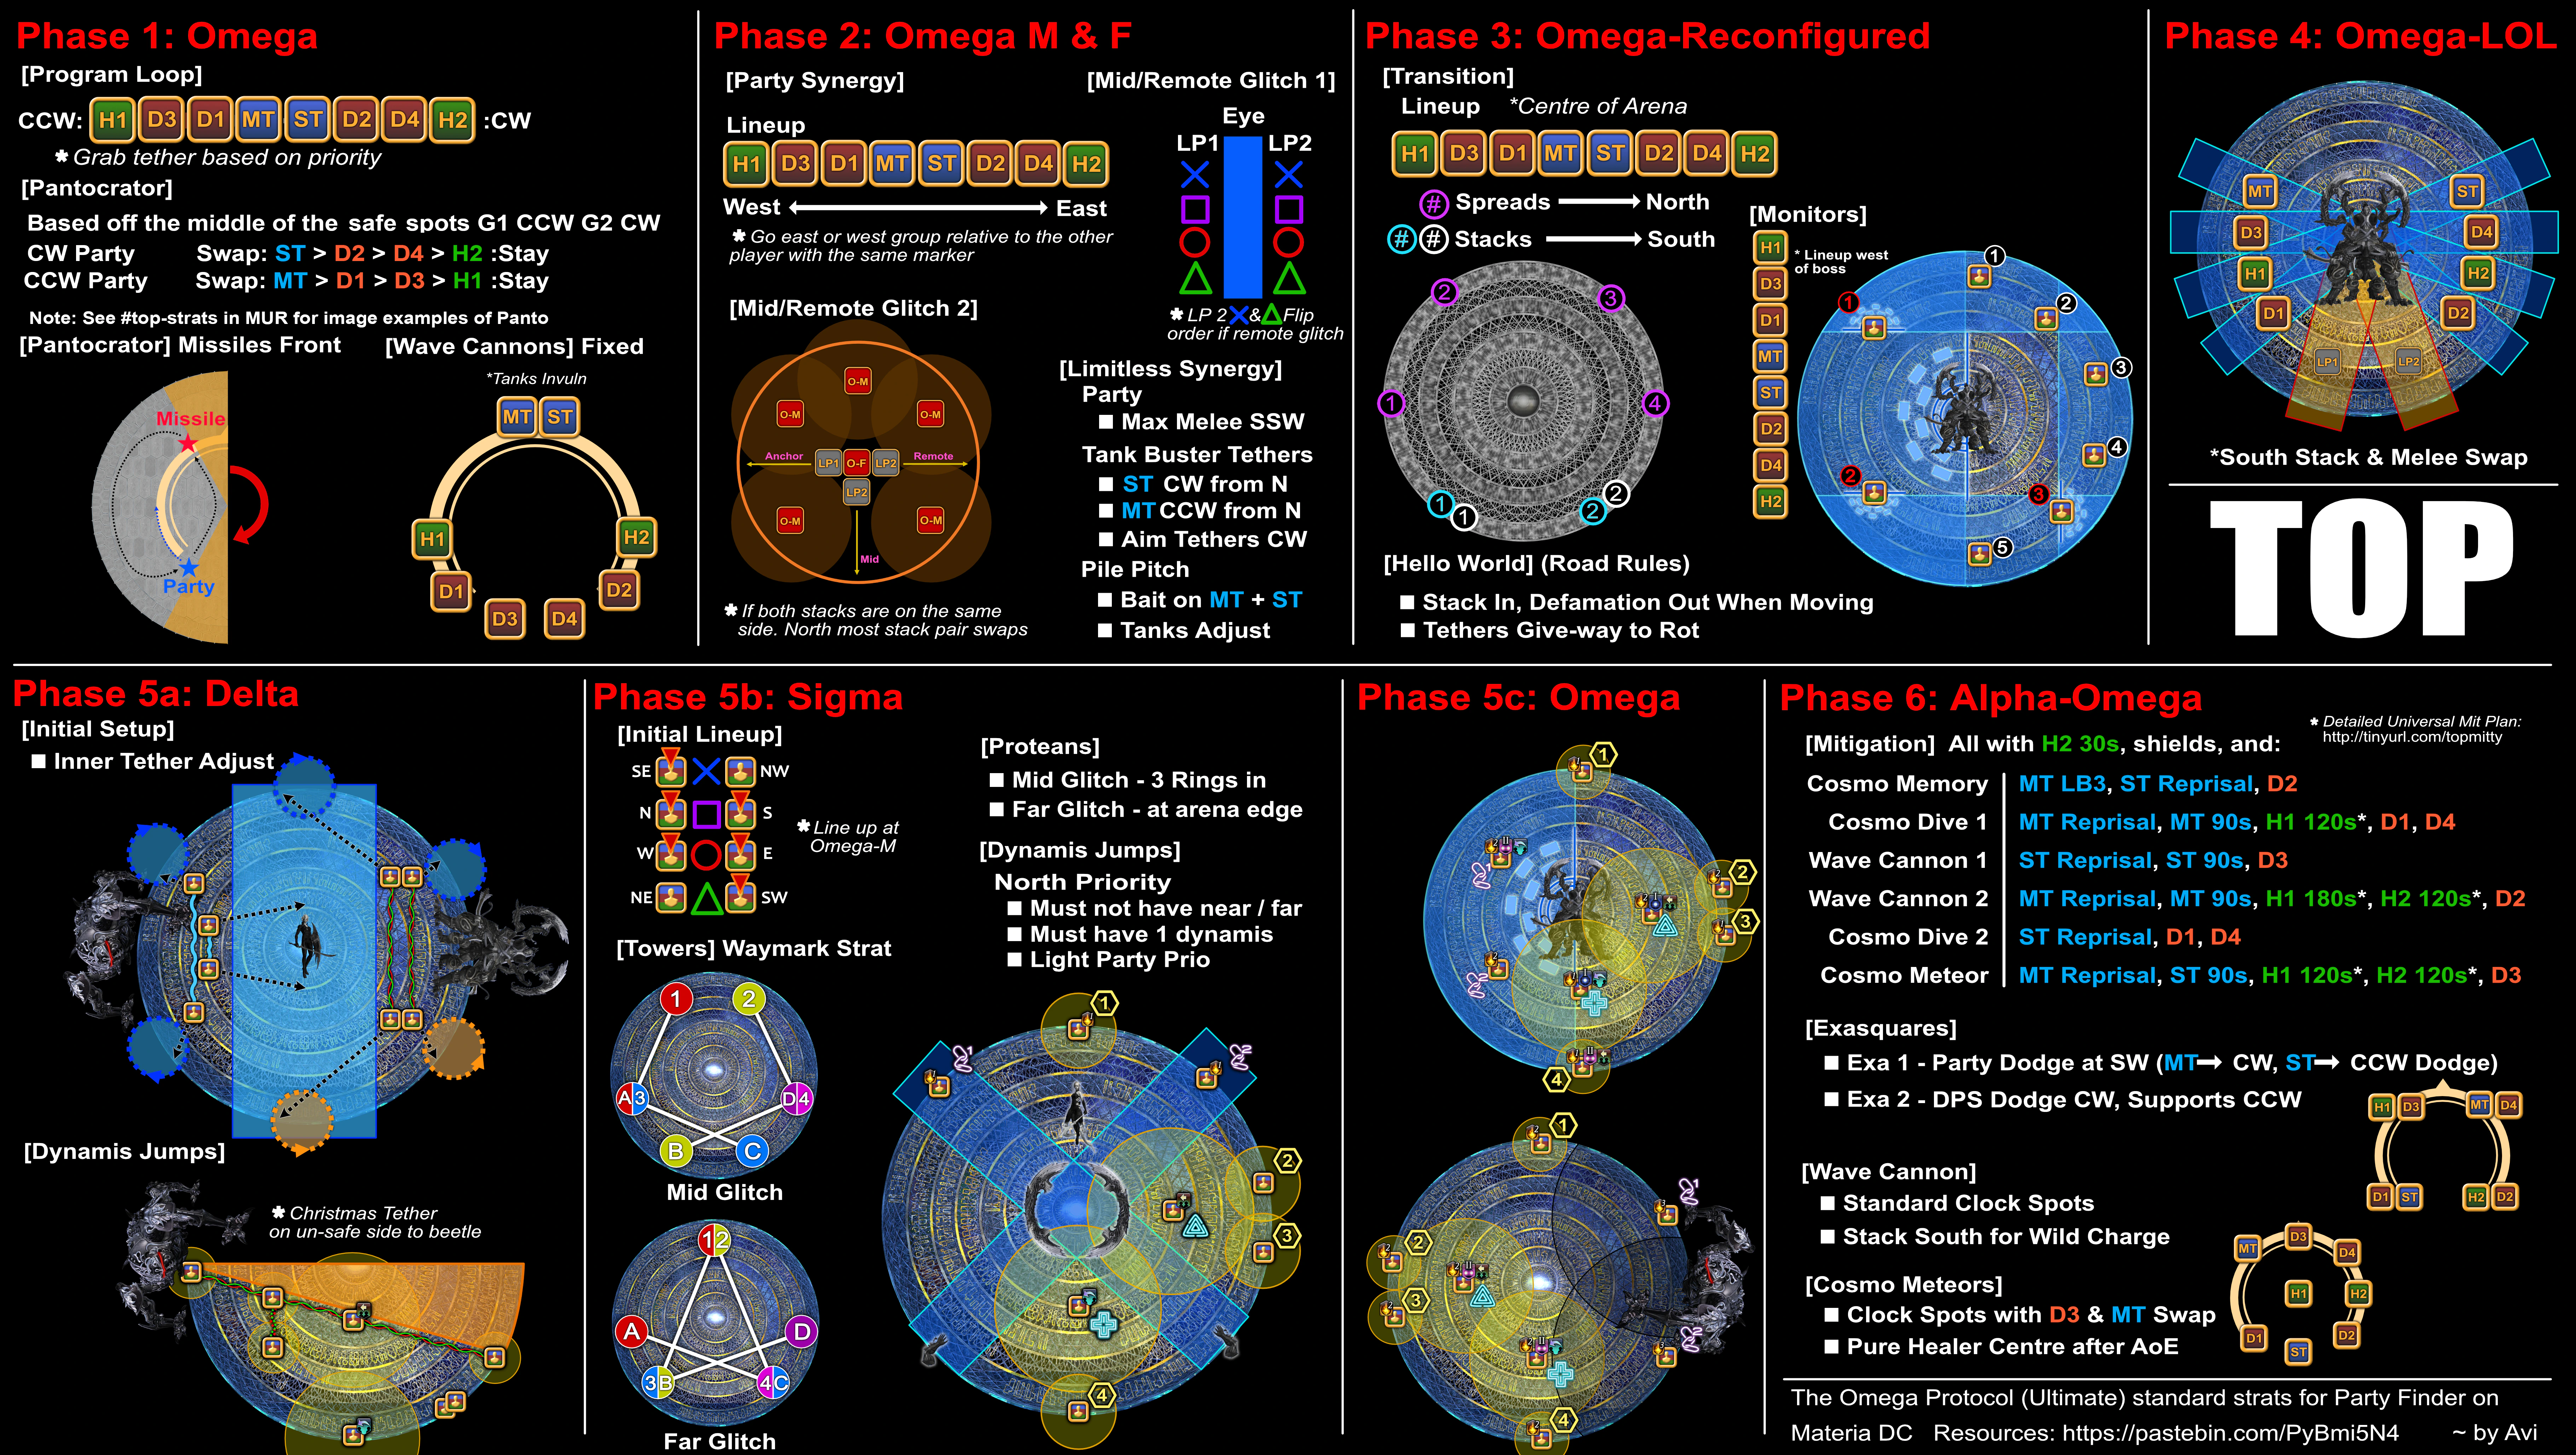
Pantokrator begins and assigns each player with a number from 1 to 4 again, indicating the order that Omega will drop a small AOE on players. Omega will then cast flamethrower and cleave two slices of the arena on random opposite cardinals/intercardinals.
Players will need to split into groups of 4, with each group containing only one of each number from 1 - 4. Of the two safe spots, Light Party 1 will move CCW, and Light Party 2 will move CW. If two of the same numbers are on the same side, one player has to adjust.
This is done by the priority system used in program loop, with the lower priority player of the two flexing to the opposite side.
If Omega cleaves the NE and SW waymarkers first then each party rotates to the safespot clockwise of their original position.
Copy image link
The cleaves will then either rotate clockwise or counter-clockwise. As the cleaves rotate each player will also leave behind puddles. The party stacks together at the rear cleave to take a 3 player line-stack, whilst the numbers leave to take their AOE away from the group before joining back to the party. This process repeats until each number has taken their AOE and the cleaves cease.
WARNING
It is very easy for the puddles to get out of hand, so stack as tightly as possible and move along the edge of Omega's hitbox whilst moving as a group.
Players whose turn it is to leave the stack should wait for a puddle to drop under their feet before exiting the stack. Using sprint can help but isn't required.
Omega will then cast two tank buster cleaves on the two furthest players, and 6 line AOEs on the non-tanks. Both tanks stack north, outside of the hitbox and use invulnerability, and the party spreads within Omegas hitbox as seen in the cheatsheet.
After this Omega will cast it's enrage: Atomic Ray.
Rampart can be cast as Omega "jumps", allowing a usage during the opening tank buster and in Limitless Synergy.
Phase 2 begins and Omega-M and Omega-F will spawn.
DAMAGE
There is about a 2 GCD window once both bosses become targetable where they are susceptible to cleave damage and this should be abused as much as possible.
2 minute raid buffs should be used either before they are targetable or on the 1st GCD.
Omega-M and F will then cast Firewall, targeting the 4 closest players to each boss. If a player is close to M they will be inflicted with Packet Filter F and be unable to damage Omega-F. If a player is close to F the opposite happens.
The party will split up into light parties for this so each boss will have a healer, tank, and two DPS able to damage it.
Both bosses will then tank buster the player with highest emnity to them, followed by 3 auto-attacks.
Both bosses will become untargetable and disappear as the mechanic begins.
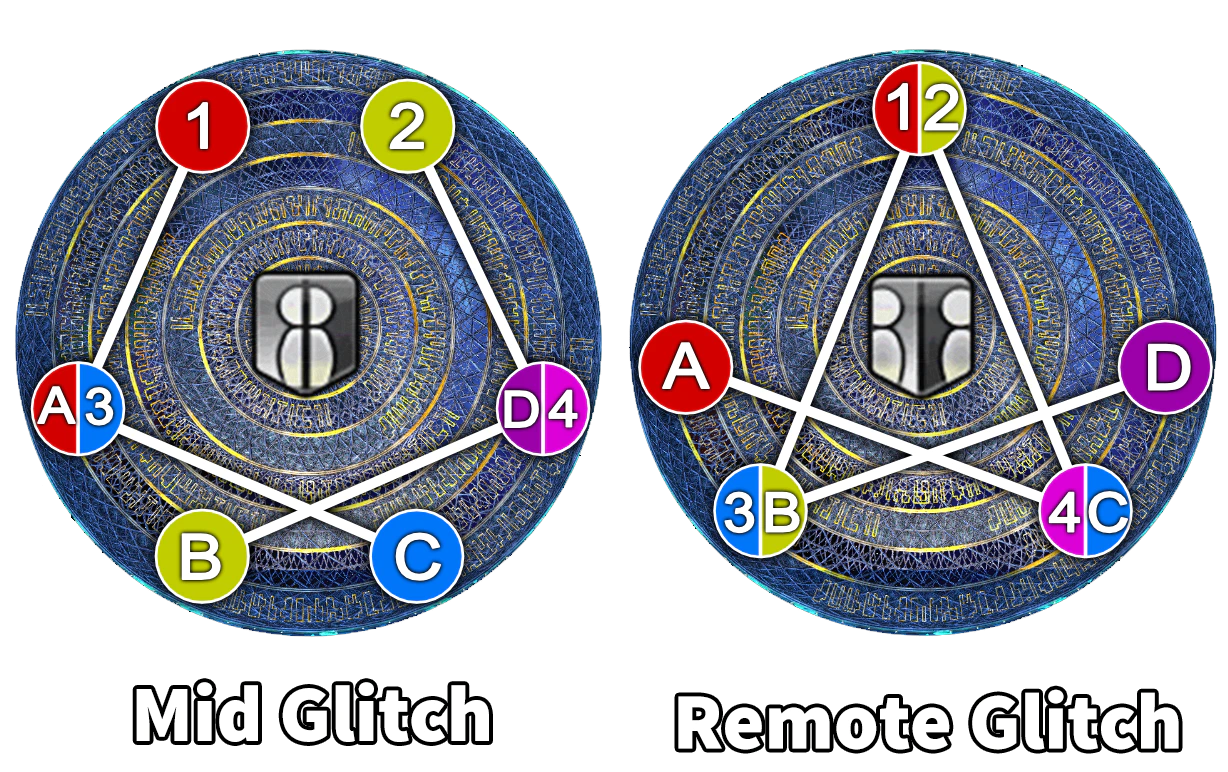
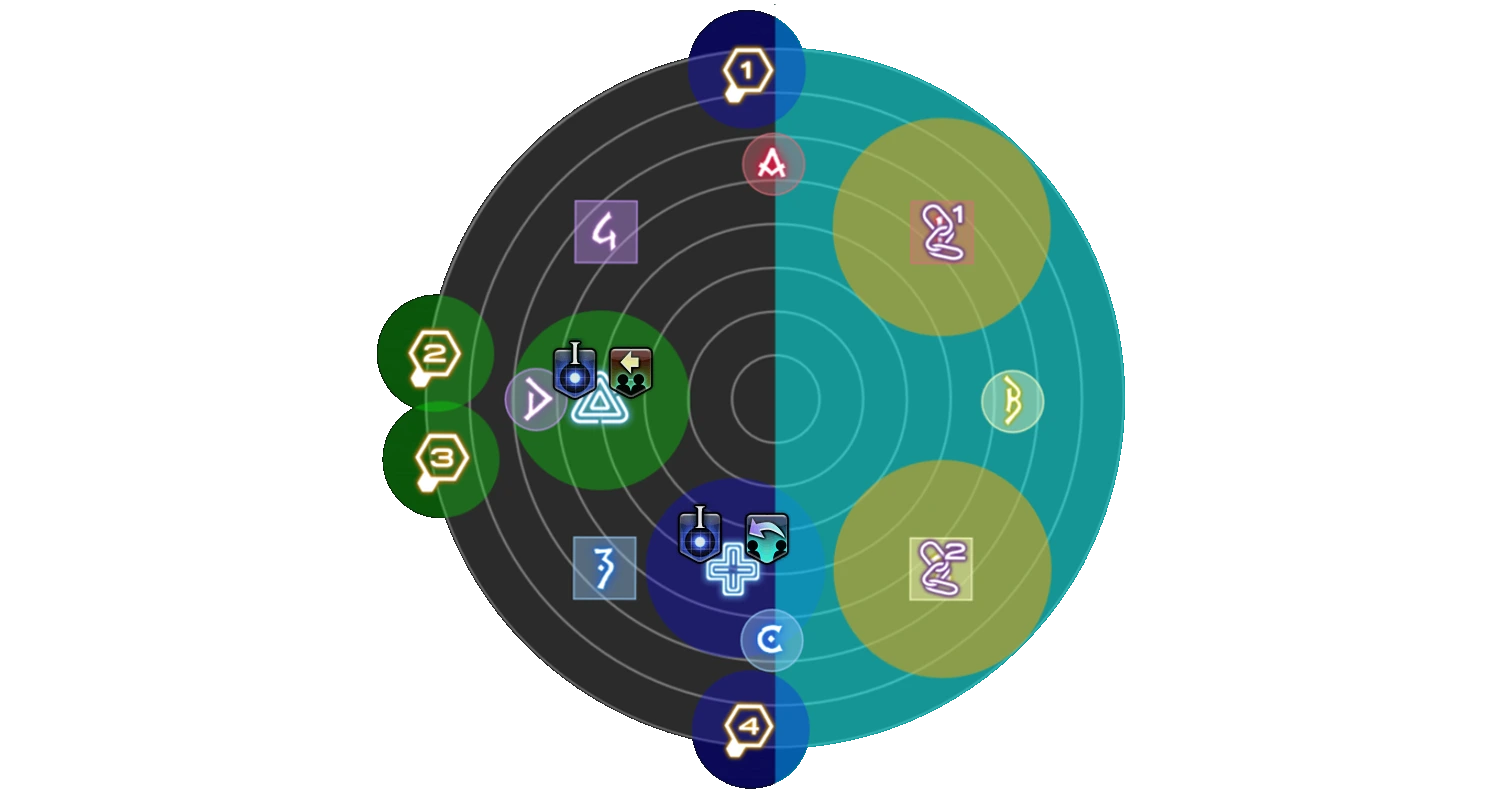
The party is inflicted with either Mid Glitch or Remote Glitch. Each player is also assigned 1 of 4 coloured symbols above their head, with two of each.
EVERYONE
The party should line-up from East to West as seen in the cheatsheet.
The furthest West symbol of a pair will be designated as Light Party 1, whilst the furthest East will be designated Light Party 2.
Copy image link
As seen above, because I am the western most cross player I move to Light Party 1.
At the same time, Omega's Eye will spawn on a random cardinal/intercardinal. This will be designated as relative north.
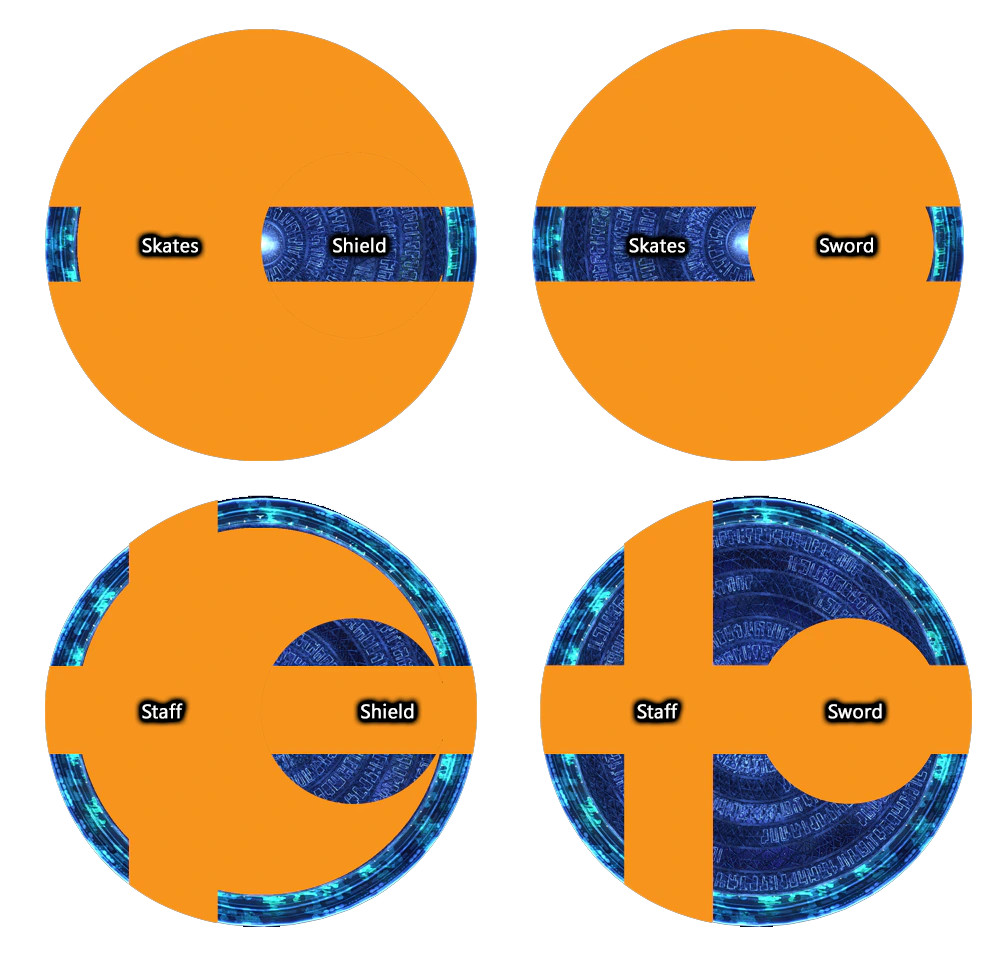
Clones will then spawn around the center of the arena, 2 Omega-M, and 2 Omega-F. An Omega-M and Omega-F pair will always be facing eachother and should be focused on. These two clones will perform a set of AOEs that are dependant on the weapons they are holding.
The possible combinations are:
Female
Male
Staff
Shield
Staff
Sword
Skates
Shield
Skates
Sword
Copy image link
NOTE
The "cursed" pattern (F-Staff & M-Shield) can be easily resolved by using the far edges of the waymarks eitherside of the male.
These waymarks also help to position during Mid/Remote Glitch.
Once the dodge is made, all players must resolve their Mid/Remote Glitch by splitting into the previously designated light parties and moving to the West (LP1) and East (LP2) relative to Omega's Eye. If Remote Glitch is being solved, the cross and triangle players in Light Party 2 will swap positions.
After each player takes an AOE, two stacks will then appear on two random players. Multiple clones will spawn around the arena, including a line of 3 Males, and 1 Female in the center. Using the middle of the 3 males as relative north, the party must form two stacks in their designated light parties around the female to get pushed back to 1 of 3 safe spots.
Light Party 1 will always anchor West, and Light Party 2 will either be pushed South for Mid Glitch , or East for Remote Glitch .
If the stack players are part of the same light party the north most stack relative to the eye must swap positions with their partner.
TANK
Between the start of the phase and after party synergy Omega-M has changed to Omega-F and vice versa, meaning you will both have to re-provoke your boss.
After ~5 auto-attacks from each boss, both Omega-M and Omega-F will cast:
The party should pre-position at South-South-West for this mechanic.
DAMAGE
As the Limitless Synergy cast finishes the Packet Filter debuff will disappear, allowing about 1/2 GCDs of cleave damage.
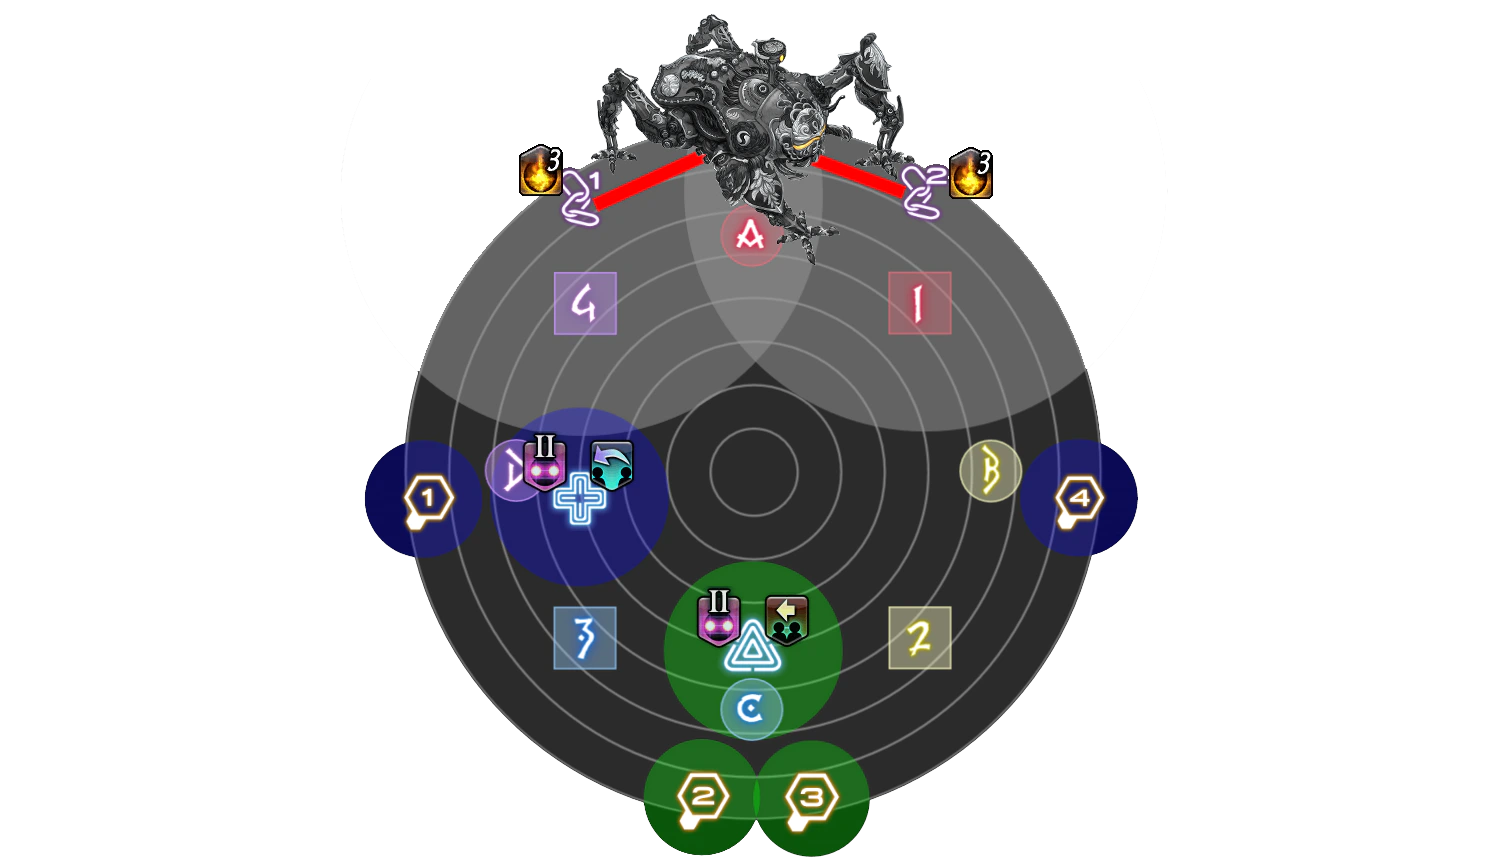
Omega-F will become invulnerable, forcing the party to attack the Male. Two tethers will spawn on two random players, orginating from two Omega clones. Both tanks will grab their designated tether (as seen in the cheatsheet).
At the same time, a Male clone will spawn on a random cardinal/intercardinal and cast Optimized Sagitarrius Arrow on a random player. This AOE will bait across the hitbox but leave a safe spot within it, which the non-tanks will move into.
TANK
Once the AOE is baited, both tanks take their tether to the wall close to their clone and rotate clock wise on the edge of the arena. Heavy personal mitigation is required to survive this tank buster.
While you are taking your tank buster you should also find where the shield male is.
Once the tank busters resolve, everyone but the tanks should stack under Omega-M as 3 flare markers will appear on 3 random players. These can be ignored. The Male clone with a shield that is on the edge of the arena will then cast Beyond Defense which will be baited by both tanks.
The tank that was not hit joins the stack, and the tank that was hit should then move away from the Male so that the stack is closest to the Male's new position as it will then cast Pile Pitch.
EVERYONE
This strategy requires HEAVY mitigation to survive, as not only are you stacking all the flares, you are also taking a stack and then a heavy hitting raidwide immediately after.
To cover both sets of hits, you can cast your mitigation at around 4/5 pulses of the flares.
Throughout this whole mechanic Omega F has been casting her enrage Laser Shower. Once Omega-M is defeated, Omega-F becomes targetable.
The party should line-up from East to West as seen in the cheatsheet before debuffs are assigned.
Copy image link
HEALER
To survive this transition the party must have at least a barrier healer's shield covering the hits.
The debuffs assigned will target 4 players with Sniper Cannon Fodder (spread) , 2 players with High-powered Sniper Cannon Fodder (stack) and 2 players will not be assigned a debuff.
Players must spread according to their debuff and priority, with the stacks and non-debuff players along the south edge of the arena, and the spread players along the north edge.
Two sets of Arms will appear that will cause large circular AOEs, as well as a cascading donut AOE (Wave Repeater) originating from the center. To resolve this, players will dodge Wave Repeater by moving in and out from the edge of the arena, and then dodging into the first arm explosion where they will take their spread or stack.
NOTE
Using sprint can help make the 2->1 dodge easier, but isn't required.
There are hard hitting auto-attacks throughout this entire phase. The OT should be using their targeted mitigation on the MT as much as possible to help reduce the strain on the healers.
HEALER
This phase requires high mitigation for each Latent Defect. Use the mitigation sheet provided, and allow the shield healer to get dead center of the arena to mitigate damage before each Latent Defect.
The phase begins with a hard-hitting raid wide cast:
This mechanic assigns a lot of debuffs to players. Thankfully, a few of them can be ignored as they will resolve themselves simply by doing the mechanic and are only present as fail conditions for doing it incorrectly.
For those interested I've attached the ignorable debuffs in the dropdown below:
Hello World Debuffs
Cascading Latent Defect
Received from soaking a red puddle. Cleansed by allowing Critical Underflow Bug to expire. Failing to do so will wipe the raid.
Latent Performance Defect
Received from soaking a blue puddle. Cleansed by allowing Critical Performance Bug to expire. Failing to do so will wipe the raid.
Latent Defect
Players must take damage before the debuff expires or they will die. This is assigned to Christmas Tether players.
Latent Synchronization Bug
Must be hit by Critical Synchronization Bug to remove. Failure to do so results in death.
However, to actually resolve the mechanic we only care about 5 of them:
Critical Underflow Bug (aka Red Rot)
Critical Performance Bug (aka Blue Rot)
Critical Overflow Bug (aka Defamation)
Critical Synchronization Bug
Local Code Smell/Local Regression (aka Christmas Tether) /
Remote Code Smell/Remote Regression (aka Blue Tether) /
Throughout the phase, each player will have to get each of these debuffs. Once you have received and resolved your debuff, you will become immune to getting it again.
Upon casting Latent Defect, 2 red and 2 blue puddles spawn on opposite sides of the arena. The corresponding coloured rot players will have to soak these puddles. As rot passes on contact, these players should be extremely cautious getting to their positions
Critical Overflow Bug and Critical Synchronization Bug are assigned randomly to one colour of rot. This will persist through the rest of the mechanic such that if red is defamation to begin with, red will be defamation for the remainder of the mechanic.
Stack rots should be as close to eachother as they can while still resolving their blue puddle, and defamation rots should be on the far edges of their puddles.
NOTE
MUR has the stack rot players move inside the boss' hitbox, whilst the defamation players move outside the hitbox.
Tether players should also give way to rots to reduce car crashes.
All players should never pass through the direct center of the arena to avoid walking through the H2 player.
Tethers players will initially have an "inactive" buff, meaning that they can be any distance away from eachother without causing it to break. Once their tether becomes active, if Blue Tethers move far apart, the tether will break, and if Christmas Tethers move close together, their tether will break. Both breaks cause high raid-wide "patch" damage and a Thrice-come Ruin to be inflicted on each player.
Failing to break a tether before it expires results in a wipe.
The Blue Tether players will move to the stack rots and in between the puddles, each player stacking close to a rot player. After the stack hits, the Blue Tether players can move out to give themself rot by stacking on top of the rot player, forcing the tether to break in the process.
WARNING
Popping the Blue Tethertoo early can cause wipes as the initial hits from defamation and the stack give a magic vulnerability debuff for 1 second.
The Christmas Tether players will be standing outside the puddle next to the defamation players, and giving themself rot once the defamation AOE occurs. They will then break their tether by getting close to one another, being careful not to do it too soon after the first tether break as it will wipe the raid due to Thrice-come Ruin
This mechanic repeats Latent Defect a total of 4 times, where for the final Latent Defect all players (except defamation) will move to the stack rot side. This will cause the Christmas Tether to break immediately, and then the Blue Tether will be broken manually after.
After rots expire Omega will cast another hard hitting raid wide Critical Error, before starting the next mechanic:
The party should pre-position in the cheatsheet lineup for monitors to quickly find their spots.
After ~3 more auto-attacks, Omega will begin to cast Oversampled Wave Cannon and point a set of blue monitors either true East or true West.
3 random players will also be inflicted with Oversampled Wave Cannon Loading, putting the same East/West facing monitors on their person. Players must position and align themselves such that each monitor is only hitting 2 people at a time, as seen in the MUR cheatsheet. If hit by a monitor, a large AOE will explode on the player for high damage and they will be inflicted by Twice-come Ruin.
Misaligning your monitor will result in players either: not being hit by monitor, or hit by 2+ monitors. If a monitor does not hit 2 players it will randomly select a player. If hit by 2+ monitors the player will be inflicted with doom due to Twice-come Ruin.
NOTE
The monitor positions "lock-in" as the Oversampled Wave Cannon cast finishes, allowing monitor players to greed GCDs.
If solved correctly, Omega will cast it's enrage: Ion Efflux.
Depending on team composition or damage needs, DPS LB3 can be sent at the end of P3 or at the start of P4. Sending in P4 requires 2 minutes raid buffs to be used during monitors.
This phase is fairly straight forward, with each player taking a protean and then taking two stacks south of the boss. This set of mechanics repeats 3 times. Just before the 2nd proteans, the party must step in to avoid Wave Repeater. Similiarly, after the 3rd stack the party must wait, and then step in to avoid another Wave Repeater.
If two stacks appear on one side of the boss, the southmost stack adjusts to the other side, and the opposite side's mDPS flexes.
Omega must be below 20% health before it's enrage is cast: Blue Screen.
Each Run: Dynamis cast comes with a HEAVY raid-wide hit that should be appropriately mitigated by every class.
This phase is very mechanically heavy, having 3 trios and lasting approximately 5 minutes.
Each trio is split into a "mechanic" section and a "Hello World" section. During the Hello World sections, 2 players are assigned the debuffs:
Hello, Distant World
Causes a large AOE on the player. This AOE "bounces" to the furthest player away causing a smaller AOE. This AOE then "bounces" once more to the furthest player away again.
These AOEs inflict 1 stack of Quickening Dynamis to each player.
Hello, Near World
Causes a large AOE on the player. This AOE "bounces" to the closest player causing a smaller AOE. This AOE then "bounces" once more to the closest player again.
These AOEs inflict 1 stack of Quickening Dynamis to each player.
The goal of the entirety of phase 5 is to end the phase with 3 stacks of Quickening Dynamis on every player, as this is required to complete phase 6.
NOTE
MUR employs blasphemous strategies of using AMs (they're actually really nice for the last trio), that simplifies the Hello World sections of Sigma and Omega. This guide is written assuming players will be using these, though I will explain why some players are required to be in certain positions.
After Omega-M becomes targetable, he will immediately cast a Solar Ray tank buster on the player with the highest emnity.
NOTE
Party member's 15 second mitigations can be used at the 2nd tank buster hit, allowing it to be up for the future trios.
I highly recommend looking at the toolbox for this trio as well as reading this guide. This is a very intensive mechanic that becomes hard to digest through entirely text alone.
HEALER
This is a very hard hitting mechanic and it becomes difficult to heal due to tethers. When able, healers should be given priority for inner tethers and after the initial monitor hit, players should squeeze in for healing.
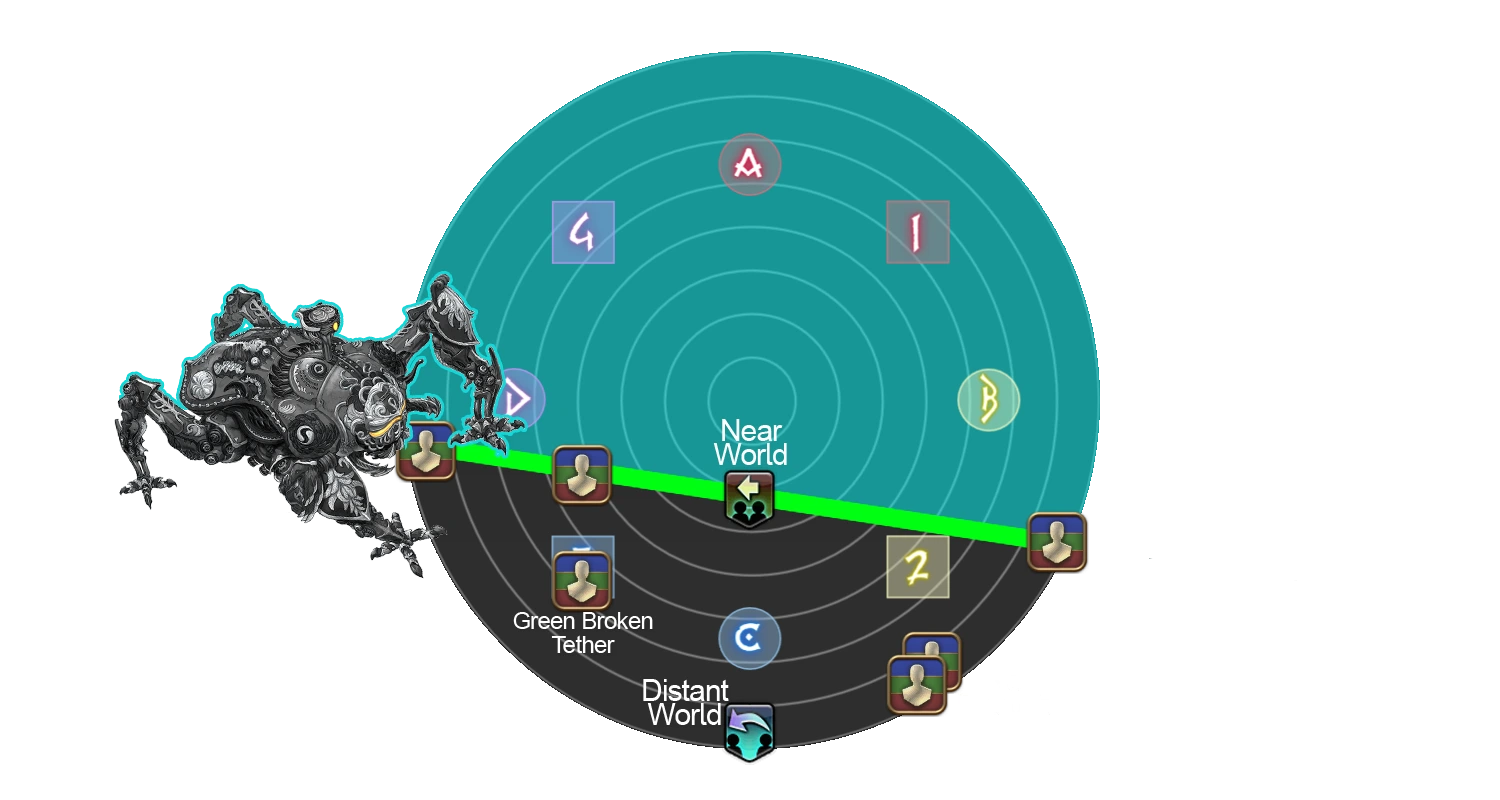
Omega-M will become untargetable and disappear, Beetle Omega and Final Omega will then spawn randomly on two opposite cardinals, and Omega's Eye will spawn on one of the remaining cardinals, and will treated as north. Each player will then be inflicted with Local Code Smell and Remote Code Smell, such that there will be 2 Blue Tethers and 2 Christmas Tethers.
Two Blue Tether Players will also receive Hello, Distant World and Hello, Near World.
Blues Tethers will then go to Beetle Omega, and Christmas Tethers to Final Omega. Both pairs of tethers will line up parallel to the edge of the arena on their respective side. This is so that there is a tether closer to the center of the arena (Inner Tether), and a tether closer to the edge of the arena (Outer Tether).
Copy image link
Much like phase 3, breaking tethers results in a large raid-wide hit as well as inflicting Thrice-come Ruin on the party. However if the tether debuffs expire the party is killed. As such, we want to gradually break all 4 throughout the course of the mechanic so that the damage does not kill the party whilst not letting the tethers expire.
As the tethers are still inactive, the Outer Blue Tether will stretch so that it will break immediately upon becoming active.
Around 9 seconds before the tethers activate a blue or yellow Rocket Punch add will spawn on each player of the party and will jump on them after a period of time, wiping the raid.
Rocket Punch must be "mitigated" by having two of opposite colours landing on eachother. Both pairs of Christmas Tethers will stack on eachother, whilst the Outer Blue Tethers will wait for their tether to activate (and break) before quickly moving to stack on the Inner Blue Tether Players. If two players have the same colour Rocket Punch, the Inner Tethers simply swap places with the player they are tethered to.
Around 4 seconds before the tethers activate, 6 Arms with spinning arrows will appear on each intercardinal and N/S around the arena. These Arms will attack the closest person to them with a wide line AOE that will rotate in the direction of the arrows.
To resolve this, 1 player must move to each of the 6 Arms and bait the AOE on the side that forces it to cleave outside of the arena rather than directly through it. The Outer Blue Tethers are responsible for baiting the intercardinal Arms on their side, whilst the Christmas Tether Players will bait both their intercardinal Arms (Outer Christmas) and the N/S Arms (Inner Christmas).
Upon baiting the Rocket PunchAOE, Omega's Eye will cleave the center of the arena, and players who are responsible for baiting an Arm will move to do so. Final Omega will then begin to cast Monitor at North or South, as well as inflicting a random Blue Tether Player with Oversampled Wave Cannon Loading.
At the same time, Inner Blue Tethers break their tether as they move to the center to bait Beyond Defense from an Omega-M that has spawned. The player that is hit by Beyond Defense must move either East or West so they are not caught by the subsequent Pile Pitch, being careful not to be cleaved by Final Omega's Monitor.
After baiting their Arms, Outer Blue Tethers will go to the middle to stack on the player who was not hit by Beyond Defense, standing on the side that is not being cleaved by Final Omega's Monitor. The player who was inflicted with Oversampled Wave Cannon Loading must face the monitor to the opposite side of the arena that Final Omega is cleaving, so that both sets of monitors are only hitting 2 Christmas Players each.
NOTE
Sprint is extremely helpful in this mechanic. It's safe for everyone except Outer Blue Tether Players to pop sprint when the tethers activate.
The Outer Blue Tether Players should use theirs after baiting the AOE from their Arm to comfortably get to middle for Pile Pitch.
After the Monitors resolve, Beetle Omega will cleave one side of the arena with a 60% angled cleave. The Non-debuff Blue Tether Players will move to the side opposite of Beetle Omega. The Outer Christmas Tethers will rotate so that the player that is currently within the cleave ends up under Omega, and the Inner Christmas Tether will then break their tether as everyone else lines up for Hello World as seen below:
Copy image link
Image by Bird
WARNING
Christmas Tether breaks must be done at the right time. Due to Twice-come Ruin debuffs from Monitors and Pile Pitch, the first break must be delayed. However, the first Christmas Tether Players can use the tether timer and break their tether at 15s as it will always be safe.
Similarly, the second Christmas Tether break can be done at ~2 seconds.
NOTE
If solved correctly, 6 players will have 1 stack of Quickening Dynamis.
Omega-M will then do another Solar Ray tank buster before casting:
At the beginning of Sigma, each player will be assigned 1 of 4 symbols and be inflicted with Mid Glitch or Remote Glitch, identical to Party Synergy. Two players will also be assigned a Hello, Distant World and Hello, Near World debuff. Two Arms will then spawn eitherside of a random cardinal/intercardinal and attach tethers to the two furthest players away from them. Directly opposite this is where Omega-M will spawn, where the party will move to line up as seen in the MUR cheatsheet.
This Omega-M (or the waymark he is on) becomes relative North for the remainder of the tether mechanic.
Six players will then be assigned targeting markers on their head for a line AOE, such that 2 pairs will have 2 markers, and 2 pairs will have 1 marker.
The North-most pair of 2 markers will spread to the North South cardinals, and the South-most pair will spread to the East West cardinals.
The North-most pair of 1 marker will move to the North-West and South-East intercardinals, and the South-most pair will spread to the North-East and South-West intercardinals.
Players will move to their designated positions, stepping in front of their waymarker for Mid Glitch, and moving to the wall for Remote Glitch. The 2 players with no marker, must be in the relative North-East and relative North-West position to bait two line AOEs from the Arms. This is to ensure that none of the players already being targeted get hit and killed.
Copy image link
After the AOEs resolve, Omega-M will change to Omega-F and towers will spawn. If the party is inflicted with Mid Glitch, 6 towers in a "smiley face" pattern will spawn. If inflicted with Remote Glitch, 5 towers in a "star" pattern will spawn. This pattern will spawn relative to the Relative North Omega-F, and can also be flipped vertically. Because these towers must be soaked whilst also resolving Mid/Remote Glitch everyone must take a particular tower.
Player's tower positions are designated by the waymark that they originally spread to:
Copy image link
As an example, if my spread position is the A Waymark, my tower to soak would be the A Tower as shown in the pictures above.
Omega-F will then move to the center and knock-back each player to their designated tower, where Mid/Remote Glitch will be resolved.
NOTE
For Mid Glitch, players should stand in the middle of their tower. For Remote Glitch, each player must stretch as far as possible to satisfy the mechanic.
After the towers are soaked, Final Omega's Blades will spawn in the center with spinning arrows, and Omega-F will appear on a cardinal with either a staff or skates. Three players with 1 Spark of Hope stack are sent to the female's side of the arena, and the rest stack on the opposite side of the arena. If Omega-F has a staff, the players must wait against the edge of the AOE once it starts moving to avoid her cleave. If Omega-F has skates, simply chase the AOE after it begins moving.
Players will then move into their Hello World positions as seen below:
Copy image link
If you are not running AMs players can pre-position in a line up while they are waiting for the rotating AOE to begin, indicating which position they will take.
NOTE
If solved correctly, 4 players will have 1 stack of Quickening Dynamis, and 4 players will have 2 stacks of Quickening Dynamis.
Omega-F will then spawn in the center and become targetable.
After another Solar Ray tank buster, Omega-F casts:
After the initial raid-wide, 4 players are assigned Hello World debuffs. Two players are assigned with First in Line, and two others will be assigned with Second in Line. One player from each pair will be assigned Hello, Distant World and the other Hello, Near World.
Omega-F will remain targetable and Final Omega will spawn in the center of the arena. Clones of Omega-M and Omega-F will appear on opposite intercardinals next to Final Omega with the same Staff/Skates + Sword/Shield combo that's seen in phase 2. Final Omega will then cast 2 large cleaves on opposite cardinals of the arena, before cleaving the opposite cardinals.
This dodge sounds incredibly complicated but it can be split up into several segments to quickly solve it:
Players will first determine which Omega clone will have the safe side on it. Often, the party will go to Omega-Mcardinals UNLESS its the pattern F(In) M(Out).
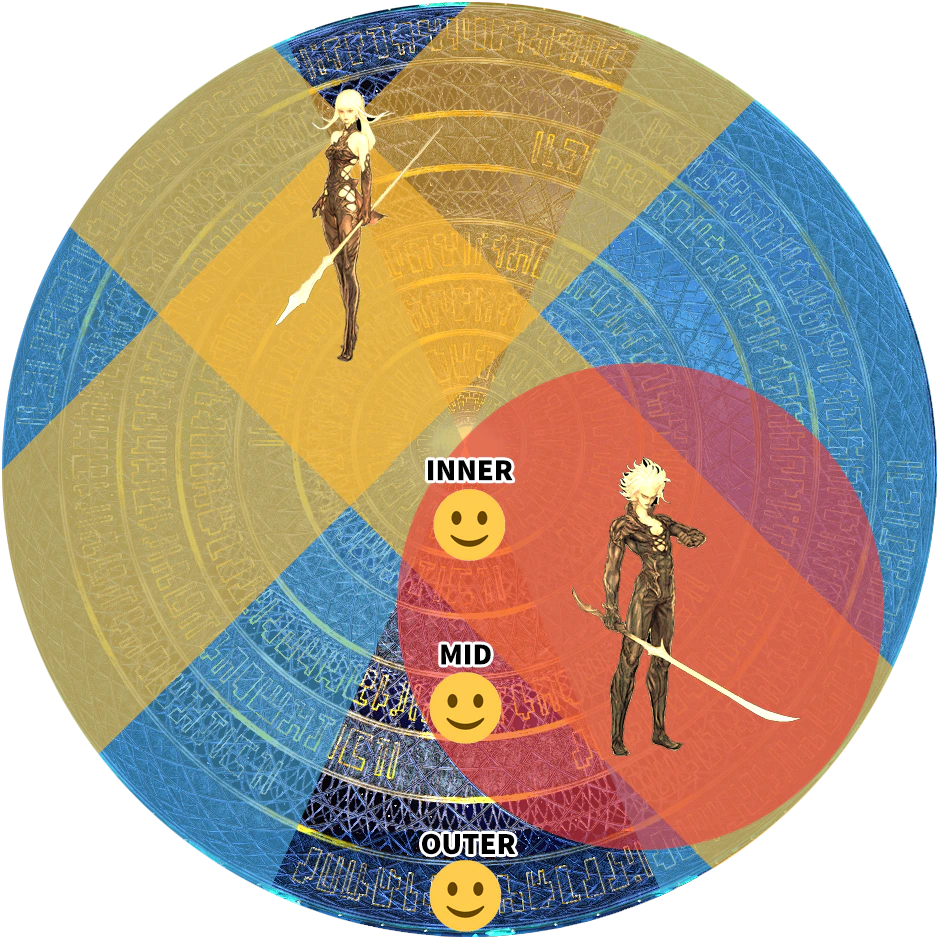
Players must then determine if the dodge is going to be an inner, mid, or outer dodge as shown by the diagram below:
Copy image link
The 2 cardinals adjacent to the safe clone will be the two possible safe spots after that. Final Omega will then point it's blades either North/South or East/West for it's cleave, leaving the one cardinal that is uncleaved to be the safespot.
Before the first dodge is made a 2nd set of clones will spawn. As Final Omega always cleaves the opposite cardinals of the first cleave, the 2nd dodge will always be a 90 degree dodge from the first position.
NOTE
If a pattern occurs where the safe spots have a large distance between them: Inner C to Outer B, players should pop Sprint to make the timing comfy as the cleaves happen in quick succession.
User sausoftheroll has compiled a list of possible dodges into a YouTube playlist:
WARNING
Anyone who fails to make this dodge will take HEAVY damage and be inflicted by a damage down debuff. To survive the hit, non-tanks require at least a shield.
After the dodges are resolved, Omega-F will become untargetable and disappear. Final Omega will then point a monitor at either true East or true West. Like before, two players must be hit by this monitor while the rest need to line up for the first Hello World section.
The two players that must be hit by the monitor are picked to be players with 2 stacks of Quickening Dynamis. Players with 2 stacks andSecond in Line take priority for this position.
If these players are not given the monitor position, they cannot line up for the 2nd Hello World as they will have 3 stacks of Quickening Dynamis and will get a 4th from their own Hello World debuff, forcing a wipe.
The party will then line up as seen below:
Copy image link
If you are not running AMs, the line up used in this strategy can prove awkward and difficult to pre-position for, so a different line up (such as in JP strats) can be used to make it more comfy.
NOTE
If solved correctly, 2 players will have 3 stacks of Quickening Dynamis and the remaining 6 will have 2 stacks of Quickening Dynamis.
Beetle Omega will then spawn on a random cardinal, and a second and final Hello World line up must be formed. The players with 3 stacks of Quickening Dynamis must take two tethers from Beetle Omega while the other 6 players position themselves as seen below:
Copy image link
NOTE
If solved correctly all 8 players will have 3 stacks of Quickening Dynamis.
Omega-F will then become targetable and do one last Solar Ray tank buster.
Omega-F must be below 20% health before she finishes casting her enrage: Blind Faith, which will knock back all players into the killzone at the edge of the arena before the cutscene plays.
NOTE
Where you are knocked back to is where you will begin the next phase. Everyone should be knocked to true South as mitigation is applied early in phase 6.
Players should move forward immediately to get out of the killzone.
This phase requires heavy mitigation on almost every mechanic.
TANK
Between every mechanic Alpha Omega will do 2 AOE auto-attacks. These will target the player with the highest emnity and the player who is furthest from the boss. The OT should stand outside the hitbox between mechanics to take these.
Alpha Omega will become targetable and immediately begin casting Cosmo Memory, which requires a tank LB3 to survive. Upon taking damage from Cosmo Memory, everyone's 3 stacks of Quickening Dynamis will be transformed to Brilliant Dynamis.
The Brilliant Dynamis buff allows every player to use a LB3 during the phase, as it will refund the gauge upon use. Once this limit break is used, Brilliant Dynamis will turn into Spark of Dynamis. Any player withoutBrilliant Dynamis or Spark of Dynamis will take lethal damage from any damage the boss inflicts.
WARNING
Brilliant Dynamis and Spark of Dynamis buffs are lost upon death so it is imperative players do not die during this phase until the very end.
Alpha Omega will then cast Cosmo Arrow (aka Exasquares), and will perform 1 of 2 patterns of AOEs. These patterns are referred to as plus (in), or square/box (out). These can be seen in the videos by user sausoftheroll below:
Plus Pattern
Box Pattern
Players must dodge these together at South West and mitigate as Alpha Omega will begin to cast Cosmo Dive as players are dodging the exasquares.
Cosmo Dive will target the furthest player away with a stack AOE, and the two closest players with tankbusterAOEs. So immediately after the final exaquare dodge the MT will move forward and to the left of Alpha Omega, and the OT will move forward and to the right. The rest of the party will stack on the 3 waymarker.
After 2 auto-attacks Alpha Omega will cast Unlimited Wave Cannon (aka Exaflares). Each player will stack under the boss to bait puddles, and move to the side of the first exaflare that spawned. They will then rotate into the exaflare and along the edge of the boss's hitbox until 6 puddles have been dropped.
NOTE
Sprint can be used on the 4th/5th puddle drop to help players reach their spots, and mitigation can be used on the 5th/6th puddle drop.
Wave Cannon will then begin casting. Players will run to their clock positions immediately after dropping the 6th puddle in Unlimited Wave Cannon.
During the Wave Cannon castbar 4 random players will be targeted for large line AOEs, then the other remaining 4 will be hit soon after. Players will then stack on C as Wave Cannon finishes casting, inflicting a high damage line stack. The 2 players at the front of the party will take increased damage, so tanks will take this position.
After 2 more auto-attacks, Alpha Omega will then cast another Cosmo Arrow. Players will have to split into groups of 2 on each intercardinal to dodge this pattern, as another Wave Cannon will be cast during Cosmo Arrow, requiring players to move to their clock positions during the dodge. DPS will be paired with a Support class during Cosmo Arrow, and DPS will dodge clock-wise, and Supports will dodge counter clock-wise.
After taking their line AOEs, players will stack on C as the Wave Cannon cast finishes.
Alpha Omega will then cast another Unlimited Wave Cannon followed by a Cosmo Dive. After the 6th puddle drop, the party will stay on the edge of the hitbox whilst tanks move in (MT left OT right) to bait the tankbusters.
Both melee DPS will use their LB3's after Unlimited Wave Cannon, and after two auto-attacks, everyone will group up under Alpha Omega as it casts:
The physical ranged player of the group will take the North waymark for this mechanic, with the MT moving to the North West waymark to replace them.
HEALER
After spreading to clock spots, the pure healer should be assigned the middle of the arena to help with heals.
Each player will get a large puddle AOE under them and they will spread to their clock positions. Several meteor adds will then spawn in a circle around Alpha Omega: 6 Cosmo Comets and 2 Cosmo Meteors that will wipe the raid when they land. The Cosmo Meteors will always be aligned on the North/South Axis.
NOTE
Players should be standing on the front edge of their waymark to ensure they receive healing.
The Caster will then LB3 the dead center of the arena to kill the Cosmo Comets and deal significant damage to the Cosmo Meteors. All 8 players will get hit by 2 sets of 4 Cosmo Meteors that will deal proximity damage to surrounding players. As soon as possible, the physical ranged player must LB3 Alpha Omega to cleave both Cosmo Meteors and kill them.
While they are locked in their LB3 animation, 3 random players will be marked with flares. If the physical ranged player does not have a flare, the party will stack on them (the A waymark). If they do have a flare, the party will stack on the opposite side of the arena (the C waymark). The flares will spread to the other 3 cardinals that the party is not stacking on.
A random non-flare player will then be targeted with a non-telegraphed stack that will be soaked with the party.
HEALER
Healers will top up everyone to full for the very last time after cosmo meteor, as there is no more lethal damage after this point.
Alpha Omega will then cast the first Magic Number. Tanks must LB3 this to survive. Shortly after the hit a 6s Magic Number debuff will be applied to the party, killing the player once the debuff falls off. This debuff is cleansed by a healer LB3.
NOTE
Although I said before that it's important to not have players die in p6, there is an exception. DRK is able to click off the tank LB3 for both magic numbers, and get resurrected by the healer LB3. This results in no weakness and full mana when they are resurrected, netting a DPS gain.
HEALER
Healers should wait for the debuff to actually appear before casting their LB3, as Magic Number takes a second or two to apply after the initial damage goes out.
This set of mechanics repeats twice, until Alpha Omega casts the final enrage:
 →
→  →
→  →
→  that will deal significant damage to the player inside.
 can help but isn't required.
 and be unable to damage Omega-F. If a player is close to F the opposite happens.
 or Remote Glitch
  . Each player is also assigned 1 of 4 coloured symbols above their head, with two of each.
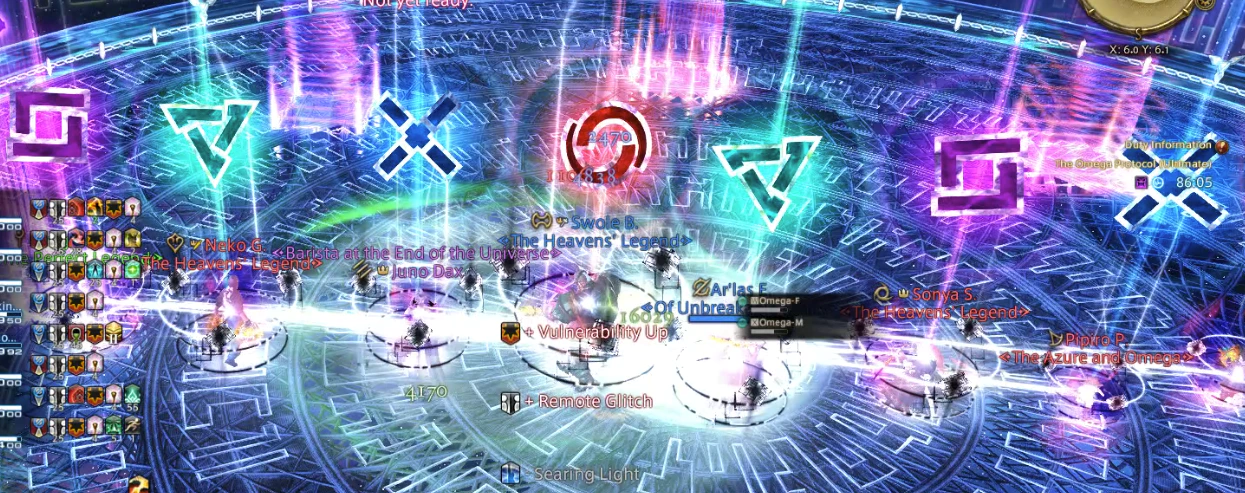
 , 2 players with High-powered Sniper Cannon Fodder (stack)
  and 2 players will not be assigned a debuff.
 . Use the mitigation sheet provided, and allow the shield healer to get dead center of the arena to mitigate damage before each Latent Defect.


to remove. Failure to do so results in death.


 /
/
 /
/
 to be inflicted on each player.
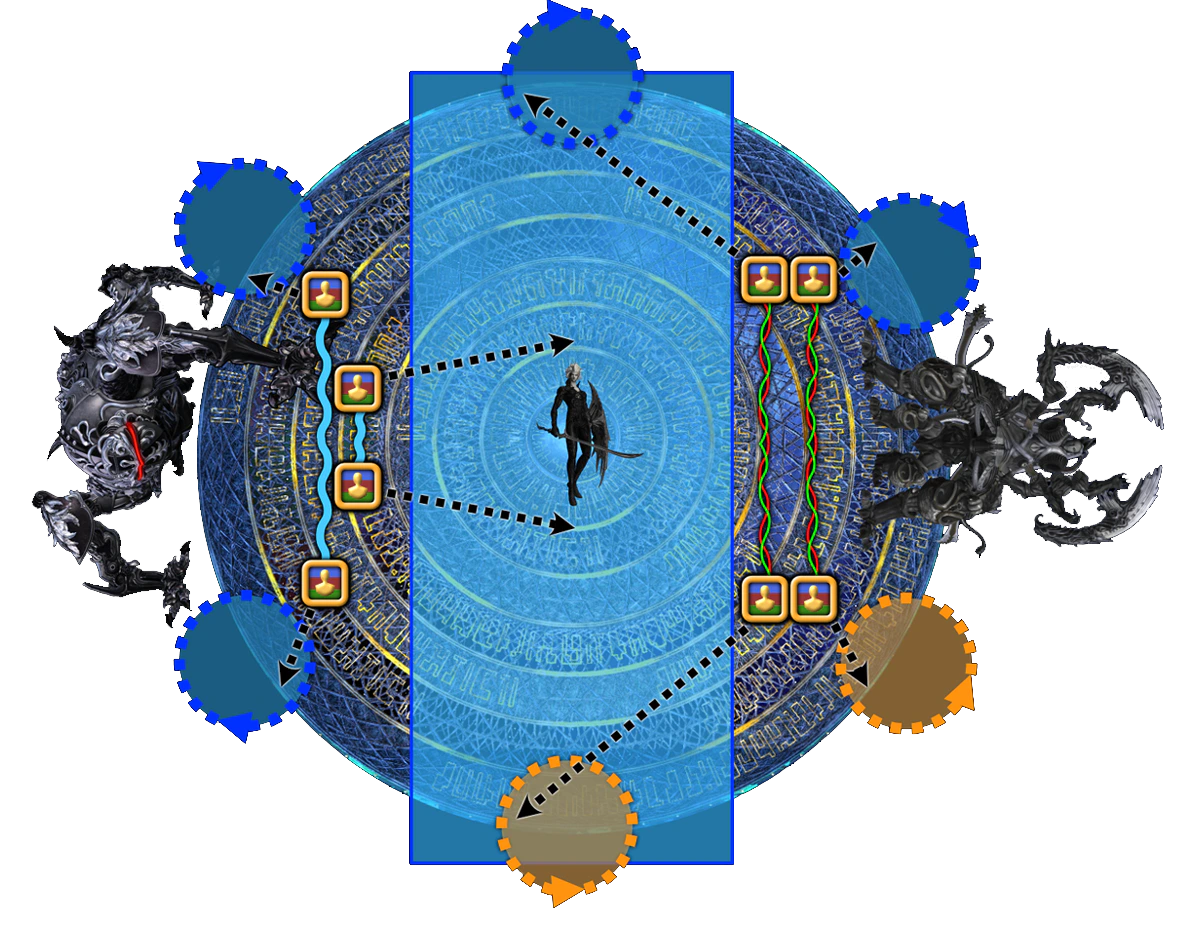

 and the other Hello, Near World
  .
.
 .
. . Any player without Brilliant Dynamis
  debuff will be applied to the party, killing the player once the debuff falls off. This debuff is cleansed by a healer LB3.