 Dragonsong's Reprise (Ultimate)
Credits
- Written guide by Juno
- Diagrams by Juno, MUR, Tessan Twintails
Table of Contents
- Toolboxes
- PoVs Videos
- Mitigation Plan
- Macros
- Mitigations
- Cheatsheet
- Buff Timings
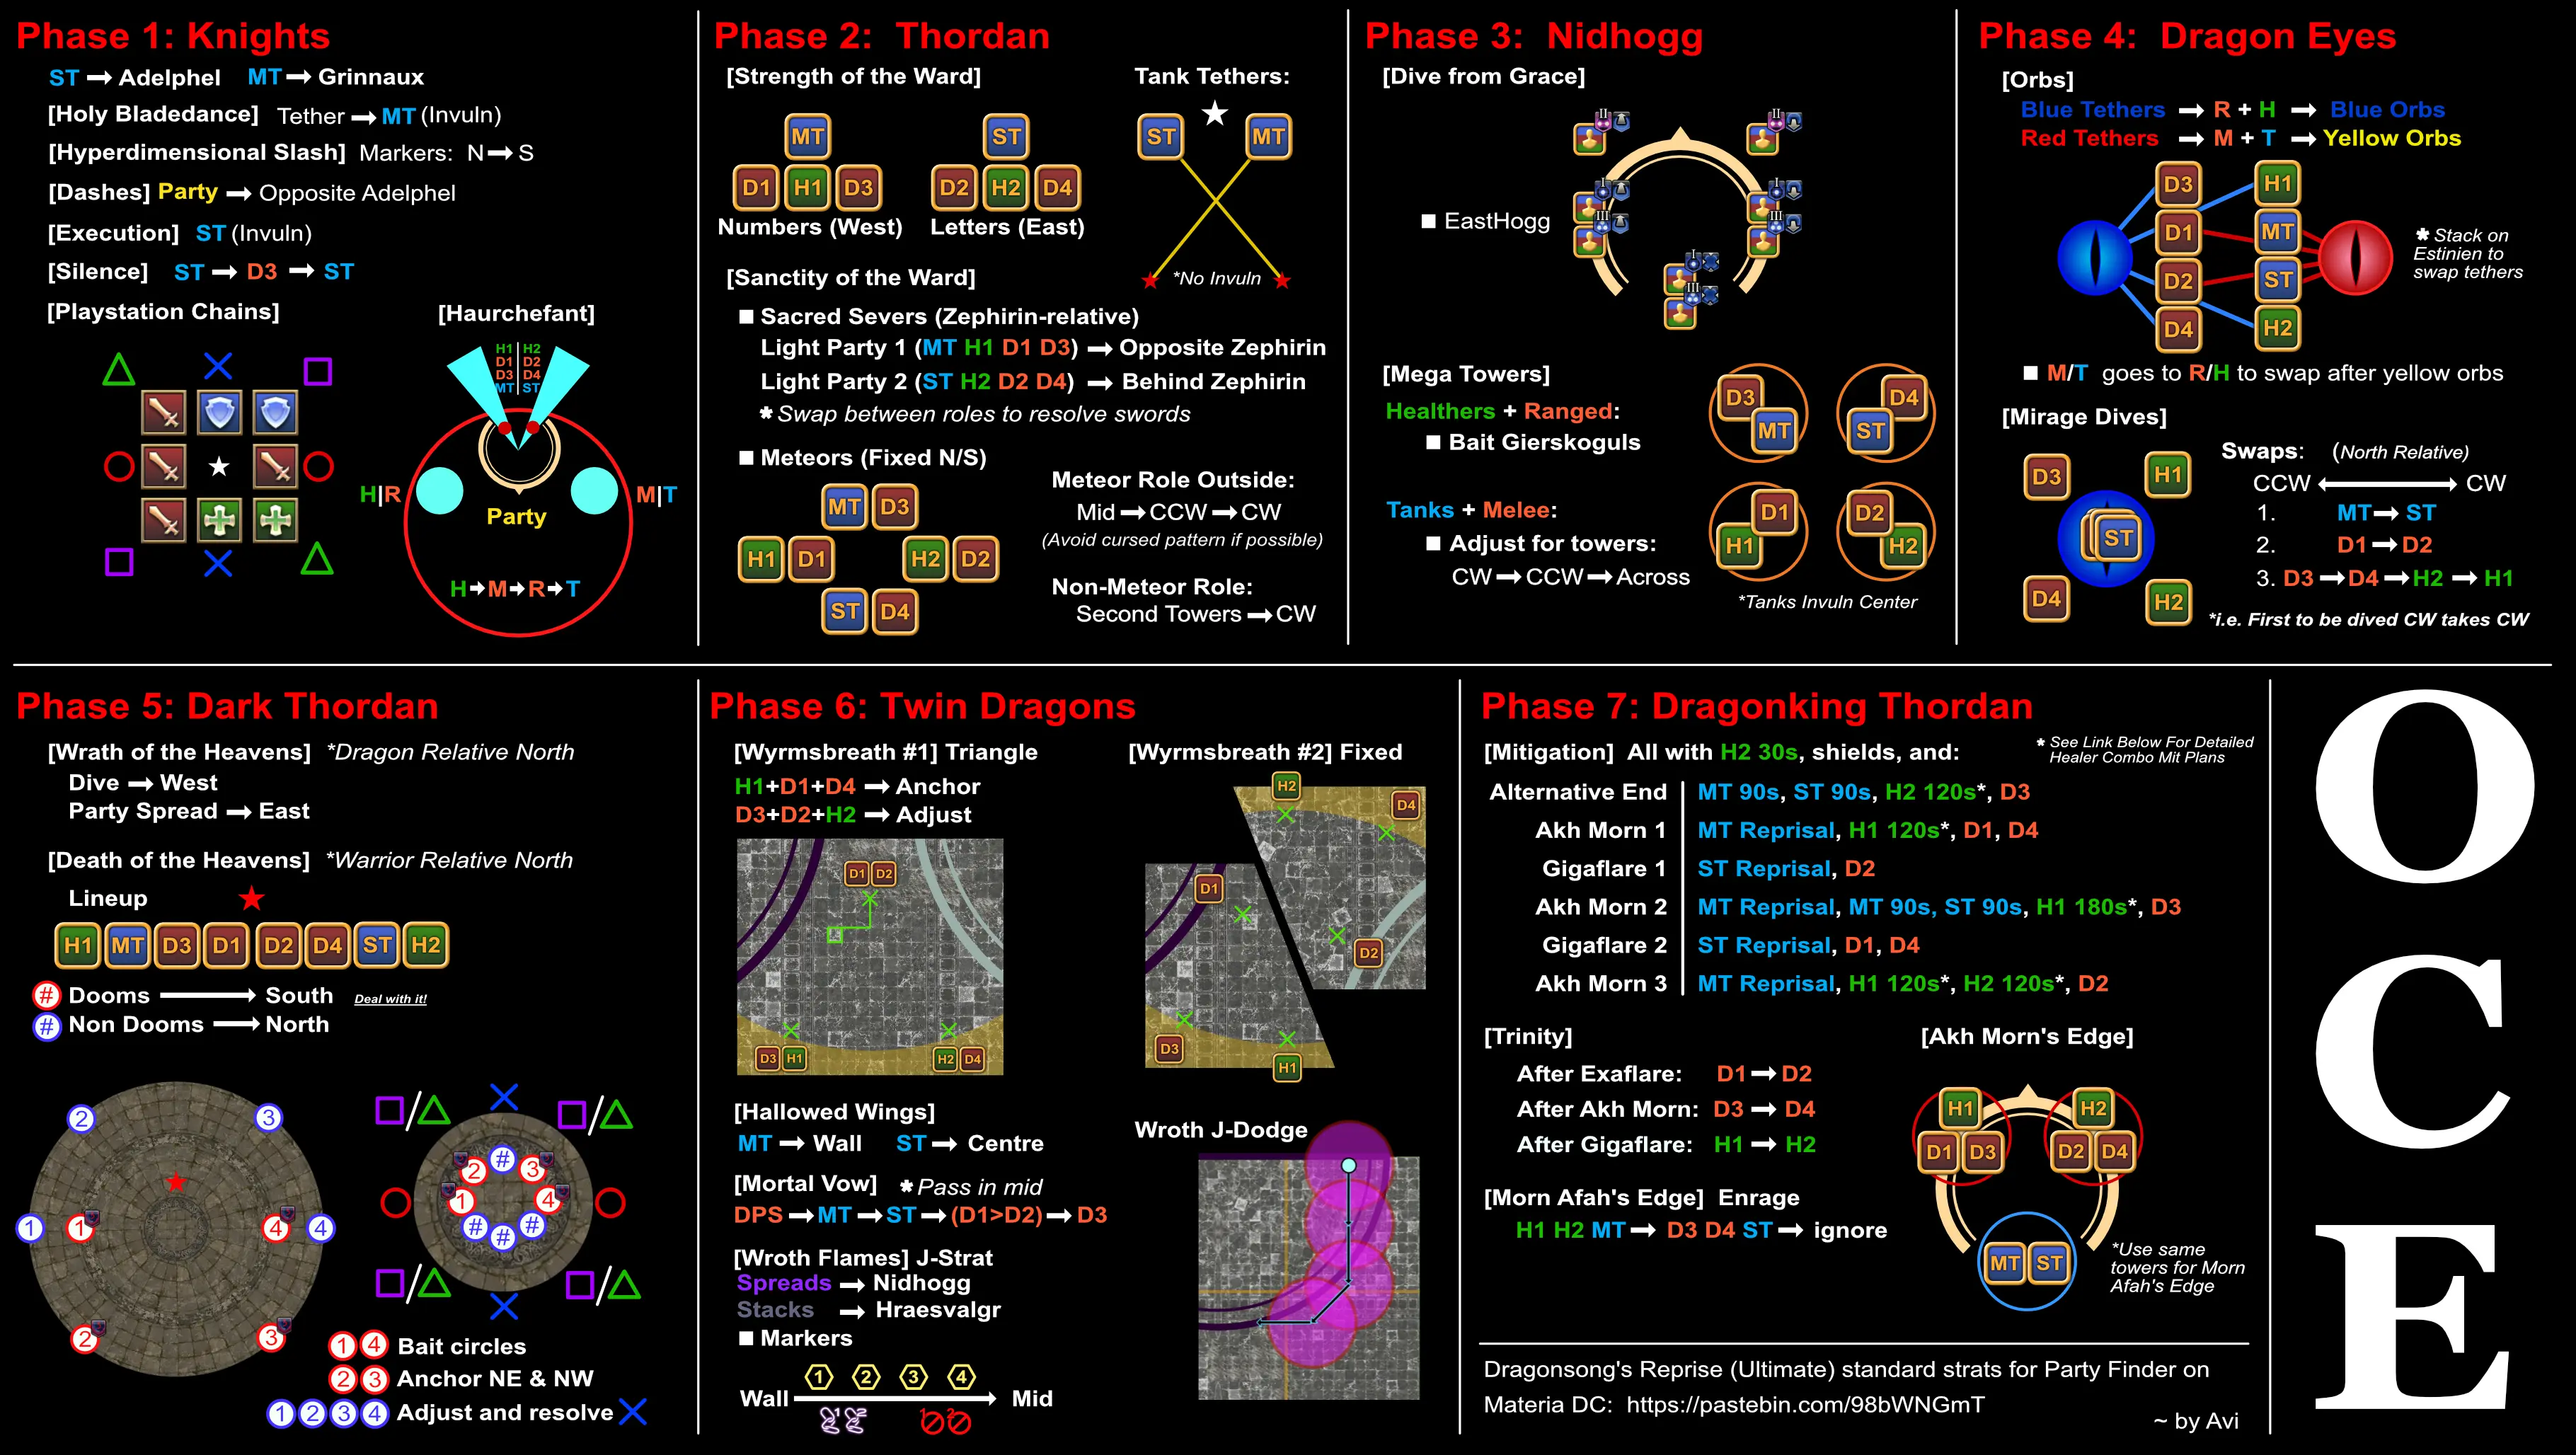
- Phase 1: Knights
- Phase 2: Thordan
- Phase 3: Nidhogg
- Phase 4: Eyes
- Intermission
- Phase 5 - Dark King Thordan
- Phase 6: Double Dragons - Nidhogg & Hraesvelgr
Toolboxes
Toolboxes are an interactive guide that allows you to click through each phase indiviudally and review the mechanics in a easy to understand manner.
Phase 1: Knights Phase 2: Thordan Phase 3: Nidhogg Phase 4: Eyes Phase 5: Dark Thordan: Wrath Phase 5: Dark Thordan: Death Phase 6: Double Dragons Phase 7: Dragon King Thordan
PoVs Videos
Videos covering clears by different roles.
Mitigation Plan
Mitigation Plan Spreadsheet
Macros
View All Macros
Playstation Chains
――【Playstation chains】――――――――――――――――――
  D△  T× T□
  D〇   D〇 west: D1>2>3>4: east
  D□  H×  H△
Haurchefant
――【Haurchefant】――――――――――――――――――
   cleave cleave   ※ cleaves towards
  H/R AoE ★ T/M AoE   ring (True South)
      party
 East cleaves: H1 > D1 > D3 > MT
 West cleaves: H2 > D2 > D4 > ST
Mitigations
View Mitigations
――【Mitigations】――――――――
3-3-2 Mit Plans

Transition, every Akh Morn, and every Gigaflare require Kerachole/Sacred Soil. The correct timing for an Akh Morn kera/SS is immediately after the second trinity in exaflares; this will ensure it catches all of akh morn and will be up for the subsequent giggleflare.

==========================
SCH/AST:
/p transition: HoL, missionary, samba, improv, collective, spreadlo
/p akh morn 1: barrier, feint 1, addle, fey illum
/p gigaflare 1: expedient, seraph, feint 2, collective, neutral
/p akh morn 2: HoL, missionary, samba
/p gigaflare 2: feint 1, addle, collective, spreadlo
/p akh morn 3: expedient, seraph, neutral, feint 2, barrier, fey illum
==========================


==========================
SCH/WHM:
/p transition: HoL, missionary, samba, improv, spreadlo
/p akh morn 1: temp, feint 1, addle, barrier, fey illum
/p gigaflare 1: expedient, seraph, feint 2
/p akh morn 2: HoL, missionary, samba, bell
/p gigaflare 2: spreadlo, feint 1, addle
/p akh morn 3: temp, expedient, seraph, feint 2, barrier, fey illum
==========================


==========================
SGE/AST:
/p transition: HoL, missionary, samba, improv, barrier, collective (USE PERSONALS, IF NO RDM USE HOLOS)
/p akh morn 1: panhaima, feint 1, addle, physis
/p gigaflare 1: feint 2, holos, collective, neutral
/p akh morn 2: HoL, missionary, samba, barrier, physis
/p gigaflare 2: feint 1, collective, addle, pneuma
/p akh morn 3: panhaima, neutral, feint 2, holos, physis
==========================


==========================
SGE/WHM:
/p transition: HoL, missionary, samba, improv, barrier (USE PERSONALS, IF NO RDM USE HOLOS)
/p akh morn 1: panhaima, temp, feint 1, physis, addle
/p gigaflare 1: holos, feint 2, pneuma
/p akh morn 2: HoL, missionary, samba,  barrier, bell, physis
/p gigaflare 2: feint 1, addle
/p akh morn 3: panhaima, temp, holos, feint 2, physis, pneuma
==========================
Cheatsheet
View Cheatsheet
Buff Timings
Fight Writeup (W.I.P)
Guide written by Juno
As a starter, a lot of the mechanics in this fight will cause Damage Down if solved incorrectly. This debuff reduces your damage by about 50% and it is common practice to wall IF IT IS SAFE TO DO SO, as the damage loss from resurrection weakness is less than damage down.
Phase 1: Knights
This phase begins with two targetable bosses: Adelphel and Grinnaux. Once pulled, tanks will stack the bosses and the party will stay south.
As Adelphel goes untargetable soon after the phase starts, players should spend their buffs and openers on him. Throughout the phase both bossess should be kept as similar health as possible.
After a Holiest of Holy raid wide Grinnaux will cast Empty Dimension, forming a donut AOE centered on him. At the same time Adelphel will cast Holy Shield Bash, a tethered AOE tankbuster that is targeted on a random player. The MT must walk through this tether and bring it north of the bosses to take the tankbuster with invulnerability. At the same time the party will take a Heavensblaze stack at the south.
After this stack and tankbuster combo, Adelphel will become untargetable and Grinnaux will cast:
Hyperdimensional Slash
Grinnaux will then target 4 random players with a line AOE. This AOE will drop a purple portal on the edge of the arena wherever it was aimed, and if two portals are too close to one another they will tether to eachother and wipe the raid. Similarly, if a player stands too close to a portal they will become tethered and die.
These 4 players must spread to the north of Grinnaux at max melee, where they will take a line AOE. The positions each player will take are designated by waymarks.
At the same time as the prey markers move north, the remaining party members will stack south of Grinnaux and take a large conal AOE stack that gets baited on a random non-prey player.
Image taken from Tessan Twintails DSR video guide
This process repeats twice, where the 2nd set of prey markers will instead spread south and the initial prey players will stack north.
Adelphel will then drop down onto a random cardinal and cast another Holiest of Holy and Grinnaux will cast Faith Unmoving which will knock players away from Grinnaux (who is still in the center of the arena). Players will use anti-knockback and position themselves so Grinnaux is between them and Adelphel, as Adelphel will then begin to dash across the arena in an hourglass shape.
Adelphel will start this dodge by either moving left or right, and the party will move the same direction and stand on the tip of an arrow shaped pattern in the arena . (I’ll try get a video for this - Juno)
After completing his dashes, Adelphel will drop onto the player who had the highest emnity on him before he dissappeared, delivering a heavy hitting AOE tank buster that the OT will invuln. To avoid hitting the party with this, the OT will follow the party to the safe spot and then continue moving past the party.
Adelphel will then immediately begin casting 1 of 3 instances of Holiest Hallowing, an interruptible heal targeted on Grinnaux. The OT will interrupt this and both tanks will position their bosses in the center of the arena for:
Playstation Chains
Each player will be marked with either a cross, square, circle, or triangle, so that there is two of each symbol.
Healers can only ever get Cross or Triangle, Tanks can only get Cross or Square, and DPS can only get Square, Circle or Triangle
The party will form around Grinnaux in the pattern seen below, and be knocked back by another Faith Unmoving to break their tethers. If unbroken, the resulting AOE will kill any players who have not resolved their tethers.
A warning to warrior players; Inner release is perfectly timed in this phase to be up as this mechanic is resolving. This means that you’ll be immune to knockback and therefore unable to resolve your tether. You can either prepull inner release earlier in the fight, or simply click the Inner Strength buff off during this mechanic.
Immediately after this is resolved, the 2nd Holiest Hallowing cast will begin, and the ranged player (or main tank) will interrupt the cast. Both bosses should be stacked middle again for another Holiest Holy and either an Empty or Full Dimension. If it is Empty Grinnaux will do a donut AOE around him like before. If it is Full, move away from Grinnaux as he will cast a large circular AOE centered on him.
The final Holiest Hallowing will be interrupted by the OT again. At this point, if one of them dies before the other, they will begin to cast their enrage: either Bull’s Steel or Brightblade’s Steel. As such both bosses must be killed at roughly the same time.
After dropping their health to 0%, they will immediately become untargetable. Grinnaux will then holmgang the entire party to the western side of the arena, chaining them in a small circle. Attempting to leave this circle will kill the player immediately.
A new boss Charibert will then appear at the southern side of the circle and begin to cast Pure of Heart, the enrage of phase 1.
Pure of Heart
Haurchefant will run to the side of the circle and block an arrow. This arrow pulses intermittently, dealing damage to the party.
Charibert will then cleave the two players closest to him, applying a 5s debuff Skyblind. Once this debuff wears off, an invisible AOE will drop under the players feet that will explode after a few seconds. To resolve this, we have players bait in the order H → M → R → T, where the ranged players will drop their AOEs on the east and the melee players will drop them on the west.
Once Charibert is reduced to approximately ~25-30% health, the DPS check is reached and as long as one player survives the transition the party will receive a checkpoint.
Phase 2: Thordan
Phase 2 will begin with the MT facing Thordan north for 2 auto-attacks before he will begin casting Ascalon’s Mercy, a baited protean on every member of the party. The party will stack up behind Thordan before dodging to the side to avoid the cleave.
The tell to move for this attack can either be the end of the castbar, or when Thordan raises his sword slightly.
Thordan will then slash 3 times at the Main Tank with a tank buster Ascalon’s Might.
Due to the mit plan that MUR PF uses, if the MT is a WAR they can use their invincibility here for free.
After moving to the center, Thordan will cast the first trio of the fight:
Strength of the Ward
Thordan will become untargetable and jump from the arena, and both Light parties will split East/West.
3 Knights will then cleave 3 random cardinals/intercardinals, leaving only 1 safespot either side of the arena.
The way that the waymarkers are set up means that Light Party 1 will always be on a number waymark, and Light Party 2 will always be on a letter waymark. Two waymarks on opposite sides of the arena will also be the same colour, allowing us to simply call out a single colour to determine both safe spots.
In the image above we can see the purple, yellow, and blue waymarks have knights on them. Thus we can simply call out “Red” and both parties will know where they have to go.
Within both of those safespots, each light party will have to spread to avoid overlapping lightning AOEs that are about to drop on each player. These lightning AOEs will go off at the same time as the dashes go off.
While the parties are getting into position Grinnaux and Thordan appear again, with Grinnaux being placed somewhere near the center of the arena and Thordan in the direct center. After everything resolves Grinnaux will begin to cast a quake that will expand out towards each light party. Avoiding this is simple, just waiting until it is safe to walk forward and doing so.
While the party is dodging this, Thordan will cast another Ascalon’s Mercy. Each light party must quickly make their way toward Thordan and stack up tightly on either side of him to bait the proteans.
Thordan will then jump again and land on a random cardinal or intercardinal, as well as 2 other knights dropping onto the arena. For this section of the Trio we will treat Thordan as our new north.
Thordan can be tricky to find here if you’re spinning your camera around. What you should do instead is look at the 2 knights, who will always be further away from and facing Thordan.
3 players will then get marked with a large blue defamation marker (named Skyward Leap), and large red puddles will begin to grow on the ground. Each of the 2 knights will also tether two random non-tank players (who do not have Skyward Leap) with Holy Shieldbash/Bladedance.
Everyone who was not marked with Skyward Leap should quickly find Thordan and make their way to him. The Tanks will take their respective tether (MT left knight facing Thordan, ST right knight facing Thordan) and criss-cross them into the safe spot under Thordan to stretch them further for reduced damage.
The relative West and East Skyward Leap players should stand on the edge of the waymark as seen in the image. If you stand in the middle of your waymark you are likely to kill one of the Tanks next to Thordan.
Just before everything goes off, 6 towers will appear in the middle of the Arena that must be soaked by every player other than the tanks.
The 3 non Skyward Leap players should line up against the wall below Thordan to indicate which tower they are taking before standing together for a stack that will be shared with both tanks.
Each Tank can stand in front of their respective knight to ensure they are the one to grab the tether, before using sprint to comfortably make it to the safe spot.
Each player will then walk forward into their respective tower and soak the damage. If one tower is missed a high amount of damage will hit the party, likely wiping the group.
Thordan will then drop into the center of the arena and cast Ancient Quaga and heavy hitting raidwide, followed by Heavenly Heel into Ascalon’s Mercy. Heel inflicts a slashing resistance down debuff, requiring a tank swap.
He will then begin to the cast the next trio of the fight:
Sanctity of the Ward
Thordan will then leave the arena and 2 knights will drop down near the center, on opposite sides to each other. These knights can either be facing clockwise or counter-clockwise, which will determine the way they are about to dash across the arena. A third knight will also spawn on one of the waymarks near the outside of the arena.
The knight at the edge of the arena will then target 2 people for distance-based stacks, indicated by either a single sword or 2 swords above the players head. The player with 2 swords should move behind the third knight, and the single sword player should move to the opposite side of the arena on the same axis as the knight (i.e. if the knight spawns on a blue waymark, the single sword moves to the opposite blue waymark).
Each stack will move 4 notches in the same direction as the knights (CW/CCW). This will leave the party in the 1st of 2 safespots as part of the dashes. After the cleaves go off around them the party will move to 4 notches before the next waymark for the next safe spot.
Just before these stacks and cleaves go off, Thordan and a large red eye that appeared around the arena will perform a gaze attack that must be avoided.
(Diagram for safespots :3)
After the last AoEs resolve, various knights will appear around the arena alongside thordan, preparing to cast various new mechanics in tandem. This set of mechanics is referred to as:
Meteors
Players should split off into pairs on each of the cardinals as per the cheatsheet (MT/D3 N, OTD4 S, H1D1 E, H2D2 W), standing between the AOEs that have spawned on the intercardinals. 2 players will be marked by “Meteors”, a small red arrow above the players head. These 2 players will ALWAYS be part of the same role. The role that gets the meteors is deemed as the “priority” role.
The meteor players will position themselves North and South, swapping with the same respective role player that is already positioned there. Generally the meteor players should try and go to N/S cardinal that is clockwise of them, however this rule isn’t always followed.
Each pair should stand roughly halfway between the centre of the arena and the edge of the arena to bait a set of partner stacks that will leave a puddle of ice that will inflict a short “Ice Resistance Up” buff for a moment, allowing you to quickly move out of the puddle before it applies a heavy frostbite DOT. The large orange AOEs on the intercardinals will also turn into fire puddles when the stacks go off, leaving the middle of the arena unable to access the outer ring and vice versa.
While everyone is moving to their positions, 8 towers will spawn. Some of these towers will be on the outer edges and some in the middle of the arena. If only one tower is available on the outer edge of the arena in a pair’s quadrant, the priority role (i.e. the one with meteors) should take that tower, and the other player should move into the middle of the arena to soak the tower clockwise from where they baited their puddle. If 2 towers are available on the outer edge of the arena the priority role will take the left most tower, and the non-priority role will take the right most. However this rule is a bit flimsy and most often people will just move to the left/right beforehand to indicate which tower they will take.
The meteor players can be a little different with which towers they want to take. The meteor debuff they both have will cause 8 meteors to drop down on them one at a time. If any of these meteors are close to eachother they will explode and wipe the raid. As such, we want the meteor players to be the furthest distance possible from eachother.
In an ideal world this means that each meteor player will take a tower that results in them being 180 degrees from eachother. However it doesn’t always pan out this way as the tower positions are semi-random, resulting in 2 other patterns where one meteor player will be closer to the other, about 150 or 120 degrees. The 120 degree pattern is colloquially known as “cursed”.
To avoid these patterns as much as possible, each meteor player will look at the other and indicate to take a tower to give the largest gap between the two. Once you inevitably get one of these patterns, the player on the “short” side, will have to: Follow the curve of the inner AOEs to use up as much space as possible, and if the pattern is cursed employ stutter stepping to pace out the meteors correctly. This can be difficult at first as the meteors will drop very close to eachother. Fortunately this pattern is pretty unlikely.
After the initial tower soak both meteor players will start moving clockwise around the arena. 8 more towers will spawn on each cardinal and intercardinal and after about 5/6 meteor drops Faith Unmoving will be cast. All outside players will use Anti KB, and all inside players will ride the knockback into their respective tower. The towers each player will take depends on the initial safespot they started from. Priority players will take the cardinal tower, and the Non-priority players will take the tower 1 clockwise of the starting safespot. Both Meteor players will end up in the opposite North or South tower.
After these towers are resolved, Thordan will drop down at true north and begin to cast a heavy hittind raidwide: Ultimate End. After this, Thordan gains a “discomposed” debuff, causing him to take 30% more damage. He will then cast Broad Swing twice in a row at a random player, where the party will stand behind him and move into the first cleave.
Thordan will then cast his enrage: Atheric Burst.
Phase 3: Nidhogg
This phase begins with a HEAVY raidwide attack and should be mitigated appropriately
Nidhogg will drop down and begin auto-attacking the main tank, before casting:
Dive from Grace
This mechanic is one of the first “walls” of this fight, and can be difficult to wrap your head around/remember all the roles. I recommend to watch videos of solves and also to review the toolbox above.
As the cast begins, a bunch of numbers will apply to the party:
- “1” x3 (put the symbol here)
- “2” x2 “
- “3” x3 “
Players will preposition in the following locations to indicate their starting position depending on their number.
After the cast is finished (~5 seconds later), a second set of debuffs get applied to each player:
- Dark High Jump (Circle)
- Dark Elusive Jump (Down Arrow)
- Dark Spineshatter Dive (Up Arrow)
The numbers players are assigned are the order that each player will be “dived/jumped” on by Nidhogg: 1->2->3 Whilst the second debuff will be what kind of dive/jump Nidhogg is performing.
After getting dived the player will leave behind a tower that needs to be soaked by someone else, as both the dive and the tower inflict a “Fire Resistance Down II” and a “Physical Vulnerability Up” debuff.
The type of dive that Nidhogg performs will indicate where that tower is going to be placed. I think of the arrows as if they push the tower in one direction, i.e. If I were to have an Up Arrow, my tower would be pushed the distance of Nidhoggs hitbox away from me in the direction I’m facing. No matter whether players have arrows or no arrows, we always want to place the towers on the East/West/South of Nidhogg’s hitbox due to another upcoming mechanic.
OCE uses the “Easthogg Strat” I.e. we solve the arrows in such a way that all arrow players can simply face east (as long as they are in the correct position) and the mechanic will resolve.
(Diagram for easthogg arrows)
As seen above we place the Up Arrow West, and the Down Arrow East. If both these players look east the towers will end up on the sides of Nidhogg’s hitbox. If a set of numbers does not have arrows, they will use the positions they indicated when the numbers first went out.
The order that the numbers will soak the towers is as follows:
(using their previously indicated positions, or their arrow positions)
- 3rd dive players will soak the towers dropped by 1st dive players
- East and West 1st dive players will soak the towers dropped by 2nd dive players
- 2nd dive players and the South 1st dive player will soak the towers dropped by 3rd dive players
Upon soaking a tower, a Nidhogg clone will drop down and aim a line AOE at that closest player. Simply bait this out of the arena, and when Nidhogg glows, step through Nidhogg to avoid being hit.
In addition to all these mechanics, while the first and third set of towers are preparing to be placed, Nidhogg will begin to cast either Lash and Gnash (in then out) or Gnash and Lash (out then in). On the cast finish, Nidhogg will cast a party stack on one of the players not currently placing or soaking a tower, as well as performing either Lash or Gnash (whichever was first on the castbar), followed by the opposite.
The sets of towers will be dropped when the cast is finished, and the towers will resolve just before the 2nd Lash/Gnash.
The snapshot timing for the first attack is on the cast finish, so you’re safe to walk through the boss before the animation goes off.
While it is possible to live getting hit by Lash/Gnash, it will knock the player back away from Nidhogg and apply a damage down debuff. At the time of writing the P3 damage check isn’t incredibly tight, but with only a few damage downs it may be impossible to beat the damage check.
Enumeration Towers
Immediately after this mechanic, the tank will take a few more auto-attacks before casting Drachenlance on a random player, which is a short conal AOE that will deal lethal damage to anyone hit.
4 towers will then spawn on each intercardinal around Nidhogg. As seen in the cheatsheet, all players will stack with their partner to begin with. In all but 1 pattern, each Tower will need a different number of people in them, the amount of which can be determined by the number of pillars in the tower. As all the ranged players anchor in their spot, if the melee player sees that only 1 person is required in the tower they start on, they will flex to another tower using the priority clockwise, then counter-clockwise, and lastly across the arena.
These towers will drop clones similar to the ones in dive from grace, however one of the clones will have a tank buster tether. The main Nidhogg in the middle will also have a tether and both tanks will take a tether each and invuln the buster in the center of the arena.
The Main tank will then face Nidhogg south and continue to take auto-attacks. After one more south-facing drachenlance, Nidhogg will cast his enrage: Revenge of the Horde
Phase 4: Eyes
Tanks should communicate which eye they are taking before this phase, as each eye deals auto-attacks. Generally in OCE, MT takes the Red eye, and OT takes the Blue eye.
Everyone will begin this phase by grouping on top of Alphinaud as he walks into the arena.
Alphinaud and a random party member will be given a buff that applies to everyone in a short range, hence why we stack up. These buffs: Soul of Devotion and Soul of Friendship allow players to damage the Blue and Red eyes respectively. The buffs are also lost upon death.
Ranged should begin to focus on the Red eye, and melee should focus on the Blue eye
Estinien will cast a heavy raidwide and bleed: Resentment
Hatebound
Tethers will randomly get applied to the party in such a way that there is 4 blue and 4 red tethers, attached to their respective eye. Taking damage while having a blue tether will heal the blue eye, and taking damage with a red tether will damage the red eye.
At the same time a large yellow orb will appear in front of either eye, and 2 smaller blue orbs will spawn to the sides of each eye.
Tethers are able to be swapped by standing on a player of the opposite colour, so be careful not to accidentally swap by walking on top of other players. In this strat, we want all melees (MT, ST, D1, D2) to begin with red tethers. If a melee does not start with this colour, they will walk to the middle of the arena and stack on Estinien. The ranged player that has the wrong colour will do the same, allowing both players to swap and receive the right coloured tether.
Supports will move to the Red eye and DPS to the Blue eye as seen below:
(Image)
Once the yellow orb grows twice, all melee will walk into it together to take a pair stack. Afterwards, they will split and stand on top of their ranged partner, swapping tethers before moving to the middle. The ranged players will wait for their orb to grow twice, before walking into it. Everyone will then move to the Blue eye. All red tethers (now ranged players) will stand in a square-like formation around the eye, and all the melee will stack under the eye.
Mirage Dives
Nidhogg will dive 2 random red tether players 4 times in a row. Each hit player must be swapped with to ensure they won’t be struck twice and instantly killed as the dive applies a vuln up.
Around 38-40% HP on the Red eye, ranged should swap to the Blue eye.
Finishing all these dives and having good damage will result in both eyes dying before they cast a final Steep in Rage cast. If both eyes are alive during this, the party will wipe. If the Red eye is alive during this, it will resurrect the Blue eye so it’s important to keep an eye on it to mitigate possible wipes.
Intermission
Intermission is a run back of the Pure of Heart mechanic from Phase 1 with some key differences.
Most importantly, Haurchefant will now be targetable. However he has a “HP Recovery Down” debuff. To remove this, a tank must use Limit Break 3, allowing Haurchefant to not only take significantly reduced damage, but also allowing him to be healed.
Either tank should LB3 as soon as Haurchefant appears. (This also works roughly after your 2nd GCD on Charibert).
Healers should keep an eye on Haurchefant throughout the entire mechanic. You want him to be almost, if not full health before the final Pure of Heart raidwide, as it will do significant damage. A WHM can save benediction for this, simplfying the healing greatly.
Following the same H -> M -> R -> T order as phase 1, players will resolve the mechanic and then face an additional DPS check on the Spear of the Fury that Haurchefant is currently blocking. Successfully defeating the spear before it casts Pierce allows players to continue on to phase 5. If unsuccessful, the party will be sent back to phase 2.
Phase 5 - Dark King Thordan
After 2 AOE autoattacks, Thordan will begin to cast:
Wrath of the Heavens (WOTH/Wrath)
Thordan will become untargetable, and 2 knights and a dragon will drop down on a random cardinal/intercardinal. This will become our new north.
A player will then be marked with a blue defamation marker and 2 players will be marked with 2 line-AOEs, indicated by orange tethers coming from the knights.
The tether players will pull these tethers across the arena from their knight, and the defamation will stand near the western knight.
Tether players can use the line markings in the arena to line up their tethers. The defamation can similarly count 2 lines from the waymark to the west of the knight to ensure they don’t clip the tether player.
The rest of the party should spread along the relative east wall. During this, the dragon will have been casting Twisting Dive, and all players should move towards the center of the arena to avoid any twisters that appear under them (or others).
For the timing of twisters you can either look at the dragon or the orange tethers stretching through the arena. As soon as the dragon moves (shortly after when the cast finishes), or the tethers disappear is when you should move to avoid twisters.
As Twisting Dive is going off, two more knights and thordan will drop into the center of the arena. After avoiding the twisters, players should spread on their side of the arena for an upcoming protean. A non-tether/defamation player will then be marked with dive bomb and should run to the wall behind the knight with a staff to bait it.
This effectively splits the party into 2 groups. 4 players who have done a mechanic, and 4 which haven’t.
After a protean slash from Thordan a random non-mechanic player will be targeted with 5 consecutive Liquid Heaven baits, and a random mechanic player will be targeted with 4 Eruption baits. 2 random players (these can be the same players as above) will also be targeted with lightning AOEs.
(video of baits)
It is very important that players stay on their side of the arena here. All mechanic players will have a Magic Vuln debuff which means that they will instantly die upon touching a Liquid Heaven.
Everyone will then make their way to the warrior as he will shortly cast a donut AOE. Everyone should stack near Thordan, whilst the two lightning AOEs should spread near the rear of the donut AOE to form a “Mickey Mouse” style shape.
Both bait players should not overlap their baits on top of the warrior to make room for the rest of the party. It is possible to walk away from the safe spot and loop back around in time to the safe spot.
After this is resolved, Thordan will cast an Ancient Quaga raidwide, followed by 2 more AOE auto attacks and another Heavenly Heel into Ascalon’s Might tank buster.
Due to the mit plan that MUR PF uses, if the MT is a WAR they can use their invincibility here for free.
Thordan will then cast:
Death of the Heavens (DOTH/Death)
This mechanic has a lot of moving parts, I highly recommend looking at POVs and toolboxes.
Thordan will go untargetable and jump to the arena’s edge, summoning his eye. Several dragons and a knight also drop onto the arena’s edge. Another knight wielding an axe will drop into the arena, slightly offset from the centre towards a cardinal/intercardinal. This knight is our new north.
The party will immediately line up as follows:
_Knight_ H1 MT D3 D1 D2 D4 ST H2
Four random players will be selected with a visible red Doom debuff that lasts for 26 seconds, killing the player if it is not cleansed. Any player who has not got a Doom will shortly drop a Doom cleaning puddle. Because of mechanics coming up, we want to spread these at west/east and the northern intercardinals.
Looking at our line up, each player must determine what number they are counting from left to right. As OCE does Dooms south, each Doom player will position themselves 1-4 along the relative south wall. The non-Doom players will do the opposite, lining up 1-4 along the relative north wall.
Because there will shortly be several dives going through the arena from the dragons and a spread mechanic from the other knight, the actual positions for the intercardinal players can be a little finnicky. Thankfully, the waymarks we use make it incredibly easy:
(image)
Once in position, all the dives from the dragons and the lightning spread from the knight will go off. As one of the dragons was the same one from Wrath, there will also be twisters.
The timing for this twister is as soon as the lightning AOE goes off.
In addition, the knight in the middle will also be doing a quake that will gradually spread outwards from his position.
Dodging this is relatively simple. All the north, close west, and close east players will simply hold forward towards the knight as soon as their lightning AOE goes off. The rest of the players will begin to walk along the arenas edge, dodging in to the 2nd earthshaker AOE that goes off.
As these go off, several knights will replace the axe knight in the middle, including our favourite Grinnaux.
Once players reach the middle, everyone will be assigned Playstation Tethers. These work slightly different from Phase 1 in that only Doom players can receive circle (which are baited by the furthest away players), and only non-Doom players can receive cross. There can also only be one square and one triangle per group.
The 1st and 4th Doom will stand outside of the inner circle to bait the circle tethers, and the other Doom players will stand on the relative NW/NE of the middle circle, surrounding Grinnaux. The non-Doom players should roughly spread to SW/SE and N/S, using eyes to adjust to be opposite your Doom player.
At this point (if not before), players should be identifying where Thordan and the giant Red eye are as there will shortly be a gaze attack from each of them.
Players will then all look away from the gazes and ride a Faith Unmoving knockback from grinnaux. Doom players should immediately move into the cleanse puddles if they aren’t knocked back perfectly (I find wiggling in the puddle sometimes helps the game to register you standing in it).
Meteors
Without a break, 8 meteors will spawn on each cardinal and intercardinal. The 3 meteors at N/NW/NE will be killed using a targeted magic LB2 on the meteor at north, whilst the rest of the party bursts down the reamining meteors.
Killing the meteors results in Thordan jumping back to the arena and performing another Ancient Quaga, followed by yet another 2 AOE auto-attacks into Heavenly Heel and an Ascalon’s Might tank buster.
Players MUST stop damaging Thordan below %2.8 health. If Thordan dies here it is impossible to beat the fight as he will wipe the party at the end of phase 6. Once this threshold is reached, Thordan will say “I yield…” and drop to one knee.
Players will then immediately position south for the next phase:
Phase 6: Double Dragons - Nidhogg & Hraesvelgr
An important mechanic to note in this phase is the two possible failure conditions:
Nidhogg’s Vow - Letting the Mortal Vow debuff fall off will result in Nidhogg’s Vow being broken. Hraesvelgr’s Vow - Dying to any instance of damage from Hraesvelgr (autos/stack/AOE/spread) will result in the Vow breaking.
Breaking a vow will result in that dragon receiving a Damage Up and Damage Taken Down buff, effectively one shotting your tanks with auto attacks.
Although breaking one of these vows may not be the end of your run later in the phase (i.e. dying in cauterize), early vow breaks will almost certainly result in a wipe.
Phase 6 is very tank heavy compared to the previous phases. Knowing your mitigation is key as without the correct mits you may need healer help or you will die.
Throughout this phase there are 2 hand of pain style HP checks. Fortunately for us, they’re even more strict than Living Liquid. The health differential must be no more than 2.8% between both Nidhogg and Hraesvelgr. Especially during the opening mechanic, DPS must be attacking their assigned dragon and tabbing between both dragons to ensure the health difference is not too far apart.
MT will grab Nidhogg, and OT will grab Hraesvelgr. After X auto attacks, both dragons will begin to cast:
Wyrmsbreath 1 (WB1)
The arena will be transformed into a donut via an AOE.
Nidhogg will then target 3 random Non Tank players with fire tethers, and Hraesvelgr will target 3 random Non Tank players with ice tethers. These tethers will cause both Pyretic and a Frozen debuff respectively. To resolve this each fire tether player must stack with an ice tether player to cancel out the debuff. Because we can’t determine which players are going to be targeted we set up 3 groups of 2 people where one person from each will be the designated “flex” player, and will swap with another player if they have the same tether as their partner.
(image WB1)
Tanks however will not need to worry about tethers as instead they will be looking at the mouths of both dragons to determine if they are about to take a single tank buster or a 2 person tank buster. If both mouths are glowing, the tanks will stack and take a buster together in the centre of the arena. If one mouth is glowing, the tank that is tanking the non-glowing dragon will take a large defamation style tank buster, and the other dragon will do a large conal cleave horizontally through the middle of the arena.
(Image WB1 Tanks)
Immediately afterwards, all players should spread away from DPS players as a random DPS will be assigned Mortal Vow in the form of a targeted AOE.
Guide is not yet completed, apologies. Please refer to the Toolboxes for the remaining phases.