Toolbox/Raidplan
Toolboxes are an interactive guide that allows you to click through each phase indiviudally and review the mechanics in a easy to understand manner.
PoV Videos
Macros
View All Macros
Macro 1Neurolinks and Nael Spreads
==========================================
[Neurolink placement]
■ - 1>2>3
[Nael spread]
         MT    OT
               ♦
        D1      D2
D3  H1      H2  D4
Macro 2 QMT and BFT
[Quickmarch]
MT     Trio   OT
H1                H2
D1                D2
D3                D4
             DPS Shaker
H1/MT   Baha   H2/OT
                STACK
(relative to trio spawn)
[Blackfire]
MT     Nael    D1
OT                    D2
H1                   D3
H2    STACK   D4
Macro 3 FRT and HFT
[Fellruin]
■ - Bahamut - MT
■ - Twin - OT
■ - Nael - Party
     MT    OT
D1    H1   D2
D3    H2   D4
(H1 stays on neurolink)
[Heavensfall]
        MTOT
H1                 H2
D1                 D2
        D3D4
*OT Covers Nael Tower
OT +1 | H2 +2 | D2 +3 | D4 +4 | MT -1 | H1 -2 | D1 -3 | D3 -4
Macro 4
TST and GO
[Tenstrike]
■ - Left > Right Generate Priority
             TRUE NORTH
D3 D1 H1 MT OT H2 D2 D4
■ - If the line-up is wrong, spread to your Quickmarch sides and adjust accordingly
             Earthshakers
                   NW  NE
              W                  E
■ - South is the safe spot for both sets of Earthshakers
[Grand Octet]
■ - Twin bait - Left of twin (from middle facing twin)
■ - Megaflare stack - Right of twin (from middle facing twin)
■ - Tank LB3 can be used here for safety
Macro 5 (D4 Float) Adds
[Adds Phase]
■ - MT = Start Twin
■ - OT = Start Nael
Neurolink Priority:
■ - D1 - Waymark 1 Neurolink
■ - D2 - Waymark 2 Neurolink
■ - D3 - Waymark 3 Neurolink
■ - D4 - Float
Macro 6 Golden Bahamut Mits
[Morn Afah Mitigation]
■ - Use the transition to clarify and adjust any mitigations
■ - 1 - MT 90, OT Reprisal, Addle, rDPS Mit
■ - 2 - OT 90, MT Reprisal, any spare Mit, Tank LB
■ - 3 - MT 90, OT Reprisal, Addle
■ - 4 - OT 90, MT Reprisal, rDPS Mit, Tank LB
■ - 5 - MT 90, OT Reprisal, Addle
[Akh Morn Mitigation]
■ - 1 - Share
■ - 2 - WAR > GNB > PLD > DRK Invuln priority
■ - 3 - The other tank
■ - 4 - Share (with tank LB if mitigation is lacking)
==========================================
Buff Timings
- Twintania opener
- Nael opener
- Bahamut opener
- Post Felruin Trio
- Start of Adds Phase
- Golden Bahamut Opener
- Mid Golden Bahamut
- Twintania opener (for extra pot usage) OR Nael reopener (to try and skip Divebombs)
- Bahamut reopener (if used pot in Twintania)
- Adds opener
- 2nd 2-minute buffs during Golden Bahamut
Given that the DPS check in Twintania and Bahamut are not tight, it is recommended to pot Nael and endeavour to avoid Divebombs. Pick the option that suits you and your party's needs.
Waymarks
These can be imported using an XIV Launcher Plugin.
{"Name":"UCoB","MapID":280,"A":{"X":-11.472,"Y":0.0,"Z":-16.383,"ID":0,"Active":true},"B":{"X":11.47153,"Y":0.0,"Z":-16.383,"ID":1,"Active":true},"C":{"X":19.31852,"Y":0.0,"Z":5.176381,"ID":2,"Active":true},"D":{"X":-19.319,"Y":0.0,"Z":5.176,"ID":3,"Active":true},"One":{"X":-7.57,"Y":0.0,"Z":-4.38,"ID":4,"Active":true},"Two":{"X":7.57,"Y":0.0,"Z":-4.38,"ID":5,"Active":true},"Three":{"X":0.0,"Y":0.0,"Z":8.75,"ID":6,"Active":true},"Four":{"X":0.0,"Y":0.0,"Z":0.0,"ID":7,"Active":true}}Fight Writeup
Written by Noz and Em
Phase 1: Twintania
This phase is a little different to most other ultimate phases in that there is no hard-fixed timeline of mechanics, and is instead broken up into 3 mini-phases depending on Twintania's HP. At the end of each mini-phase (i.e. once Twintania is damaged down to a certain HP), Twintania drops a Neurolink - this is a small circular puddle that reduces a player's damage dealt while standing inside, but plays an important role in resolving mechanics throughout the entire fight. The goal is to place a Neurolink in Waymarks 1, 2 and 3:
Regardless of where you are up to in the phase, if Twintania is not dead by 3 minutes since the start of the fight, it will become untargetable and enrage.
100% -> 74%
Start at the west side of the arena to make pulling easier. Everyone should be loosely spread and not on the rear of the boss, prepared to dodge Twister. The tank should pull the boss into the 1 Waymark then face it away from the party as it will use Plummet, a cleaving tankbuster with no cast bar.
A player will then be marked with Fireball, which is a party stack. Just before this resolves, Twintania will cast Twister - at the end of the cast, random players will have small tornadoes spawn beneath them. Coming into contact with a Twister results in instant death and knock back surrounding players into the death wall. It is recommended to start moving about 90% into the castbar. Twister will be a recurring mechanic throughout the entire fight, so it is important you get a feel for its timing and to also be aware of surrounding players.
Players will converge to the boss's rear to resolve the Fireball stack.
NOTE
Just for this first Fireball, it is common practice for both tanks and 1 other designated player (commonly D3 but can be anyone as long as the party agrees on someone) to exclude themselves from this stack.
This increases LB generation therefore guaranteeing LB2 (possibly LB3) for P2 to P3 transition, where tank LB is required). If the designated player is the one with the Fireball stack, someone else can adjust to leave the stack.
Future Fireballs should have everyone stacked together.
Twintania will then cast Death Sentence, a single-target tankbuster that leaves a slashing resistance down and requires a tank swap. Provoke during the castbar.
Ideally, the boss is pushed to below 74% at this point, but if not, Twintania will just begin repeating mechanics:
- Plummet
- Twister into Fireball
- Death Sentence tank swap.
74% -> 44%
Twintania will drop a Neurolink (should be in Waymark 1) and the next miniphase begins. The current tank with aggro (OT on a clean run) will drag the boss over to the 2 Waymark and face it out.
While this is happening D3 should be waiting around the south wall. Shortly after, Twintania will cast Liquid Hell to the furthest player, a series of 5 fire puddle baits. These will be baited by the D3, who will move clockwise along the wall to bait them and everyone else should just stand somewhere (i.e. in mid or near Twintania) where they will not accidentally bait a puddle themselves.
Staying in or walking into a puddle after it has been placed will inflict a lethal bleed.
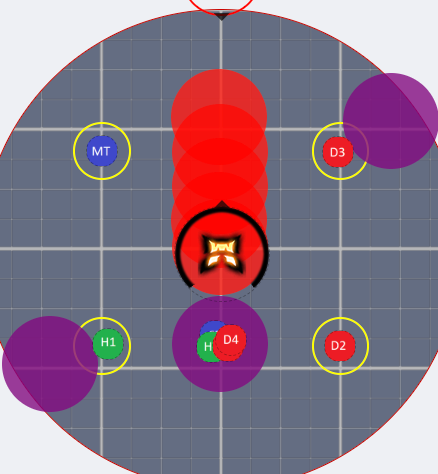
Twintania will then cast Generate, creating a hatch orb and marking a DPS. The orb will chase the marked player and upon contact, explode and wipe the raid. If the orb lingers and does not make contact with any player after a period of time, it will also explode and wipe the raid. If the marked player however soaks the orb in a Neurolink, the player will survive and only emit a small explosion.
WARNING
Do not stand directly under Twintania and do not stand in the orb's trajectory to avoid touching it.
Non-marked players should steer clear from Neurolinks as this small explosion is still lethal.
NOTE
If a marked DPS dies before the orb reaches them, it will redirect to another random player. If the player can work out the orb is chasing them and there is a clear path to a Neurolink, the pull may be salvageable but this note is more to emphasise the importance of not dying if you are marked.
Twintania will immediately cast another set of Liquid Hell baits. This should be continued on from where the last puddles stopped and baited clockwise again. If the D3 is the marked hatch orb player, they will not be able to do the baits so a backup baiter (usually D4 or if there is a fake melee physical ranged) should assist instead.
Twintania will then cast Death Sentence. Swap aggro.
The boss will cast Generate again, creating and orb and marking a DPS again. As the orb is travelling, Twintania will cast Twister. Everyone should side-step accordingly, and what the hatch DPS should do is wait outside the Neurolink, and move in once the Twister has gone off as to not bait it inside the Neurolink.
Twintania will then use Plummet before repeating mechanics:
- Liquid Hell.
- Hatch to Neurolink.
- Liquid Hell.
- Death Sentence tank swap.
- Hatch to Neurolink with Twister dodge.
- Plummet.
Ideally, the boss is pushed to below 44% after the Twister, but a group with great DPS will phase before the Twister cast even goes off.
44% -> 0%
Twintania will drop a Neurolink (should be in Waymark 2) and the next miniphase begins. The current tank with aggro (MT on a clean run) will drag the boss over to the 3 Waymark and face it out. D3 will hang around the west / north western wall, ready for Liquid Hell baits.
NOTE
For this mini-phase, it is a good idea for light party 1 to stick around and attack Twintania from the south west side of the arena, while light party 2 sticks around south east. This is not necessarily a strict rule or strat but is just good practice to give everyone a bit of room for the upcoming mechanics.
A series of Liquid Hell baits will drop (D3 taking them clockwise again), then Twintania casts Generate, this time marking 2 DPS with 2 different orbs since now 2 Neurolinks are available (on the 1 and 2 Waymarks). Who takes which Neurolink is kinda just use-eyes but with the light party splits it should not be difficult to determine who should go where. As usual everyone else should be careful not to collide with orbs as they travel.
Shortly after Twintania marks someone with a Fireball stack and a random player with Liquid Hell baits (note that both can be on the same player). The stack should be taken just north of the 3 Waymark, and the person with Liquid Hell should bait them anywhere away from the party, before joining the stack after the 5th puddle.
NOTE
Sprint can be helpful here, especially for the baiter to ensure they reach the stack in time without baiting a puddle in the middle of the party.
Twintania will then cast Death Sentence. Swap aggro.
There will be another Generate cast marking 2 DPS, shortly followed by a Twister. Resolve Twister first before entering the Neurolink.
Twintania will then use Plummet. During this time, D3 should return to the wall ready for Liquid Hell baits, as Twintania will just repeat mechanics from here. Push the boss to 0% and the third Neurolink will drop in the 3 Waymark:
- Liquid Hell
- Hatch x2 to Neurolink.
- Liquid Hell on RANDOM party member.
- Fireball stack.
- Death Sentence tank swap.
- Hatch x2 to Neurolink with Twister dodge.
- Plummet.
Finally, stand in a Neurolink for phase transition (generally tanks will go north and party south).
HEALER
You may notice there is little to no mention of healers in this entire phase. Your job is to just stand out of the way lol and don't get hit by orbs or distance-baited Liquid Hells (help tanks with tankbusters, heal up after fireball stacks, potentially spot heal Liquid Hell baiters if needed).
Phase 2: Nael
Upon transition, a pillar will drop in the middle of the room and knock everyone back.
NOTE
If you are progging it is helpful to make a mental note now on how far the knockback is. In Heavensfall Trio in Phase 3, you will need to ride a similar knockback without the aide of the Neurolink.
Players must now spread as they will be targeted with Meteor Stream (small AoE spread) in 2 sets. Spread positions are fairly yolo-able but you can use clock positions as a guide if you wish. While this is happening, players need to rotate around to dodge the cleaves.
Nael will then dive onto whoever last had aggro on Twintania (on a clean run, will be OT) with Dalamud Dive, a heavy hitting tankbuster. This tank should wait on the north side of the pillar. Immediately after, she will use Bahamut's Claw, a multi-hit tankbuster. Both should be fully resolved with the OT's invulnerability.
Once these tankbusters resolves, the MT should provoke Nael and face her north while the party stacks in the middle (4 Waymark).
Nael will then cast Bahamut's Favour, spawning 5 dragons around the room. The dragons do a number of things but the only ones I will mention for now is the Ice Dragon and Fire Dragon.
The Ice Dragon will periodically single-target hit players with an iceball. This applies an Icebitten debuff, causing the next Iceball attack to kill them.
On the other hand, the Fire Dragon applies a fire tether to a random player, which after a few moments explodes in a small AoE, inflicting a Firescorched debuff on affected players. Being hit by another fire AoE with this debuff will result in death.
The fire and ice attacks cancel each other's debuffs out which is how we will survive them.
There will be 4 fire tethers throughout this phase. There is a specific order and way in which we will handle them that works everytime, so you don't need to keep track of your debuffs. However, if you mess one of the tethers up (e.g. you missed the AoE of the first tether), just be prepared to adjust on the next tether.
As quick reference, the way we resolve fire tethers is IN PARTY -> OUT OF PARTY -> IN PARTY -> IN PARTY (this will make sense as you continue reading the guide).
NOTE
If there are a multitude of deaths during this phase, you may be hit by the Ice Dragon more often as other players are dead, and consequently die to the ice attack. There isn't much you can do about this other than hope people die less next time.
First Quotes / Doom 1 / Fire 1
Shortly after the dragons spawn, 2 players will be inflicted with the Thunderstruck debuff, which at the end of the timer will release a point-black AoE around the player, paralysing anyone around them. Naturally, they need to be away from the party.
Nael will then say a quote, which indicate the upcoming mechanics. She will say either:
- O hallowed moon, take fire and scorch my foes! = Lunar Dynamo (donut) → Thermionic Beam (stack)
- This is IN -> STACK
- O hallowed moon, shine you the iron path! = Lunar Dynamo (donut) → Iron Chariot (point black AoE)
- This is IN -> OUT
The two players with Thunderstruck must seperate from the party and take up a position near the boss on north side. Thunderstruck will resolve around when the IN goes off - the two players who had Thunderstruck will then rejoin or run out depending on quotes.
The first fire tether will appear during quotes. After the second quote mechanic, the party will stack together in the middle of the arena to take the fire tether together and cleanly bait the next mechanic.
Doom will apply to two players (6s and 10s). A dragon will then cast Wings of Salvation on a party member, leaving a large white puddle. The party should rotate clockwise around the boss to avoid the puddle, as once it 'explodes' it will leave behind a small white puddle used to cleanse the doom.
The shortest Doom timer takes the small puddle after Wings of Salvation explodes. Another Wings of Salvation and Doom cleanse follows that and the party needs to move out of the large white AoE again, being very careful not to accidentally yoink the previous cleanse puddle.
Nael will use Bahamut's Claw on the tank during Doom cleanses.
If you forget what order / timer your Doom puddle was, you should be taking the cleanse puddle when your Doom is less than 5 seconds.
Second Quotes / Doom 2 / Fire 2 and 3
During Bahamut's Claw on the tank, the second fire tether will appear. This must be taken away from the party (just run off to the side). Everyone else should stack middle for the next set of quotes.
Thunderstruck will apply to two players after fireball resolves, these need to leave immediately.
Nael will then say another quote, she will say either:
- Blazing path, lead me to iron rule! = Thermionic Beam (stack) → Iron Chariot (point black AoE)
- This is STACK -> OUT
- Take fire, O hallowed moon! = Thermionic Beam (stack) → Lunar Dynamo (donut)
- This is STACK -> IN
As you can see, this will always be a stack first which is why we have the party group up mid. The Thunderstruck resolves FIRST, then the two players return to the party for the stack. After the second part of the quote, everyone should return middle as another set of Doom and Wings of Salvation will happen, this time affecting 3 players (6s, 10s and 16s).
Once again, rotate clockwise and it is your turn to cleanse when there is 5 seconds or less left on your Doom.
NOTE
If the quote was OUT second, the Doom cleanse puddle may be somewhere in Narnia - just keep an eye out.
After the third Wings of Salvation another two players will get Thunderstruck and should leave the party stack immediately. As Thunderstruck players move out, the third fire tether will appear. This should be stacked with the party, EXCEPT the person who had the second tether should move out (as they will still be firescorched).
Players who had Thunderstruck and did not have the second fire tether will need to make sure they get back to the stack for this (sprint is helpful).
WARNING
As people will be running around a lot for this section, this is a gentle reminder to not accidentally steal someone's cleanse puddle.
Nael will follow this up with another Bahamut's Claw.
Third Quotes / Doom 3 / Fire 4
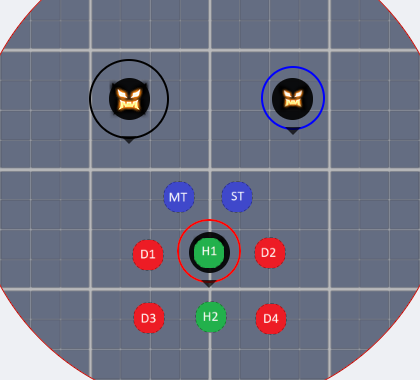
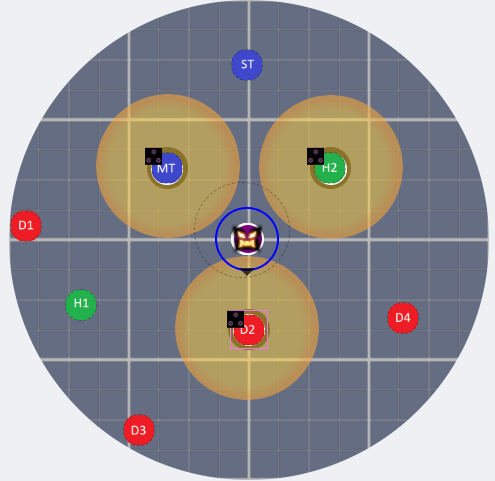
Prepare for third quotes by pre-spreading as this will always start with a Raven's Dive - this is a spread mechanic where Nael dives onto a random player, and any players closeby will be knocked back and killed.
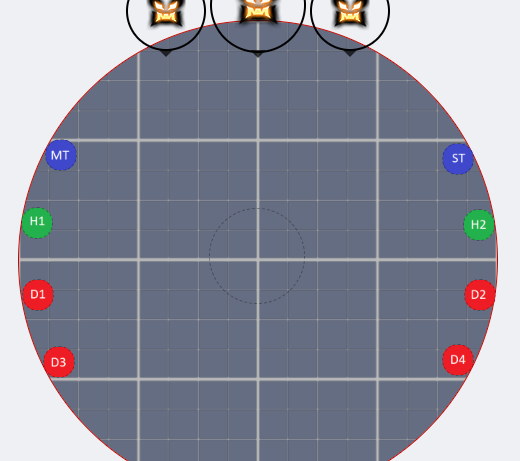
This is the default spread with H1 on Waymark 4.
   MT    OT
D1    H1   D2
D3    H2   D4
Nael will say either:
- From on high I descend, the iron path to call! or From on high I descend, the iron path to walk! = Raven's Dive (spread) → Iron Chariot (point blank AoE)
- This is SPREAD -> OUT
- From on high I descend, the hallowed moon to call! = Raven's Dive (spread) → Lunar Dynamo (donut)
- This is SPREAD -> IN
Keep in mind that since Nael jumps to a player here, the following IN or OUT will be relative to her new location.
During the quotes, another fire tether will target a player and two more players will get Thunderstruck. This Thunderstruck will resolve AFTER the fire tether, so the party (everyone this time) will stack for the fire AoE and players with Thunderstruck should run out when they have 3 seconds left on their Thunderstruck debuff to ensure they get hit by the fire, while safely resolving their Thunderstruck.
Following the fireball will be another set of Doom and Wings of Salvation on three players, resolve same as before.
Nael will then cast Ravensbeak, a single target tankbuster that applies a piercing resistance down, requiring a tankswap. Provoke during the castbar.
Divebombs and Fourth Quotes
Nael will call out the fourth quote, while the Divebomb markers start showing up. We will go through the quotes first:
- Fleeting light! 'Neath the red moon, scorch you the earth! = Dalamud Dive (tankbuster dive on main aggro, which should be the OT since we just tank swapped) → Thermionic Beam (stack)
- Resolve by SPREADING -> STACK
- Fleeting light! Amid a rain of stars, exalt you the red moon! = Meteor Stream (spread) → Dalamud Dive (tankbuster dive)
- Resolve by SPREADING -> remain around mid, away from the OT
This quote will not resolve until after the second divebomb finishes.
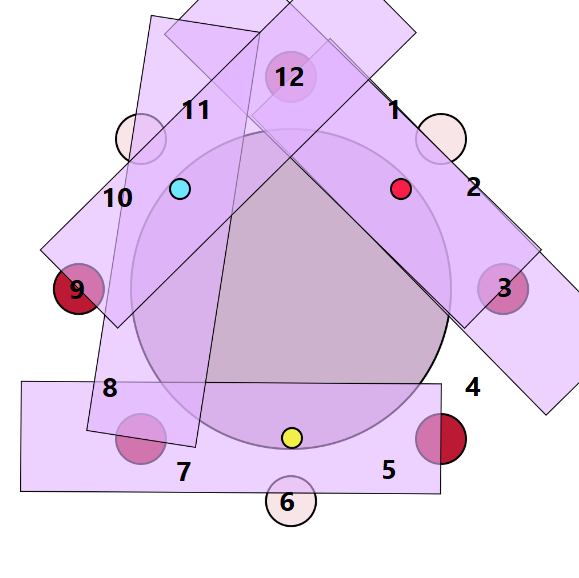
For the divebombs, the dragons on the outside of the room will start targetting players for dives. Three players will be fixated with a green marker on their head, these go out one at a time.
The Dragons will dive in sets of 2-1-2 starting at True North. The 1st and 2nd dragon will fixate on the 1st marked player. The 3rd Dragon will fixate on the 2nd marked player, and the last two dragons will fixate on the 3rd marked player.
Your goal is to position the three marked players in such a way that they bait the Dragon Dives away from the middle of the room.
There are 8 possible locations for the Dragons to spawn (the cardinals and intercardinals).
You need to bait the dives in such a way to avoid the middle of the room, such as the following example where RED is the first dive, YELLOW is the second dive and BLUE is the third dive.
You can actually begin to read and solve divebombs at the start of the phase when Nael spawns the dragons (Bahamut's Favour). If you have an experienced party member, they will often call the bait positions using Clock Positions (indicated in the following image) to loosely indicate where each bait should go, the solution for this example would be: "2 6 10"
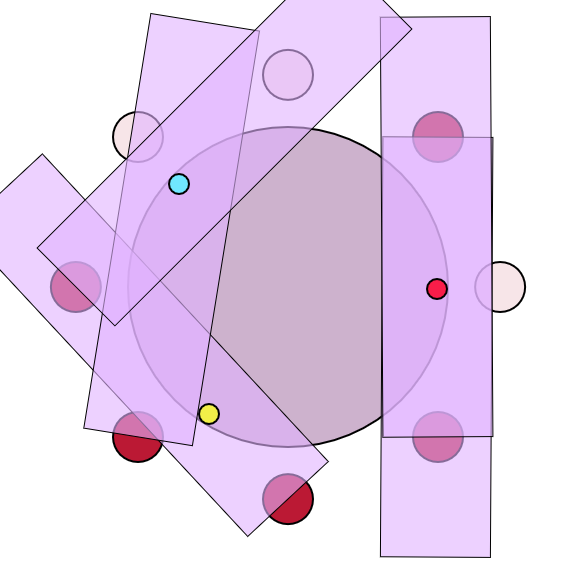
More Examples...
Solution: 3 7 10
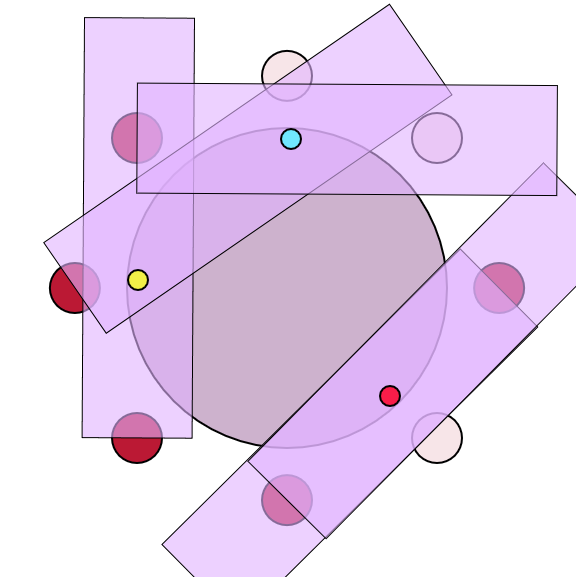
Solution: 5 9 12
Solution: 11 5 7
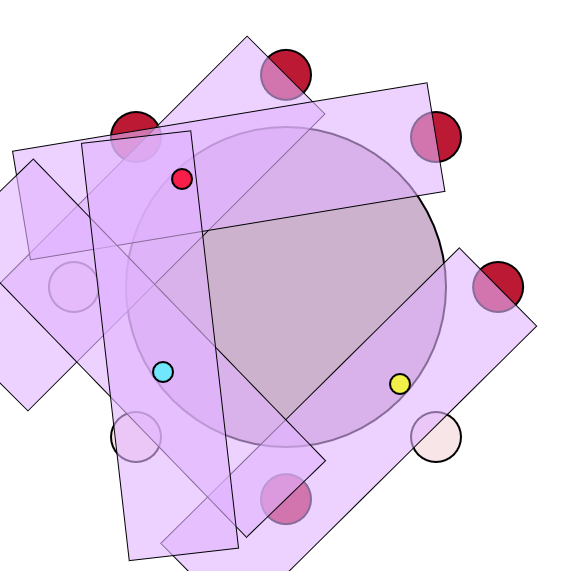
Try out the Divebomb simulator here to practice solving these yourself:
Divebomb SimulatorNael will also be targetting the furthest players with Hypernova, a moderate size puddle AoE. Players baiting dives will need to watch out for these as they move out.
NOTE
The Dragons will lock on to the players position when the green marker above them disappears. This might mean dodging some Hypernova before moving into the correct position.
Once the first dragon dive occurs, Nael will become untargetable and the quotes will resolve.
Once Nael Dalamud Dives, she should be close to dead on a clean run. If not, she will repeat some recycled quotes and tankbusters you've already seen until she enrages. The enrage cast is Megaflare.
Phase 3: Bahamut Prime
Transition and Intro
After Nael dies, the party stacks on south Neurolink ready for the Seventh Umbral Era, a heavy raidwide and knockback. This will be followed by three Calamitous Flame raidwides and Calamitous Blaze, a much heavier raidwide.
Tank LB is essential to surviving these attacks - use immediately after the knockback. With tank LB3 the raidwides are fairly comfortable, but if it is only a tank LB2, some mitigation and healer GCDs will be required to live.
TANK
There will be a variety of tankbusters in between mechanics during this phase. A sample mit plan is available in #ucob-strats in the MUR Discord. Generally speaking, the MT will take the first two sets, then it alternates between OT and MT after. However depending on Nael kill times and due to the general nature of this fight (how easily recoverable deaths are), be prepared to make quick adjustments and communicate with your cotank.
HEALER
Some of the tankbusters are multihit (such as the triple Flare Breath), be prepared to top of your tank in between hits if required.
For all major mechanics in this phase, Bahamut Prime will be untargetable in the beginning. You only need to DPS him down to below 60% to 'make' the DPS check.
The MT should immediately face the boss north away from the party as he will cast Flare Breath, a frontal tankbuster and Flatten, another tankbuster. The MT should be able to solo this with a few mititgations. Bahamut Prime then casts:
Quickmarch Trio (QMT)
QMT ToolboxThe party will begin in the middle and look for the three dragons to appear at a wall. These dragons are preparing to dive across the room - treat their location as relative north.
The light parties will then split, with LP1 going relative west and LP2 going relative east. Players will spread along the wall, top to bottom (Tanks > Healers > Melee > Ranged).
Players will drop a Twister when the dragons dive, so being moving inwards when you see the dragons begin their dive across the arena.
Stay spread out as players are about to drop Megaflare Puddles followed by some players being hit with Megaflare AoEs. Players now all need to check debuffs and move into the following positions -
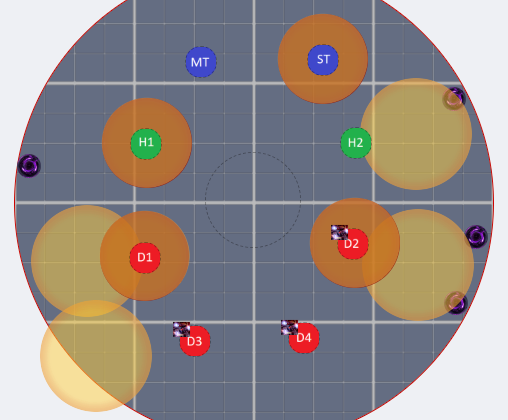
Bahamut Prime becomes targetable here. One DPS and both healers get Earth Shaker (marker above head), which one resolves does a cleave and leaves a lethal puddle behind where they were standing. H1 moves to relative west. H2 moves to relative east. DPS with Earth Shaker moves to relative north. When the Earth Shaker resolves, move out of the AoE.
All other DPS stack relative south.
Tanks will intercept the Tempest Wing Tethers (light green tether) and take these east and west in line with the Healers.
HEALER
You may need to run into the middle after Megaflares to top up the party as there is heavy damage here, just make sure you get to your relative position quickly after. Sprint is helpful. Also, make sure you are not too close to tanks for Tempest Wing.
Earth Shaker DPS should wait until Tempest Wing resolves before moving back to party stack.
Once more, Bahamut Prime will use Flare Breath followed by Flatten.
Bahamut Prime then casts:
Blackfire Trio (BFT)
BFT ToolboxPlayers stack center and look for Nael on the wall - this becomes relative north.
Liquid Hell will start hitting the party, and everyone should move together towards Nael and stay stacked for Thermionic Beam.
HEALER
This stack is heavy damage and needs to be topped up fast. Use a Swiftcasted heal if required and other OGCD heals as you will not have time to stop and heal here.
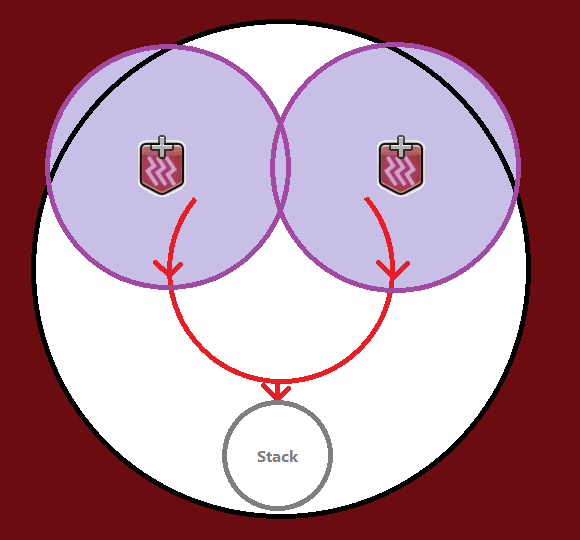
The party will split into roles groups at the wall, with supports going left and DPS right.
Once split, two DPS and two supports will receive markers - these are stack markers and run these to relative south.
Non-stack markers should move NEAR one of the four towers that have spawned.
While healers should be given priority to the south tower to be in range for heals, to be honest for the DPS side this is a use-eyes and adjust mech as macros and toolboxes have conflicting information (if you want something set-in-stone for your static, below is the macro prio).
MT     Nael   D1
OT            D2
H1            D3
H2    STACK   D4
Before towers resolve, Nael will send out two Hypernova puddles. wait for these first to go out before moving into the towers.
Once the towers resolve, Bahamut Prime will become targetable again and cast Gigaflare, a raidwide. The party should gather and stack for a quick heal. Bahamut Prime then follows with 3 Flare Breaths. Bahamut Prime will then cast:
Fellruin Trio (FRT)
FRT ToolboxNael, Bahamut and Twintania will spawn on a Neurolink each. The party should move to Nael, with her becoming relative south.
Nael will do another set of Quotes:
- "From hallowed moon I descend, a rain of stars to bring!" = Lunar Dynamo → Raven's Dive → Meteor Stream
- IN -> SPREAD -> SPREAD
- "From on high I descend, the moon and stars to bring!" = Raven's Dive → Lunar Dynamo → Meteor Stream
- SPREAD -> IN -> SPREAD
You can use the same spreads used in Third Quotes during Phase 2: Nael.
WARNING
Remember that the IN is relative to Nael's positioning.
While this is happening, two Tempest Wing Tethers (as seen in QMT) will appear. Tanks will need to grab the two Tempest Wing Tethers coming from Bahamut and after the IN goes off, the MT runs to Bahamut and OT runs to Twintania. Sprint is helpful to reach the Neurolink in time for an upcoming raidwide.
After whatever the second quote as, the party must stack in south Neurolink (and the tanks in the Neurolink under their respective boss) for Aetheric Profusion, a heavy raidwide that is only survivable while being in a Neurolink.
After this immediately, Bahamut Prime will become targetable. Spread for Meteor Stream and everyone should gather to Bahamut for heals, as he will use Gigaflare.
This is followed by another set of tankbusters with Flare Breath followed by Flatten and then another Flare Breath.
Bahamut Prime will then cast:
Heavensfall Trio (HFT)
HFT ToolboxThe party will once again stack mid, similar to QMT where the party will split left and right from where the Trio spawns on the wall.
The Trio will be in a random order with Nael positioned either Left, Middle or Right. Two of the Trio will be doing a dive across the room, while Nael will not be diving.
Screenshots from the toolbox below show the possible spawns and respective spreads, Nael is highlighted RED.

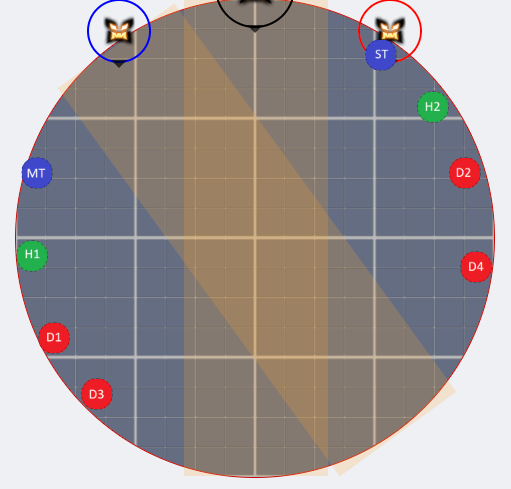
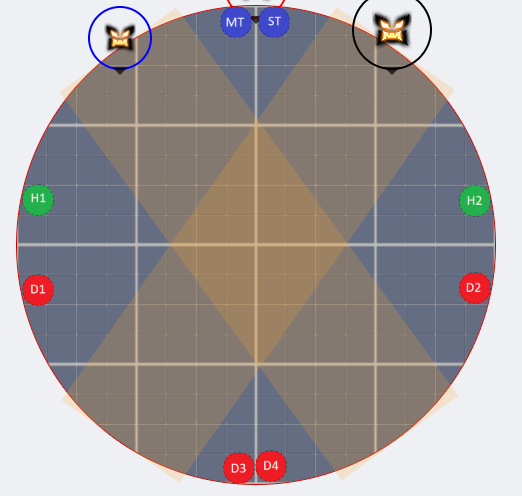
Pay attention to the position of Nael and spread out in the safe spaces that are not being dived. When the dive goes off, move inwards to avoid a Twister. Players will drop Megaflare Puddles as they move in, so do not rush in otherwise you might place these too close to the middle.
8 towers will now spawn in positions around the room and each player will need to position to be knocked back into one of the towers. LP1 will count towers counter-clockwise from Nael and LP2 will count clockwise.
Find your tower using the following priority system:
                  <NAEL>
D3 < D1 < H1 < MT < OT > H2 > D2 > D4
NOTE
If a tower spawns infront of Nael, this belongs to OT.
Avoiding the Megaflare Puddles that drop, preposition yourself to be knocked back into your tower by Heavensfall (a pillar will drop in the middle - this is the same knockback as the transition from P1 to P2).
If you miss the tower, you have a brief moment to adjust into the tower before it explodes.
Once the towers resolve, rotating cones will begin spinning around the room. Avoid the AoEs by rotating around the room and stay near the wall while Nael sends out two Hypernovas.
After the two Hypernovas, make your way into the center of the room. When the pillar disappears, Bahamut Prime becomes targetable again and everyone should stand on the 4 Waymark (dead centre) for party stack (Fireball).
Finally, Bahamut Prime will use another Gigaflare raidwide (healers must quickly top up between damage), followed by three Flare Breath. Remember to face the boss away from your party.
Bahamut Prime then casts:
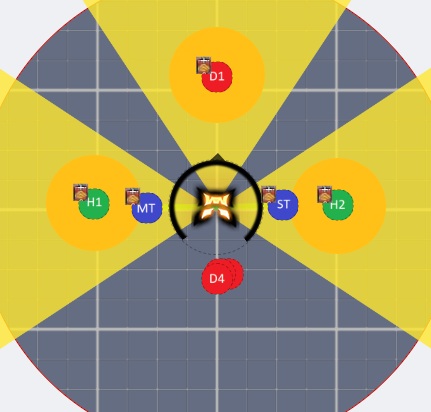
Tenstrike Trio (TST)
TST ToolboxPreposition in QMT spreads around the middle of the room.
Twintania will appear in the middle of the room and cast Generate, marking 3 players and send hatch orbs to them. The same three players will be targeted again in a second wave of Generate, however due to vulnerabilities they will need someone else (a backup) to intercept it for them.
To begin, targetted players should move to a Neurolink (use eyes), with 3 other players shadowing each of them to be their backup (without being too close to the Neurolink to avoid the AoE explosion). The 2 remaining players doing nothing need to stand out somewhere away from all the action.
The marked players will firstly take the first orb in the Neurolink.
Targetted players will then run directly out to the wall to bait the second hatch orb to go through the Neurolink. The backup player will then intercept it by standing in the Neurolink.
Neurolink targets move to the wall marked in RED.
Intercepts move into Neurolink to catch Orbs marked in YELLOW.

NOTE
Intercepts on south waymark may need to side-step a bit to catch the incoming orb as it sometimes spawns slightly offset to the right. Your job is to act like a goalkeeper and catch the orb as it goes past the Neurolink.
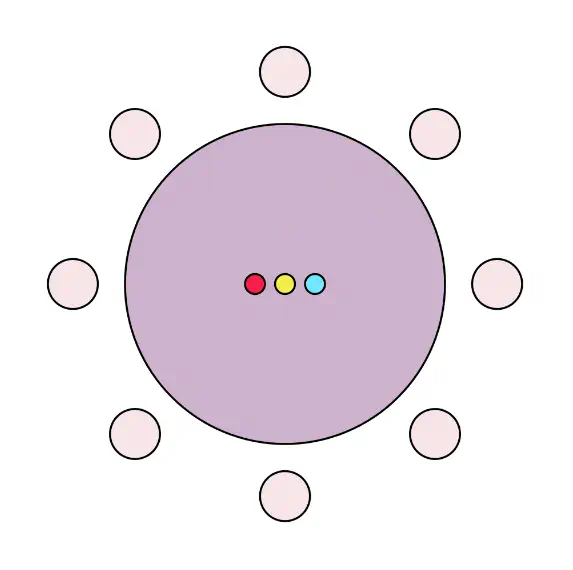
After the Hatch resolve, four players will be targetted with Earth Shaker.
Players with Earth Shaker head to the 4 outer waymarks.
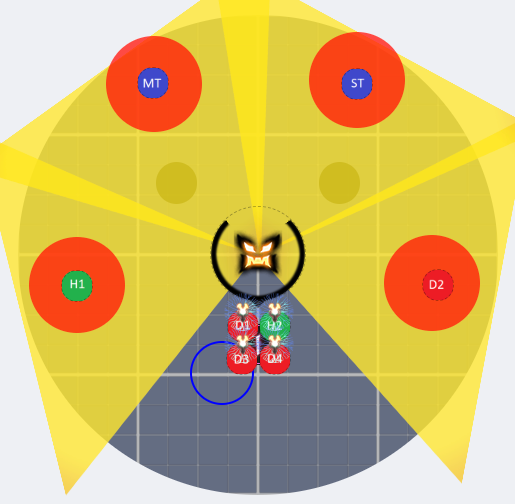
The remaining players should head to south 3 Waymark to avoid Earth Shaker. These players will now get Earth Shaker and need to swap positions with the first four players.
NOTE
While the positioning of the first set of Earth Shakers is simply use-eyes, the second set of players can pre-position around the south waymark to indicate where they will go.
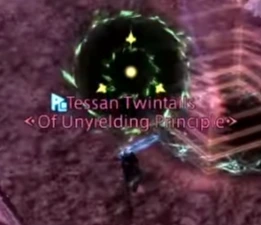
Image from Tessian's UCOB Guide Video
During the resolution of the first set of Earth Shakers, Bahamut Prime becomes targetable. After the final Earth Shaker resolve, the phase will end with Gigaflare followed by Flatten and Flare Breath.
Bahamut Prime will cast (he will not be targetable again after this):
Grand Octet (GO)
GO ToolboxThe party should stack middle. Bahamut, Nael, Twin and the 5 Dragons will spawn on all cardinals and intercardinals. Look at Bahamut's position, this will tell you which direction you rotate around the room in GO.
If Bahamut is on a:
- CARDINAL you will rotate counter-clockwise around the room.
- INTERCARDINAL you will rotate clockwise around the room.
Once you find Bahamut, look to the opposite direction.
- IF Nael is NOT opposite Bahamut, run directly to the wall.
- IF Nael IS opposite Bahamut, offset by one dragon position clockwise or counter-Clockwise in the direction you will be rotating.
Once you are at the wall, wait for the first dive go off, then start running in the CCW or CW direction mentioned before.
After the second dragon dive goes off, use sprint and continue running around the wall past Bahamut (Do NOT use sprint if you had to adjust for Nael opposite Bahamut)
Once you are past Bahamut, one player will get targetted with a Red beacon. Once this appears, all players turn and run into the middle of the room.
Tanks use LB3 when towers appear and ALL party members use knockback resist when you see the Tank LB.
NOTE
Tank LB and Knockback Resist will be used to cheese the dive from Twintania and the Stack markers, these can be completely ignored.
Ensure that at least one party member is in a tower (use eyes) and prepare for Twister when Twintania completes their Dive.
If you are soaking a tower, walk across the tower as the dive goes off to ensure you do not leave the tower early and you don't get clipped by your own Twister.
Once Twisters resolve, you will finish the phase and go into Adds.
NOTE
If tank LB3 is not available, you will need to do the mechanic properly. The red marker is baiting Twintania's dive and this should be baited beside where Twintania is, so it dives outside the wall. Stack markers should gather near Twintania, but opposite the side where the red marker baited it.
Phase 4: Adds
Bahamut will spend this phase in the background charging up Aethertrail Attunement, indicated by the Duty Gauge. In this phase you will simultaneously take on Twintania and Nael, who are defending Bahamut as he charges up. If Aethertrail Attunement reaches 100 before the 2 bosses are killed, the party will wipe.
Twintania and Nael will spawn together north, in which initially the MT takes aggro of Twintania and OT takes Nael.
TANK
As initial aggro is based off emnity during Phase 3: Bahamut Prime, be sure to Provoke your boss.
There are no brand new mechanics this phase. However, as you have the mechanics of both bosses to deal with, there's more to do and things can get pretty chaotic.
DAMAGE
Keep the HP's of both bosses as similar as possible, as they need to be killed approximately at the same time, otherwise the other will begin casting an enrage.
Phase Timeline
Expand Phase Timeline
- Twintania Plummet and Nael Bahamuts Claw on their respective aggro'd player.
- Twintania Liquid Hell.
- Twintania Generate (Hatch) into Twister.
- Nael Quotes.
- Twintania Twister.
- Nael Megaflare (raidwide).
- Twintania Death Sentence and Nael Ravensbeak (tankbusters that require a tank swap).
- Twintania Plummet and Nael Bahamuts Claw on their respective aggro'd player.
- Twintania Liquid Hell.
- Twintania Generate (Hatch) into Twister.
- Nael Quotes.
- Twintania Twister.
- Twintania Death Sentence and Nael Ravensbeak (tankbusters that require a tank swap).
- Nael Megaflare (raidwide).
- Teraflare: if bosses are not dead at this point the gauge would have filled -> wipe.
You'll notice after the tank swap (Death Sentence and Ravensbeak) the mechanics just repeat in the same order (except the last tankbuster and Megaflare are switched). Essentially, you will have 2 'rotations' or 'cycles' of mechanics to kill Twintania and Nael before the enrage occurs.
DAMAGE
Liquid Hell is to be baited by D3, who should take them along the southern wall, starting from east/south east-ish.
Generate will target 3 DPS this time to soak a Hatch in a Neurolink. To prevent people from fighting over a Neurolink, we have assigned spots for this phase. D1 will take the one on Waymark 1 (north-west), D2 takes Waymark 2 (north-east) and D3 takes Waymark 3 (south). D4 will flex accordingly.
Twintania's Twister comes very shortly after Generate is cast - be sure to move in a way so you will resolve both mechanics safely. DPS soaking on Waymark 1 and Waymark 2 should find that they can soak their Hatch first then move for Twister, while DPS soaking on Waymark 3 may find that they need to resolve Twister first before moving into their Neurolink due to the orb needing to travel longer.
TANK
Plan your mitigations carefully - this phase will hurt.
Face the bosses to the wall, away from the party and your cotank. This will prevent Twintania dunking on everyone with Plummet.
When the bosses cast their respective Death Sentence and Ravensbeak, you and your cotank will need to swap aggro of each boss as these tankbusters apply a vulnerability to the boss's attacks. Simply Provoke - shirk shouldn't be necessary.
HEALER
Watch and look after your tanks and remember to use your single target cooldowns to help them, especially when the back-to-back tankbuster is coming up.
As you resolve Twister and move around in general throughout this phase, be sure to stand in an area where you will not be clipped by the explosion of DPS resolving Generate (Hatch). One suggestion is to stick around the wall north east or north west so you are not accidentally baiting Liquid Hell while also still being in range to support your tanks. Then, you can just move along the wall as Twister is cast.
Quotes
As you can see from the timeline, Nael will do 2 sets of quotes. Each set will come with 3 attacks each.
Nael will do 4 possible quotes:
- From hallowed moon I bare iron, in my descent to wield! = Lunar Dynamo → Iron Chariot → Raven's Dive
- From hallowed moon I descend, upon burning earth to tread! = Lunar Dynamo → Raven's Dive → Thermionic Beam
- Unbending iron, descend with fiery edge! = Iron Chariot → Raven's Dive → Thermionic Beam
- Unbending iron, take fire and descend! = Iron Chariot → Thermionic Beam → Raven's Dive
You will notice that:
- The first is always an IN or OUT.
- If it is IN first, it can be OUT next into a spread, otherwise it is spreads into stack.
- If it is OUT first, the next is either spread into stack, or stack into spread.
Everyone should run to Waymark 4 (centre of the arena) for the stack.
WARNING
Remember that the IN / OUT is relative to where Nael is so keep an eye on her hitbox (i.e. if you happen to be targeting Twintania, don't get their hitboxes confused)
NOTE
If it is spreads into stack, the spreads are fairly yolo-able, but do not stand too far out from the centre to ensure you make it to Waymark 4 in time. Be sure to spread out again after the stack for an incoming Twister.
If it is stack into spreads, run outwards from Waymark 4 after the stack (generally speaking, in the direction of your clock spot is a good idea to ensure everyone is going different ways, except for tanks who should stick to their bosses) for not only a potential incoming spread, but to be separate for the upcoming Twister cast which comes after quotes.
EVERYONE
Once the Twister that comes after quotes is resolved, come back inwards to receive mitigation and healing for the upcoming Megaflare raidwide, before repositioning for the next rotation of mechanics.
On the 2nd round of quotes, it will be the same list of possible quotes. However, the first IN or OUT will always be the opposite of what the first set of quotes was. So, if the first set of quotes had IN as the first attack, the second set of quotes will definitely have OUT as the first attack.
All of these attacks happen in fairly quick succession so after Hatches and Twisters, watch Nael carefully and quickly interpret and resolve her following attacks.
Transitioning to the Final Phase
To help finish off the bosses, a caster should use Limit Break on the 2 bosses. The Limit Break gauge will fully recharge for the final phase anyway, so you might as well use it. Remember to kill the bosses at the same time!
If you successfully take down the 2 bosses before Aethertrail Attunement fully charges, Teraflare will cast and wipe the party. Everyone will then be fully resurrected by the Phoenix, who will grant the party with full 3 bars of Limit Break and the Phoenix's Blessing buff, which is a sweet damage buff that lasts until the end of the pull / fight, or on death. This buff will help you overcome the final phase of this fight.
NOTE
If anyone has died in the wall at the end of this phase, they will die again once resurrected by Phoenix. They will need to be resurrected again by a player, thus gaining a weakness and losing Phoenix's Blessing.
Bahamut will then return, paint himself yellow and begin his final standoff.
Phase 5: Golden Bahamut
NOTE
If in Phase 3: Bahamut Prime, Bahamut was not reduced to below 60% HP, he will gain a significant damage buff which will make it extremely unlikely that you will survive this phase. Although, it is not impossible...
WARNING
The damage buff from Phoenix's Blessing is lost on death. While the DPS check is still winnable with maybe 1-2 early deaths, keep your main focus on surviving and playing safe where possible.
Golden Bahamut will cycle between 3 attacks throughout this phase.
- Morn Afah: a party stack on a random player. Mitigation is a MUST, you can use tank LB if you feel it is needed.
- Akh Morn: repeated shareable tankbuster attacks on the highest emnity target. The first Akh Morn includes 3 attacks, but each subsequent Akh Morn will add 1 extra hit. These can be shared between both tanks with mitigation or taken solo with an invulnerability - everyone else must steer clear. Tanks will usually have an ignore overhead marker so healers and DPS can easily identify where they should not stand near.
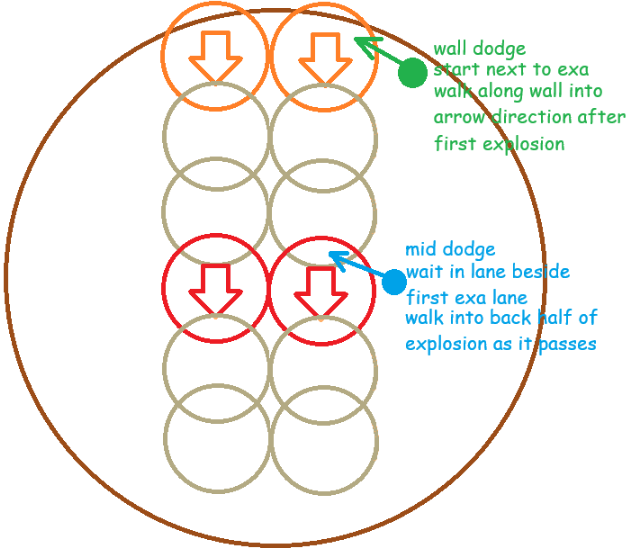
- Exaflare are AoE circles that travel in the direction of the indicated arrow. In this fight, the exaflares all spawn on one side in 3 sets of 2, and all travel in the same direction. The first set appears roughly at 50% of the castbar. Taking damage from an exaflare is lethal for healers and DPS, tanks can survive a hit but will be afflicted with a damage down.
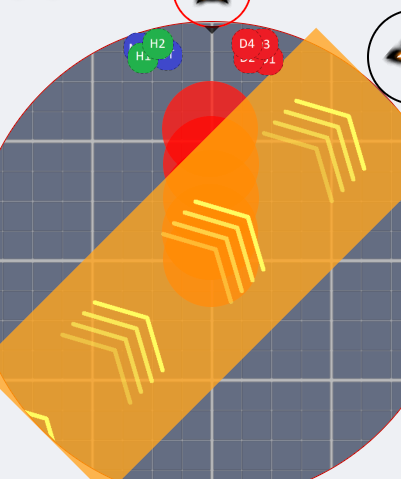
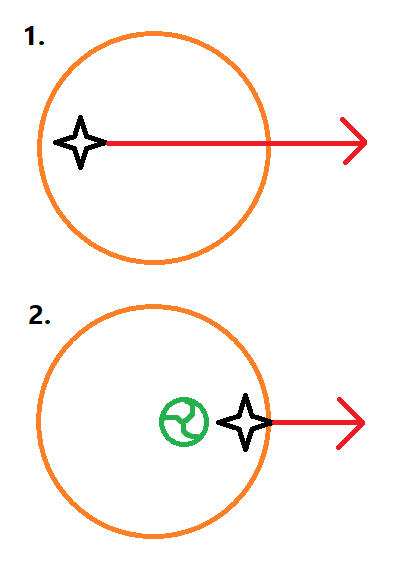
I will explain 2 ways to dodge Exaflare, wall dodge and mid dodge.
Wall dodging is a safe and easy way to handle Exaflare, but will require the most movement and can lead to loss in uptime for melee jobs.
As soon as you see and locate the first set of Exaflare that spawn, stand beside one on the wall and wait. Then, when that first set of Exaflare begin to resolve, walk along the wall into where the first Exaflare exploded, and simply wait till all the other Exaflare go off and group back up with your party.
Mid dodging is best for uptime and will require much less total movement. This video explains mid dodging amazingly and I highly recommend watching it.
Essentially, you treat each set of Exaflare like a lane. Once you identify the first set of Exaflare, imagine its trajectory is a lane - stand beside (NOT in) the lane, wait for the Exaflare to pass by, then move into the lane and wait.
Mid dodging does require a bit more effort than wall dodging as you have the extra step of visualising this 'danger lane.' However if you are a melee DPS or tank, mid dodging would be ideal to learn to maintain uptime.
To keep this guide consistent in the quality of the diagrams, below is an Emgram style MS Paint diagram showing the 2 ways to dodge Exaflare. The orange on the wall indicates an example of where the first set may spawn, the pale yellow shows how the AoE circle of the Exaflare cascades and the red just demonstrates 1 point for mid dodgers in which they can 'switch lanes.'
DIAGRAM IS NOT 100% TO SCALE AND IS PURELY FOR DEMONSTRATIVE PURPOSES
Phase Timeline
Expand Phase Timeline
TANK
While I have noted how the Akh Morn tankbusters are generally handled, if you require any variation for any reason, simply communicate with your cotank, ideally during transition.
HEALER
For an Akh Morn that is shared by both tanks, watch their health, use your single target cooldowns and top them up if needed, ESPECIALLY for the final 6 hit Akh Morn.
- Morn Afah
- Akh Morn (3 hits): shared by both tanks.
- Exaflare
- Akh Morn (4 hits): take with invulnerability.
- Morn Afah
- Exaflare
- Morn Afah
- Akh Morn (5 hits): take with invulnerability.
- Exaflare
- Morn Afah
- Akh Morn (6 hits): shared by both tanks.
- Exaflare
- Morn Afah
After is Golden bahamuts enrage - he will continuously cast Morn Afah for lethal damage, so everyone should spread out as he takes everyone down one by one.
TANK
The Morn Afah enrage is based on emnity, so if you see the enrage, it is a good idea to shirk your healers to give DPS a few extra seconds to defeat him.