
Delubrum Reginae (Savage) Overview
Delubrum Reginae (Savage) is the only high-difficulty raid available within Save the Queen: Blades of Gunnhildr, introduced in Shadowbringers. The raid features multiple bosses and small-scale encounters, requiring a large group of players with good coordination to complete. The raid is designed for up to 48 players but can be entered with a minimum of 24 should they still meet the entry requirements.
Entry to Delubrum Reginae (Savage) is located within Gangos and will require completing several prerequisites before players can enter the raid.
Read on for more information about Save the Queen, or click below to jump to the Raid Guide.
Raid GuideSave the Queen Overview
Save the Queen allows players to progress their character's power in many different ways, each serving to help the player in all Save the Queen zones.
These upgrades are not strictly required to clear the raid, but are generally recommended for players that plan to spend a lot of time in this series of Field Operations.
Garlean Synthetic Fabric
Garlean Synthetic Fabric is a unique quest material used to increase the maximum capacity of a player's Lost Actions holster by 10 slots.
To start, players must first accept the quest: Let Me Holster That for You, from Kriv within Gangos, available right before unlocking the next zone, Zadnor.
Players must then turn in 3 Garlean Synthetic Fabrics to complete the quest. They are available as rare drops from certain FATEs and Critical Engagements within The Bozjan Southern Front, and can also bought off the Marketboard.
Resistance Honors
Resistance Honors, introduced in Zadnor, allow players to exchange any additional mettle earned after achieving Resistance Rank 25 for permanent, passive buffs.
To obtain these, players must speak to the Resistance Councilor within Zadnor. From here, players can exchange 20 million mettle for 3 Proofs of Mettle, which can then be exchanged for 3 different types of Resistance Honors, up to a maximum of 10 per type:
- Ray of Fortitude - Increases max HP (additive 5% per stack).
- Ray of Valor - Increases damage dealt (additive 3% per stack).
- Ray of Succor - Increases healing potency (additive 10% per stack).
Augmented Bozjan & Law's Order Sets
Augmented Bozjan and Law's Order sets are obtainable gear that increase the player's Haste stat while in Save the Queen zones, with each point reducing the GCD's cooldown by an additive 1%.
Augmented Bozjan Sets are obtainable from the Resistance Supplier within The Bozjan Southern Front, first by exchanging Bozjan Coins for the unaugmented gear, then augmenting it with Bozjan Runner's Secrets, obtainable from the Critical Engagement: The Battle for Castrum Lacus Litore or purchased with Bozjan Coins.
Augmented Law's Order sets are obtainable from the Resistance Supplier within Gangos, first by exchanging Bozjan Gold Coins for the unaugmented gear, then augmenting it with both the Orderly Runner's Secrets, obtainable from Delubrum Reginae (Savage), and the Augmented Bozjan gear.
Bozjan Earring
The Bozjan Earring is another piece of gear that increases the player's Haste stat while in Save the Queen zones.
It is rewarded to players for obtaining the achievement Lost and Found IV, by appraising 1,000 Forgotten Fragments.
Raid: Delubrum Reginae (Savage)
WARNING
This guide will entail set ups and strategies for an ANYPROG run, meaning that any player at any prog-point in the raid can join.
Depending on what type of run it is and who is running it, the assigned roles and Lost Actions in the raid can change considerably. Please confirm the roles and Lost Actions with the raid leader's linked resources and be sure to ask questions if any player is unsure.
New players are recommended to understand their required Lost Actions and the mechanics of Boss 3 - Trinity Avowed.
Pocket Guides
These pocket guides are helpful for players only after the essentials of each fight. Players that would like more information about each encounter can read the written guide further below.
Boss 2 - Queen's GuardBoss 3 - Trinity AvowedLost Actions & Essences
Lost Actions, introduced in The Bozjan Southern Front, allow the use of various and specialised actions at any time that have powerful effects.
They are essential to clearing Delubrum Reginae (Savage) and a successful run will require a number of certain actions.
To obtain and equip them, players must first acquire the necessary Forgotten Fragments. These can be dropped by mobs, FATEs and Critical Engagements, found in lockboxes and also purchased from Resistance Quartermasters within each zone and the Marketboard. Afterwards, players can speak with a Resistance Appraiser to appraise them.
Essences, also introduced in The Bozjan Southern Front are a subset of Lost Actions that passively boost certain stats and augment certain Lost Actions, lasting until the player leaves the instance or changes jobs.
There are 3 categories of Essences:
- Essences
- Deep Essences - Stronger variations of Essences, giving higher stat boosts.
- Pure Essences - Unique Essences only available for use within Delubrum Reginae and its Savage version.
To see an example list of required Lost Actions for an anyprog run of Delubrum Reginae (Savage), please see the spreadsheet below:
Anyprog HolstersTo see a complete table of Lost Actions, along with their effects and Forgotten Fragment acquisitions, please see the website below:
Lost Actions ListVideo Guides, POVs & Waymarks
By Hobi
Waymarks can be imported to the game using Waymark Preset Plugin, or you can ask a friend to import them for you and save a copy for yourself.
Preparation
{"Name":"Stairs","MapID":761,"A":{"X":-7.073,"Y":30.554,"Z":441.278,"ID":0,"Active":true},"B":{"X":-6.955,"Y":33.598,"Z":447.976,"ID":1,"Active":true},"C":{"X":-6.636,"Y":37.478,"Z":456.509,"ID":2,"Active":true},"D":{"X":6.967,"Y":30.815,"Z":441.852,"ID":3,"Active":true},"One":{"X":0.0,"Y":0.0,"Z":0.0,"ID":4,"Active":false},"Two":{"X":0.0,"Y":0.0,"Z":0.0,"ID":5,"Active":false},"Three":{"X":6.965,"Y":34.7,"Z":450.398,"ID":6,"Active":true},"Four":{"X":7.149,"Y":37.636,"Z":456.858,"ID":7,"Active":true}}Trash 1 - Slimes & Golems & Boss 1 - Trinity Seeker
Trash 1 - Slimes & Golems
{"Name":"Slimes/Golems","MapID":761,"A":{"X":-275.0,"Y":-31.0,"Z":423.493,"ID":0,"Active":true},"B":{"X":-275.055,"Y":-31.0,"Z":437.146,"ID":1,"Active":true},"C":{"X":315.032,"Y":48.999,"Z":403.795,"ID":2,"Active":true},"D":{"X":315.021,"Y":48.999,"Z":414.553,"ID":3,"Active":true},"One":{"X":-279.496,"Y":-31.0,"Z":428.012,"ID":4,"Active":true},"Two":{"X":-270.519,"Y":-31.0,"Z":428.007,"ID":5,"Active":true},"Three":{"X":-279.514,"Y":-31.0,"Z":432.586,"ID":6,"Active":true},"Four":{"X":-270.417,"Y":-31.0,"Z":432.659,"ID":7,"Active":true}}Boss 1 - Trinity Seeker
{"Name":"Seeker","MapID":761,"A":{"X":-7.188,"Y":8.0,"Z":258.233,"ID":0,"Active":true},"B":{"X":18.563,"Y":8.0,"Z":271.795,"ID":1,"Active":true},"C":{"X":6.768,"Y":7.999,"Z":297.671,"ID":2,"Active":true},"D":{"X":-18.302,"Y":7.999,"Z":284.493,"ID":3,"Active":true},"One":{"X":-7.302,"Y":8.0,"Z":270.484,"ID":4,"Active":true},"Two":{"X":7.301,"Y":7.999,"Z":270.975,"ID":5,"Active":true},"Three":{"X":7.219,"Y":7.999,"Z":285.182,"ID":6,"Active":true},"Four":{"X":-7.144,"Y":7.999,"Z":285.096,"ID":7,"Active":true}}Trash 2 - Dahu & Boss 2 - Queen's Guard
Trash 2 - Dahu
{"Name":"Dahu","MapID":761,"A":{"X":-4.48,"Y":38.0,"Z":465.472,"ID":0,"Active":true},"B":{"X":-4.5,"Y":37.999,"Z":474.482,"ID":1,"Active":true},"C":{"X":7.334,"Y":37.999,"Z":465.295,"ID":2,"Active":true},"D":{"X":7.516,"Y":37.999,"Z":473.644,"ID":3,"Active":true},"One":{"X":-7.932,"Y":37.999,"Z":467.847,"ID":4,"Active":true},"Two":{"X":-1.248,"Y":38.0,"Z":468.054,"ID":5,"Active":true},"Three":{"X":-7.782,"Y":37.999,"Z":472.373,"ID":6,"Active":true},"Four":{"X":-1.148,"Y":38.0,"Z":472.462,"ID":7,"Active":true}}Boss 2 - Queen's Guard
{"Name":"QG new","MapID":761,"A":{"X":244.095,"Y":-86.0,"Z":-173.0,"ID":0,"Active":true},"B":{"X":255.255,"Y":-86.0,"Z":-162.309,"ID":1,"Active":true},"C":{"X":244.095,"Y":-86.0,"Z":-152.47,"ID":2,"Active":true},"D":{"X":233.485,"Y":-86.0,"Z":-162.309,"ID":3,"Active":true},"One":{"X":232.621,"Y":-86.0,"Z":-173.218,"ID":4,"Active":true},"Two":{"X":255.425,"Y":-86.0,"Z":-173.218,"ID":5,"Active":true},"Three":{"X":255.425,"Y":-86.0,"Z":-150.455,"ID":6,"Active":true},"Four":{"X":232.621,"Y":-86.0,"Z":-150.455,"ID":7,"Active":true}}Trash 3 - Bozjan Phantom & Boss 3 - Trinity Avowed
Trash 3 - Bozjan Phantom
{"Name":"Phantom","MapID":761,"A":{"X":183.947,"Y":-96.999,"Z":-389.727,"ID":0,"Active":true},"B":{"X":195.884,"Y":-96.999,"Z":-390.592,"ID":1,"Active":true},"C":{"X":208.037,"Y":-96.999,"Z":-390.119,"ID":2,"Active":true},"D":{"X":219.958,"Y":-96.999,"Z":-391.045,"ID":3,"Active":true},"One":{"X":184.007,"Y":-96.999,"Z":-351.083,"ID":4,"Active":true},"Two":{"X":195.88,"Y":-96.999,"Z":-351.114,"ID":5,"Active":true},"Three":{"X":208.095,"Y":-96.999,"Z":-351.242,"ID":6,"Active":true},"Four":{"X":220.076,"Y":-96.999,"Z":-351.263,"ID":7,"Active":true}}Boss 3 - Trinity Avowed
{"Name":"TA","MapID":761,"A":{"X":-271.969,"Y":-182.0,"Z":-102.04,"ID":0,"Active":true},"B":{"X":-252.021,"Y":-182.0,"Z":-82.126,"ID":1,"Active":true},"C":{"X":-272.012,"Y":-182.0,"Z":-61.993,"ID":2,"Active":true},"D":{"X":-291.9,"Y":-182.0,"Z":-82.012,"ID":3,"Active":true},"One":{"X":-282.003,"Y":-182.0,"Z":-92.017,"ID":4,"Active":true},"Two":{"X":-272.067,"Y":-182.0,"Z":-92.053,"ID":5,"Active":true},"Three":{"X":-272.063,"Y":-182.0,"Z":-82.054,"ID":6,"Active":true},"Four":{"X":-281.973,"Y":-182.0,"Z":-81.996,"ID":7,"Active":true}}Trash 4 - Stygimoloch Lord & Boss 4 - The Queen
Trash 4 - Stygimoloch Lord
{"Name":"Mino Lord","MapID":761,"A":{"X":-426.153,"Y":-191.0,"Z":-194.456,"ID":0,"Active":true},"B":{"X":-405.747,"Y":-191.0,"Z":-194.293,"ID":1,"Active":true},"C":{"X":-405.816,"Y":-191.0,"Z":-173.724,"ID":2,"Active":true},"D":{"X":-426.258,"Y":-191.0,"Z":-173.785,"ID":3,"Active":true},"One":{"X":-415.859,"Y":-191.0,"Z":-211.895,"ID":4,"Active":true},"Two":{"X":-387.99,"Y":-191.0,"Z":-184.483,"ID":5,"Active":true},"Three":{"X":-416.005,"Y":-191.0,"Z":-156.455,"ID":6,"Active":true},"Four":{"X":-443.841,"Y":-191.0,"Z":-184.173,"ID":7,"Active":true}}Boss 4 - The Queen
The markers used are up to the preference of the host, used for the purposes of calling the starting spots in Super Chess.
Diamond
{"Name":"Queen Diamond","MapID":761,"A":{"X":-271.985,"Y":-175.0,"Z":-434.975,"ID":0,"Active":true},"B":{"X":-252.069,"Y":-175.0,"Z":-414.976,"ID":1,"Active":true},"C":{"X":-272.015,"Y":-175.0,"Z":-395.076,"ID":2,"Active":true},"D":{"X":-292.007,"Y":-175.0,"Z":-415.049,"ID":3,"Active":true},"One":{"X":-282.039,"Y":-175.0,"Z":-425.148,"ID":4,"Active":true},"Two":{"X":-261.867,"Y":-175.0,"Z":-424.945,"ID":5,"Active":true},"Three":{"X":-262.048,"Y":-175.0,"Z":-404.942,"ID":6,"Active":true},"Four":{"X":-281.988,"Y":-175.0,"Z":-405.153,"ID":7,"Active":true}}Diagonal Left
{"Name":"Queen Diagonal LEFT","MapID":761,"A":{"X":-272.126,"Y":-175.0,"Z":-425.098,"ID":0,"Active":true},"B":{"X":-261.187,"Y":-175.0,"Z":-415.356,"ID":1,"Active":true},"C":{"X":-271.731,"Y":-175.0,"Z":-405.196,"ID":2,"Active":true},"D":{"X":-282.082,"Y":-175.0,"Z":-414.13,"ID":3,"Active":true},"One":{"X":-261.823,"Y":-175.0,"Z":-434.669,"ID":4,"Active":true},"Two":{"X":-252.664,"Y":-175.0,"Z":-425.568,"ID":5,"Active":true},"Three":{"X":-282.206,"Y":-175.0,"Z":-394.871,"ID":6,"Active":true},"Four":{"X":-291.952,"Y":-175.0,"Z":-405.53,"ID":7,"Active":true}}Cross
{"Name":"Queen Cross","MapID":761,"A":{"X":-292.0,"Y":-175.0,"Z":-415.0,"ID":0,"Active":true},"B":{"X":-282.0,"Y":-175.0,"Z":-415.0,"ID":1,"Active":true},"C":{"X":-262.0,"Y":-175.0,"Z":-415.0,"ID":2,"Active":true},"D":{"X":-252.0,"Y":-175.0,"Z":-415.0,"ID":3,"Active":true},"One":{"X":-272.0,"Y":-175.0,"Z":-435.0,"ID":4,"Active":true},"Two":{"X":-272.0,"Y":-175.0,"Z":-425.0,"ID":5,"Active":true},"Three":{"X":-272.0,"Y":-175.0,"Z":-405.0,"ID":6,"Active":true},"Four":{"X":-272.0,"Y":-175.0,"Z":-395.0,"ID":7,"Active":true}}```

**Battleship**
``` waymarks
{"Name":"Queen Battleship","MapID":761,"A":{"X":-282.022,"Y":-175.0,"Z":-439.992,"ID":0,"Active":true},"B":{"X":-271.999,"Y":-175.0,"Z":-440.0,"ID":1,"Active":true},"C":{"X":-261.999,"Y":-175.0,"Z":-440.026,"ID":2,"Active":true},"D":{"X":-251.978,"Y":-175.0,"Z":-440.012,"ID":3,"Active":true},"One":{"X":-297.008,"Y":-175.0,"Z":-424.997,"ID":4,"Active":true},"Two":{"X":-296.92,"Y":-175.0,"Z":-414.966,"ID":5,"Active":true},"Three":{"X":-296.794,"Y":-175.0,"Z":-404.975,"ID":6,"Active":true},"Four":{"X":-296.613,"Y":-175.0,"Z":-394.994,"ID":7,"Active":true}}
Entry Requirements
Delubrum Reginae (Savage) is unlocked and entered by completing the quest "A Seaside Story" from the Troubled Gentleman in Gangos. To unlock the quest, players must fulfil the following conditions:
- They have completed the quest "Fit for a Queen".
- They are Resistance Rank 15.
- They currently have 700,000 mettle.
Finding a Group
Two major communities support Field Operations in OCE, the Content Achievers Discord covers a wide variety of content beyond Field Operations, while the Murder of Geese (MOG) Discord focuses specifically on coordinating groups for raids in Field Operations.
Content Achievers DiscordMurder of Geese (MOG) DiscordSet Up
NOTE
The nature of Lost Actions allows players to take on other roles to cover any missing bases of tanking, healing and damage.
Lost Actions ListEach party should aim for:
x2 Tanks
x2 Healer
x3 DPS (1 of each type)
Each party will also have a Letter/Number designation, used for mechanic positions. These are:
Letter Alliance
- Party A
- Party B
- Party C
Number Alliance
- Party 1 / D
- Party 2 / E
- Party 3 / F
Additionally, everyone should have a  Reraise buff active at AT ALL TIMES, available from either a Resistance Reraiser or the Lost Action Lost Reraise. It offers players a 70% chance (80% with Lost Reraise) to be automatically revived if they die, a very useful tool to circumvent the
  restriction on standard raises. If it gets consumed, find a safe moment to refresh the buff, even during battle.
Depending on the role, it's essential to have certain Pure Essences active and Lost Actions in the holster to provide stat boosts, support for the team and to augment certain Lost Actions. Also listed are holsters for each role that players should prepare in advance of each run:
| Role | Pure Essence | Lost Actions |
|---|---|---|
| Tank | Indomitable |  Lost Sacrifice (Augmented) - Full HP raise for KO'd target, 50% chance to avoid death. Lost Sacrifice (Augmented) - Full HP raise for KO'd target, 50% chance to avoid death.  Lost Aethershield - 30% mitigation for the whole party. Lost Aethershield - 30% mitigation for the whole party.  Lost Shell II - Spammable 15% mitigation for 30 minutes. Lost Shell II - Spammable 15% mitigation for 30 minutes. |
| Healer | Divine | Lost Arise (Augmented) - 15% chance to raise a player despite the raise restriction.  Lost Spellforge & Lost Spellforge &  Steelsting - Converts all target player's damage to magic/physical respectively. Steelsting - Converts all target player's damage to magic/physical respectively. Lost Dispel - Removes one buff from target.  Lost Banish III - Increases undead enemies' damage taken by 25%, 1 healer per raid. Lost Banish III - Increases undead enemies' damage taken by 25%, 1 healer per raid. |
| Melee | Duelist |  Banner of Honored Sacrifice (Augmented) - Increases damage by 55% for 30 seconds. Banner of Honored Sacrifice (Augmented) - Increases damage by 55% for 30 seconds.  Lost Rend Armor - Increases target's damage taken by 10%, 2 melee per raid. Lost Rend Armor - Increases target's damage taken by 10%, 2 melee per raid. |
| Phys. Ranged | Fiendhunter |  Lost Dervish - Buffs party by considerable amount. Lost Dervish - Buffs party by considerable amount. |
| Caster | Elder | Lost Cure IV (Augmented) - Grants  Lost Bravery to all targets healed, increasing damage by 10% for 1 minute. Lost Bravery to all targets healed, increasing damage by 10% for 1 minute. |
Encounters
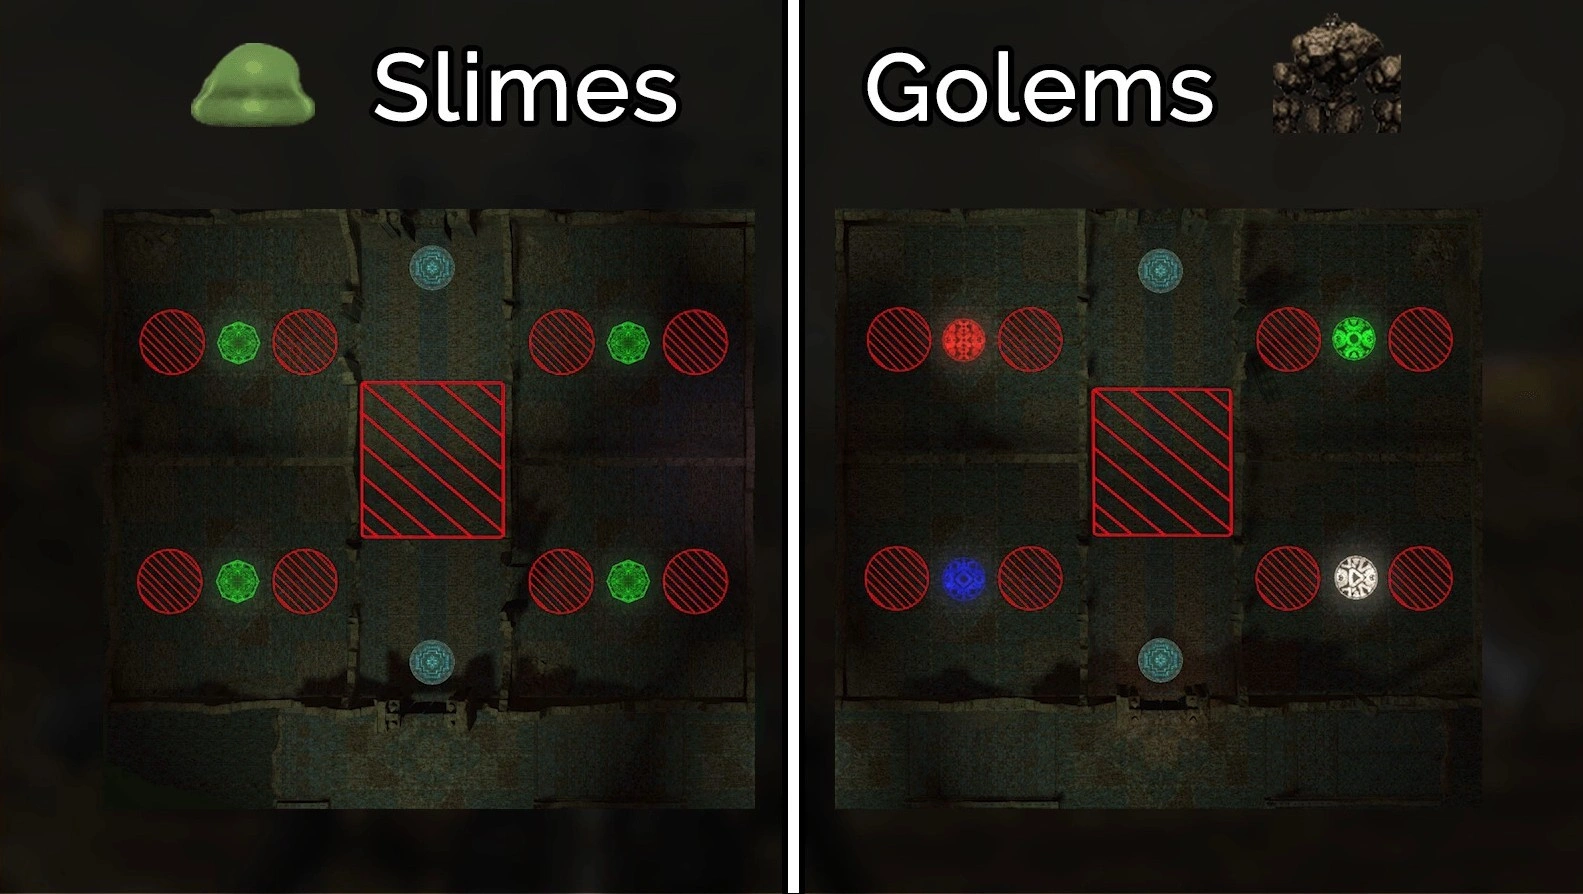
Trash 1 - Slimes & Golems
Slimes and Golems are the first trash encounter of Delubrum Reginae (Savage). Despite being trash mobs, each alliance will need to coordinate as a team to successfully resolve their mechanics and open the way towards the first boss.
When the entire raid is ready to begin the run, the Letter alliance will take the West teleporter towards the Slimes and the Number alliance will take the East teleporter towards the Golems. The pull begins when the doors are opened.
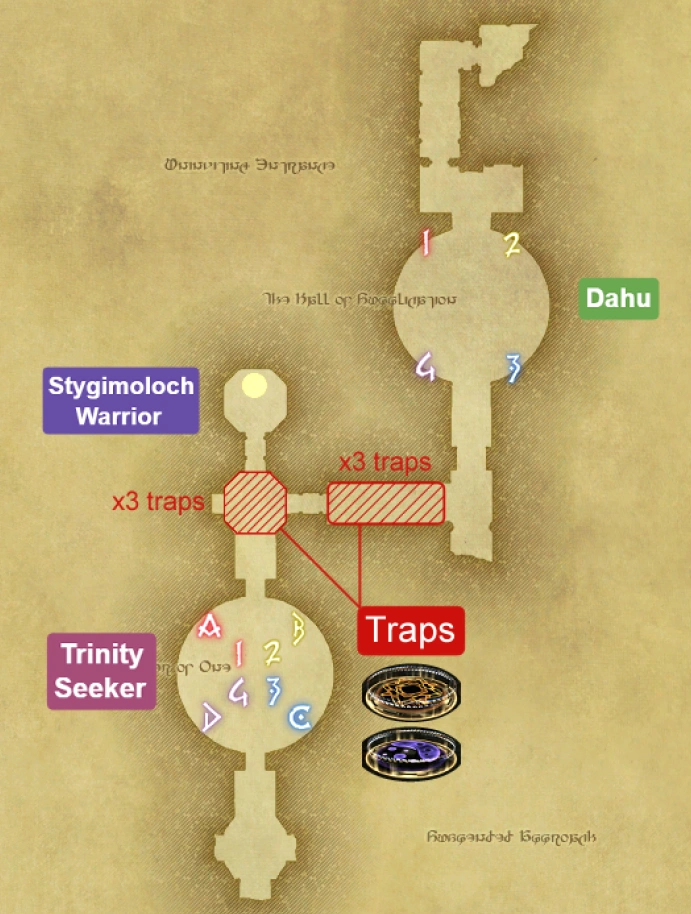
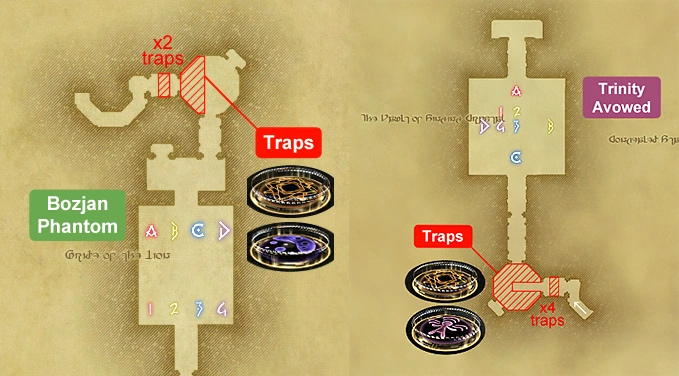
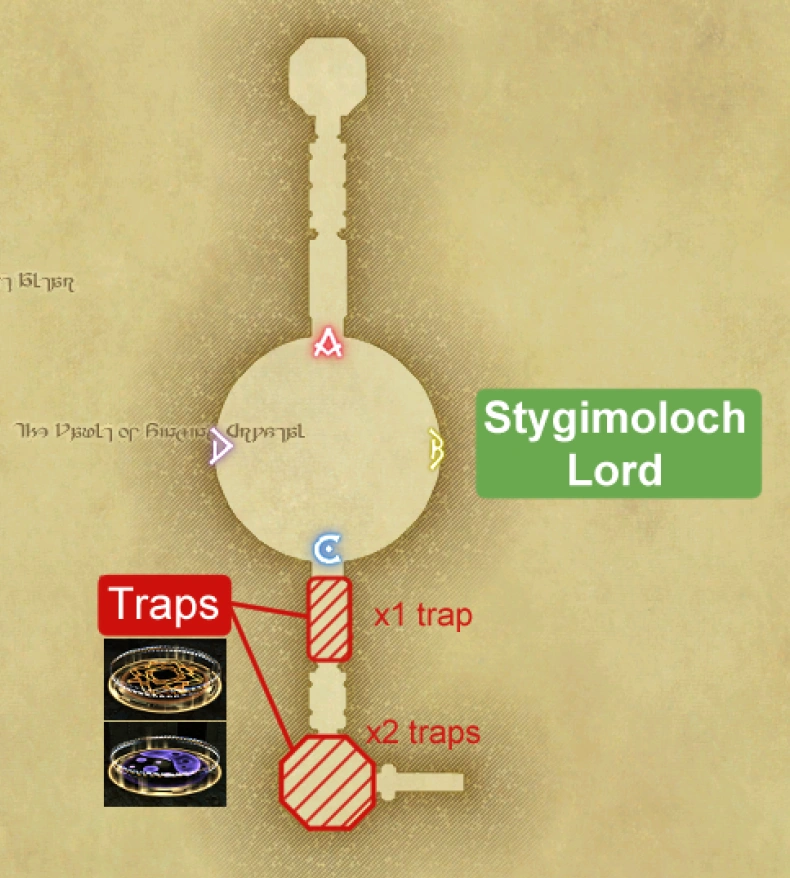
There are 3 traps in each area, 1 in the hallway and 1 in 2 separate rooms. Players with Lost Perception can hug the outside walls of the 2 southern rooms, and detect any traps in those areas ahead of time.
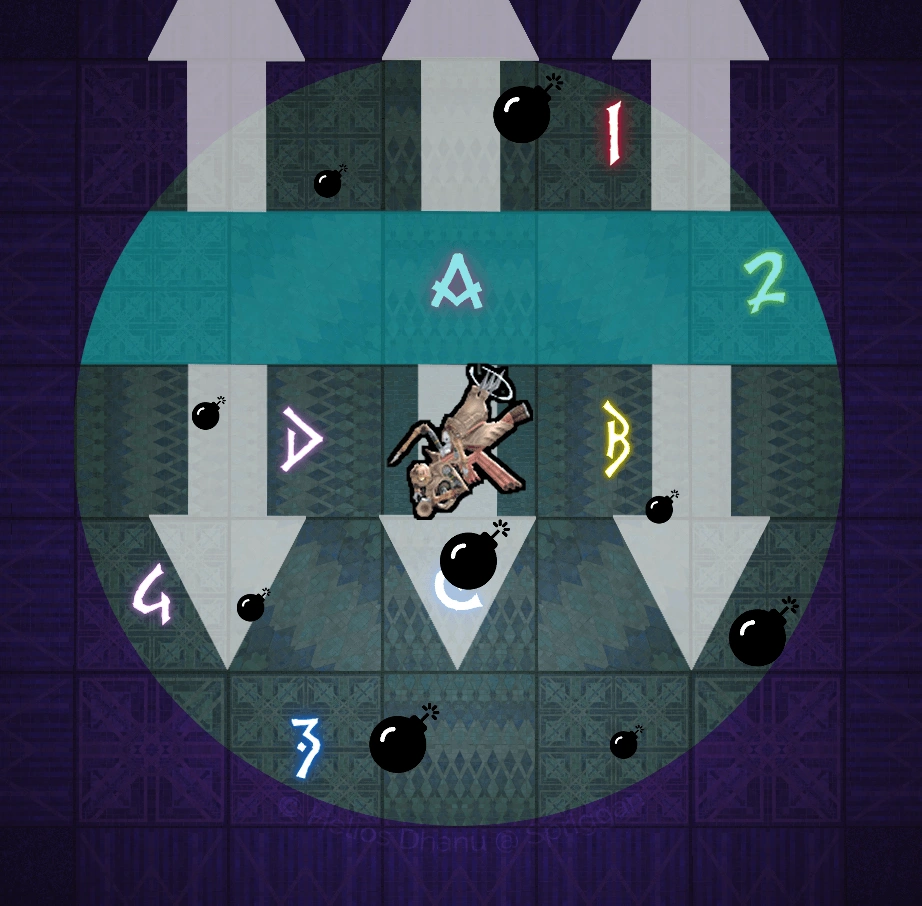
There are 3 types of traps within Delubrum Reginae (Savage).
| Exploding Trap | Poison Trap | Mini Trap |
|---|---|---|
 |  |  |
| Explodes in a small area around itself when detonated, killing any nearby players. | Explodes in a small area around itself when detonated, inflicting any nearby players with  Poison. Poison. | Explodes in a small area around itself when detonated, inflicting any nearby players with  Mini. Mini. |
Most traps are walked around with an exception for the Mini Trap, which is purposefully popped after Trinity Avowed to access the Stygimoloch Lord.
Slimes
There are 3 different enemy types that players will have to deal with. The goal is to have 1 Viscuous Clot explode and die on a button in each room.
Viscuous Clots
- Green in colour.
- Will fuse with other Viscuous Clots in close proximity, gaining a stacking increase in damage and health. Will explode at 5 stacks.
- Exploding (and dying) on green buttons will resolve their mechanic.
4 Tanks will take turns pulling slimes onto each button in their rooms, pulling 3 first, then 2 when it's their turn to pull slimes again.
4 Healers will pull 1 final slime into each room after all tanks have finished pulling. They must wait for the call to merge this final slime into the
tanks' slimes.
Sanguine Clots
- Red in colour.
- Will fuse with Viscuous Clots if left alone, causing a wipe.
DPS will pull and kill these immediately.
Bozjan Soldiers
- Spawn in the North & South of the hallway.
- Will occasionally do PB AoEs around itself.
- 2 players will pull 1 each and hold them where they spawned.
After the call to merge the final slime, each Viscuous Clot, each now at 5 stacks, will begin hardcasting their explosion. ALL PLAYERS must immediately take the North exit in the hallway and run towards their teleporter, getting as far away as possible to avoid the explosions.
Golems
There are 2 different enemy types that players will have to deal with. The goal is to have each Bicolor Golem die on a button with the same colour as itself.
- Bicolor Golems
- Uses Metamorphosis, an interruptible attack to change colours.
- The order of colour changing is Blue > White > Green > Red > Blue...
 Blue
Blue- AoE tankbuster, inflicts a deadly Esuna-able
 DoT.
DoT. 1 Tank will pull this golem to the SW room and interrupt every Metamorphosis cast.
1 Healer will watch the tank, keeping them alive and using Esuna to cleanse the DoT.
- Killed 1st
- AoE tankbuster, inflicts a deadly Esuna-able
 White
White- Begins casting a full heal on itself upon reaching 30% HP.
1 Tank will pull a Blue Golem to the SE room, allow it to cast Metamorphosis ONCE and then interrupt every subsequent cast.
TANK
Because it's morphing from a
Blue Golem, the Tank will also need to deal with its tankbuster beforehand.
Healers should remember to use Esuna to remove the
DoT.- All damage cooldowns should be held until the 30% threshold is passed.
- Killed 2nd
 Green
Green- Absorbs nearby Ruin Golems.
1 Tank will pull this golem to the NE room and interrupt every Metamorphosis cast.
- Killed 3rd.
 Red
Red- Tethers to the 1st player that deals damage to them and chases them, doing heavy autos in melee range.
1 Tank will pull a Green Golem to the NW room, allow it to cast Metamorphosis ONCE and then hit it with an attack and kite it around the room. When the Slimes players make the call, this tank will pull the Red Golem onto the button and use their invulnerability while everyone else burns it down.
1 Phys. Ranged DPS will let the Green Golem cast Metamorphosis ONCE and then interrupt every subsequent cast.
- Uses Metamorphosis, an interruptible attack to change colours.
- Ruin Golems
- Spawn in the North & South of the hallway.
- Tether to the 1st player that deals damage to them.
- Casts a small raidwide inflicting
 Thrice-come Ruin if not killed in time.
 - 2 players will pull 1 each and hold them where they spawned.
Boss 1 - Trinity Seeker
Trinity Seeker is the very first boss of Delubrum Reginae (Savage). While not much changes from its Normal version, there is still a hard enrage at 9:50 if none of its attacks are skipped.
Trinity Seeker opens with the following sequence of attacks:
Katanas
- Verdant Tempest - Raidwide
- Manifest Avatar - Jumps to the middle of the room and creates a clone of itself.
- First -> Fourth Mercy - 1 of its 4 swords will glow on each cast, indicating a 180° cleave in that direction.
- Fourfold Mercy - Each sword will perform its 180° cleave in the order indicated by First -> Fourth Mercy.

- Seasons of Mercy (Clone) - 2 grid line AoEs will spawn back to back requiring players to dodge.
- A gray orb spawns on an intercardinal and performs a gaze. Players must look away from it.
- A pink circle AoE spawns on another intercardinal and massively grows in size right before resolving. Players must run away from where it spawns.
- Verdant Tempest
- Merciful Arc - Solo tankbuster targeted on Main Tank.
Upon using Merciful Arc or falling below 80%, it will transition into its next sequence of attacks.
Greatswords
- Verdant Path -> Baleful Swathe - Summons 2 greatswords and sweeps its left and right. Safe spots are in front and behind it, as well as under the boss.
- Baleful Onslaught - Conal cleave shared tankbuster.
- Phantom Edge - The greatswords will glow, augmenting its next "Baleful Onslaught/Blade" attack.
- Baleful Onslaught (Phantom Edge) - Conal cleave solo tankbuster.
- Phantom Edge (Random chance)
- Burning Chains - Tethers random players together. Players should stack together until the telegraph above their head disappears, then run away from each other to break the chain.
- Baleful Blade - Room-wide AoE dealing lethal damage. Hide behind a barrier. OR
- (Phantom Edge) - Knockback. Get in front of a barrier.
WARNING
Remember to check if the boss has used Phantom Edge. Players can do this by checking if the boss's greatswords are glowing during this attack.
- (Phantom Edge) - Knockback. Get in front of a barrier.
- Manifest Avatar
- Phantom Edge (Random chance)
- Baleful Firestorm (Clone) - 4 clones will spawn around the wall of the arena in a sequential order, each doing a large circle AoE as they do. They will then dash directly through the arena in that same order. Players should stand at the empty side of the 1st clone, then run into each clone as they dash through the arena.
- Baleful Blade
- Baleful Blade (Phantom Edge)
WARNING
Remember to check if the boss has used Phantom Edge. Players can do this by seeing if the boss's greatswords are glowing during this attack.
- Baleful Blade (Phantom Edge)
- Verdant Tempest
Upon using Verdant Tempest during its Greatswords phase or falling below 60%, it will transition into its next sequence of attacks.
Unarmed
- Verdant Path -> Iron Impact - Starts fighting barehanded and targets a random player with a shared damage line AoE. EVERYONE must stack up to share the damage.
- Manifest Avatar
- Iron Rose (Clone) - 4 clones will target random players with line AoEs, requiring players to dodge.
- Iron Splitter - Trinity Seeker will jump to a ring composed of either sand or tiles, then detonate all rings of that material it is standing on. Players must stand on the opposite material.
- Manifest Avatar
- Iron Splitter + Dead Iron (Clone) - 3 players are targeted with Earth Shakers. They must split away from the party and spread from each other to avoid overlap. All players must stand on the opposite material rings to Trinity Seeker.
- Iron Splitter + Dead Iron (Clone)
- Iron Rose (Clone)
- Verdant Tempest
Upon using Verdant Tempest during its Unarmed phase or falling below 43%, it will transition into its next sequence of attacks.
By this point, players would have seen every attack Trinity Seeker can perform. The rest of the fight remixes these attacks, notes are only provided for these remixes.
Katanas 2
- Verdant Path -> Act of Mercy - Summons 4 katanas and performed a '+'-shaped AoE. Dodge at its intercardinals.
- Manifest Avatar
- Baleful Firestorm (Clone)
- First -> Fourth Mercy - Will light up sequentially while Baleful Firestorm is being resolved.
- Fourfold Mercy
- Seasons of Mercy
- Burning Chains
- Verdant Tempest
- Merciful Arc
- Manifest Avatar
- First -> Fourth Mercy + Iron Splitter (Clone) - Iron Splitter (Clone) will resolve right after Fourth Mercy.
- Fourfold Mercy + Iron Splitter (Clone) - Iron Splitter (Clone) will resolve right after the last cleave in Fourfold Mercy
- Seasons of Mercy + Iron Splitter (Clone) + Iron Rose (Clone) - Resolves in the following order:
- Iron Splitter (Clone)
- Grid AoEs
- Gray orb
- Iron Rose (Clone)
- Pink circle AoE
Upon using Seasons of Mercy during its Katanas phase, it will transition into its final sequence of attacks.
Greatswords 2
- Verdant Path -> Baleful Swathe
- Manifest Avatar
- Phantom Edge (Random chance)
- First -> Fourth Mercy (Clone) + Baleful Blade - The clone performing First -> Fourth Mercy will be standing at a cardinal. Baleful Blade will resolve at Third Mercy (Clone).
WARNING
Remember to check if the boss has used Phantom Edge. Players can do this by seeing if the boss's greatswords are glowing during this attack.
- Fourfold Mercy (Clone) - These will resolve at the clone's position, at a cardinal.
- Burning Chains
- Verdant Tempest
- Manifest Avatar
- Phantom Edge (Random chance)
- Iron Splitter (Clone) + Baleful Blade - Baleful Blade will resolve right after Iron Splitter (Clone)
WARNING
Remember to check if the boss has used Phantom Edge. Players can do this by seeing if the boss's greatswords are glowing during this attack.
- Manifest Avatar
- First -> Fourth Mercy (Clone) + Burning Chains - The clone performing First -> Fourth Mercy will be standing at a cardinal. Burning Chains will resolve during Second Mercy (Clone).
- Phantom Edge (Random chance)
- Fourfold Mercy (Clone) + Baleful Blade - Baleful Blade will resolve right after the last cleave in Fourfold Mercy (Clone).
WARNING
Remember to check if the boss has used Phantom Edge. Players can do this by seeing if the boss's greatswords are glowing during this attack.
- Phantom Edge (Random chance)
- Baleful Onslaught
WARNING
Remember to check if the boss has used Phantom Edge. Players can do this by seeing if the boss's greatswords are glowing during this attack.
If Trinity Seeker is not killed before this point, it will cast a hard enrage, wiping the raid.
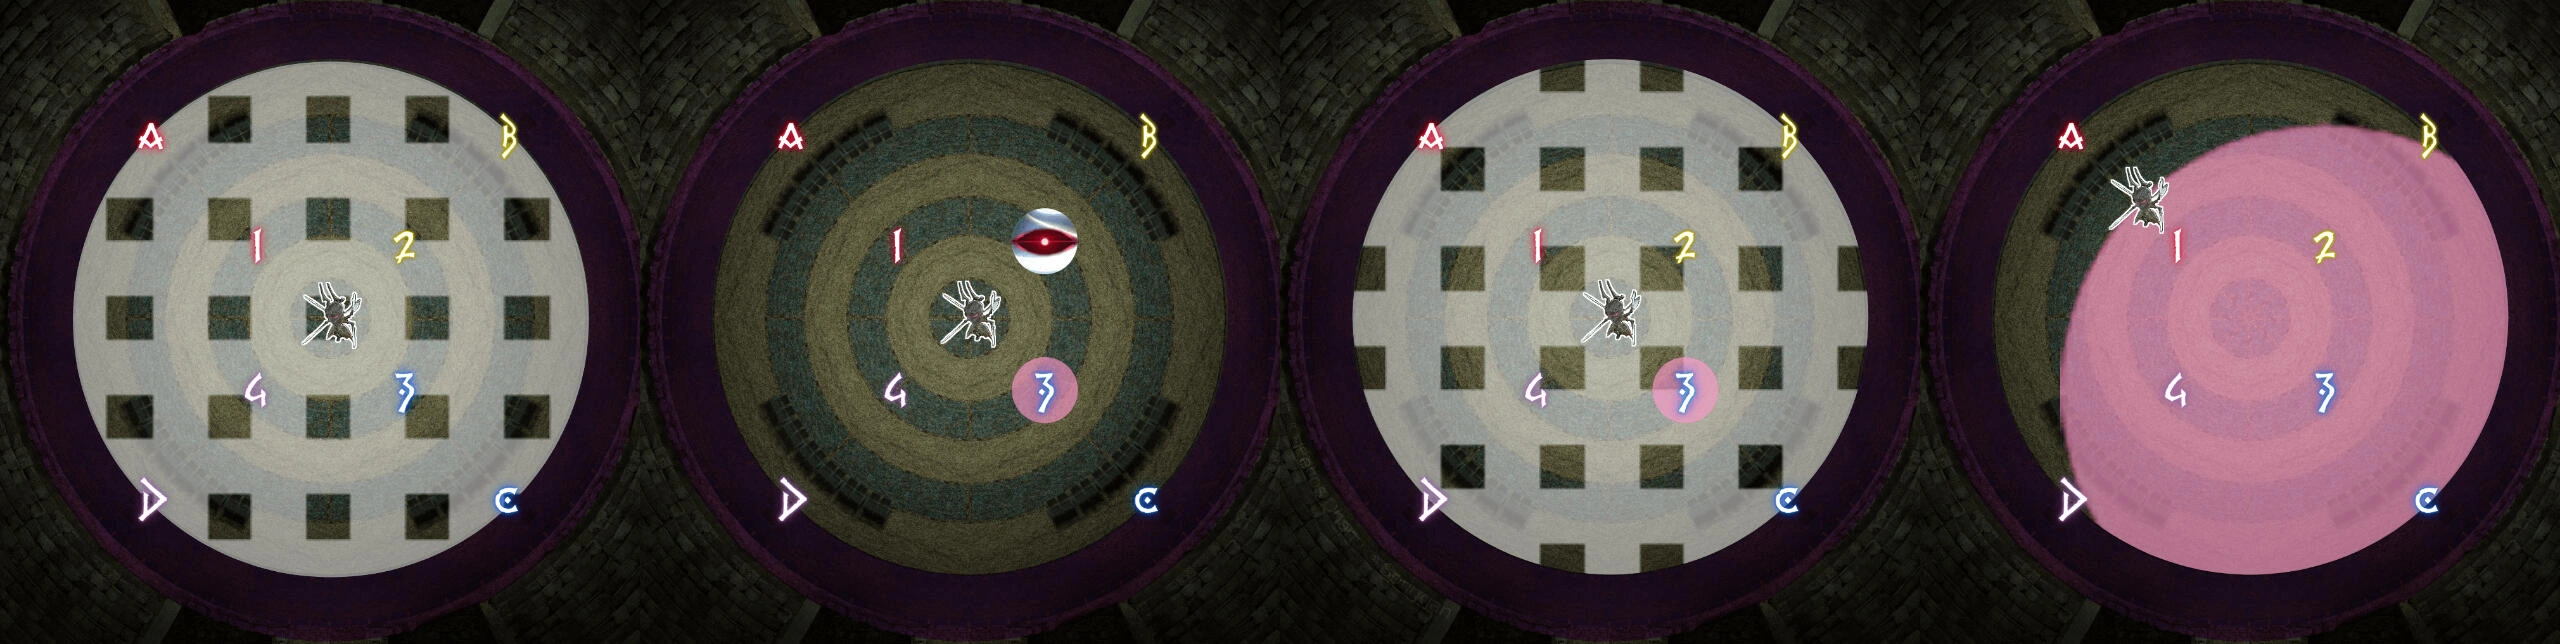
Trash 2 - Dahu
POVDahu is the 2nd trash encounter of Delubrum Reginae (Savage). It has no enrage and will repeat mechanics until it is dead.
Before pulling, the raid's designated Duelist will take the teleporter just North of Trinity Seeker's arena.
Dahu begins with the following:
- Reverberating Roar x2 - Spawns 3 puddles underneath random players. This happens 6 times across both casts for a total of 18 puddles.
- Hot Charge - Dahu turns towards a random direction and charges to the wall. This is a line AoE hitting anyone in front of it.
- Hot Charge - Dahu then does a 180° turn and charges across the arena to the opposite wall. Also a line AoE.
- Firebreathe - Conal AoE from its current position. Be behind or on its sides.
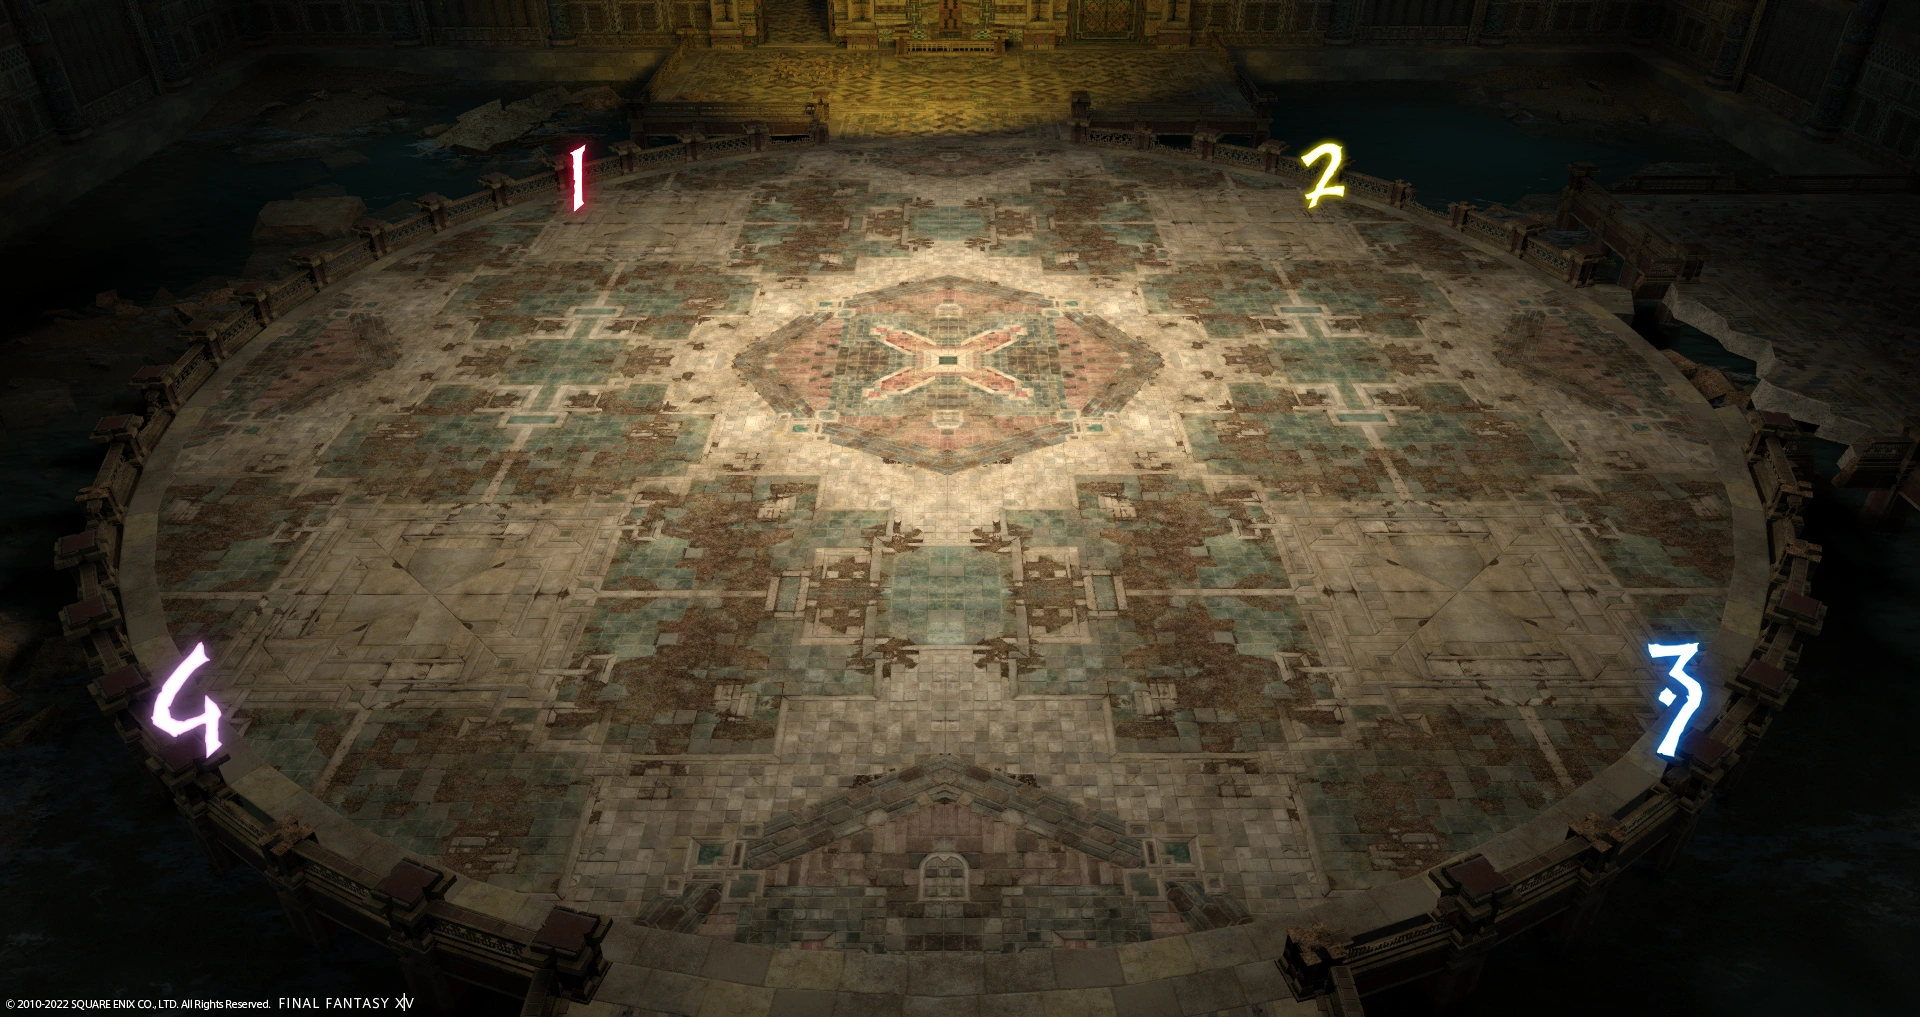
After Firebreathe, Marchosias adds will spawn around the walls of the arena. These adds are untargetable and will perform Head Down, jumping around and creating line AoEs throughout.
- Spit Flame - Targets 4 random players with spread AoEs numbered 1 -> 4 above their heads.
- These players can use Spit Flame to kill a Marchosias by standing next to one. Each marked player should go to the waymark that matches the number above their head, using Spit Flame to kill the Marchosias in that spot.
- Left/Right-sided Shockwave - Cleaves the side shown on the castbar 1st, before cleaving the opposite side shortly after.
- Feral Howl - Knocks back all players from itself.
- Shortly after all players are knocked back, the Marchosias will use Hunter's Claw, swiping the area around them in a small circle AoE. Players will need to get knocked back towards an empty space created by the Spit Flame players earlier.
- Firebreathe x5 - Each use of Firebreathe will rotate Dahu in the shown direction. Players will need to rotate around, avoiding its front.
- This attack will kill all remaining Marchosias adds on the field.
After Firebreathe x5, Crowned Marchosias adds will spawn in 3 waves of 2 each. These adds tether to Dahu's current target and deal heavy damage auto-attacks. The Main Tank should use their defensive cooldowns here. Everyone else should burn them down as quickly as possible. Shortly after, more Marchosias adds will spawn and begin using Head Down.
- Reverberating Roar
- Left/Right-sided Shockwave
- Spit Flame
- Hysteric Assault + Burn - Another knockback from itself.
2 Tanks are targeted with Flare markers.
- Marked
Tanks should get knocked back into the 2 Northern safespots, while everyone else should be knocked back to the 2 Southern safespots
- Marked
- Firebreathe
- Left/Right-sided Shockwave
- Hot Charge
- Firebreathe
- Crowned Marchosias adds
- Reverberating Roar x2
From here, Dahu's rotation will loop until it is killed.
Duel - Stygimoloch Warrior
POVThe Stygimoloch Warrior is a special duel that only 1 player out of the entire raid group may undertake. Defeating it rewards the player with  Pride of the Lioness, a buff that doubles the player's damage dealt and increases their Maximum HP, Physical and Magical Defence.
WARNING
The following Lost Actions are required:
| Lost Action | Usage |
|---|---|
 Lost Perception Lost Perception | There are hidden traps near the entrance and exit of the teleporters, and the Stygimoloch Warrior uses hidden traps as part of its mechanics. |
 Lost Dispel Lost Dispel | The Stygimoloch Warrior occasionally grants itself a  Damage Up buff throughout the fight. Damage Up buff throughout the fight. |
To start, Stygimoloch Warrior will cast Surge of Vigor, granting itself a Damage Up buff. The duelist will need to use Lost Dispel to remove the buff.
This is followed by Unreleting Charge, dashing 3 times towards the duelist and knocking them back with each dash. It's recommended to use an 
 anti-knockback ability to avoid being knocked into the wall. This attack also deals moderate damage, so mitigation or healing is advised.
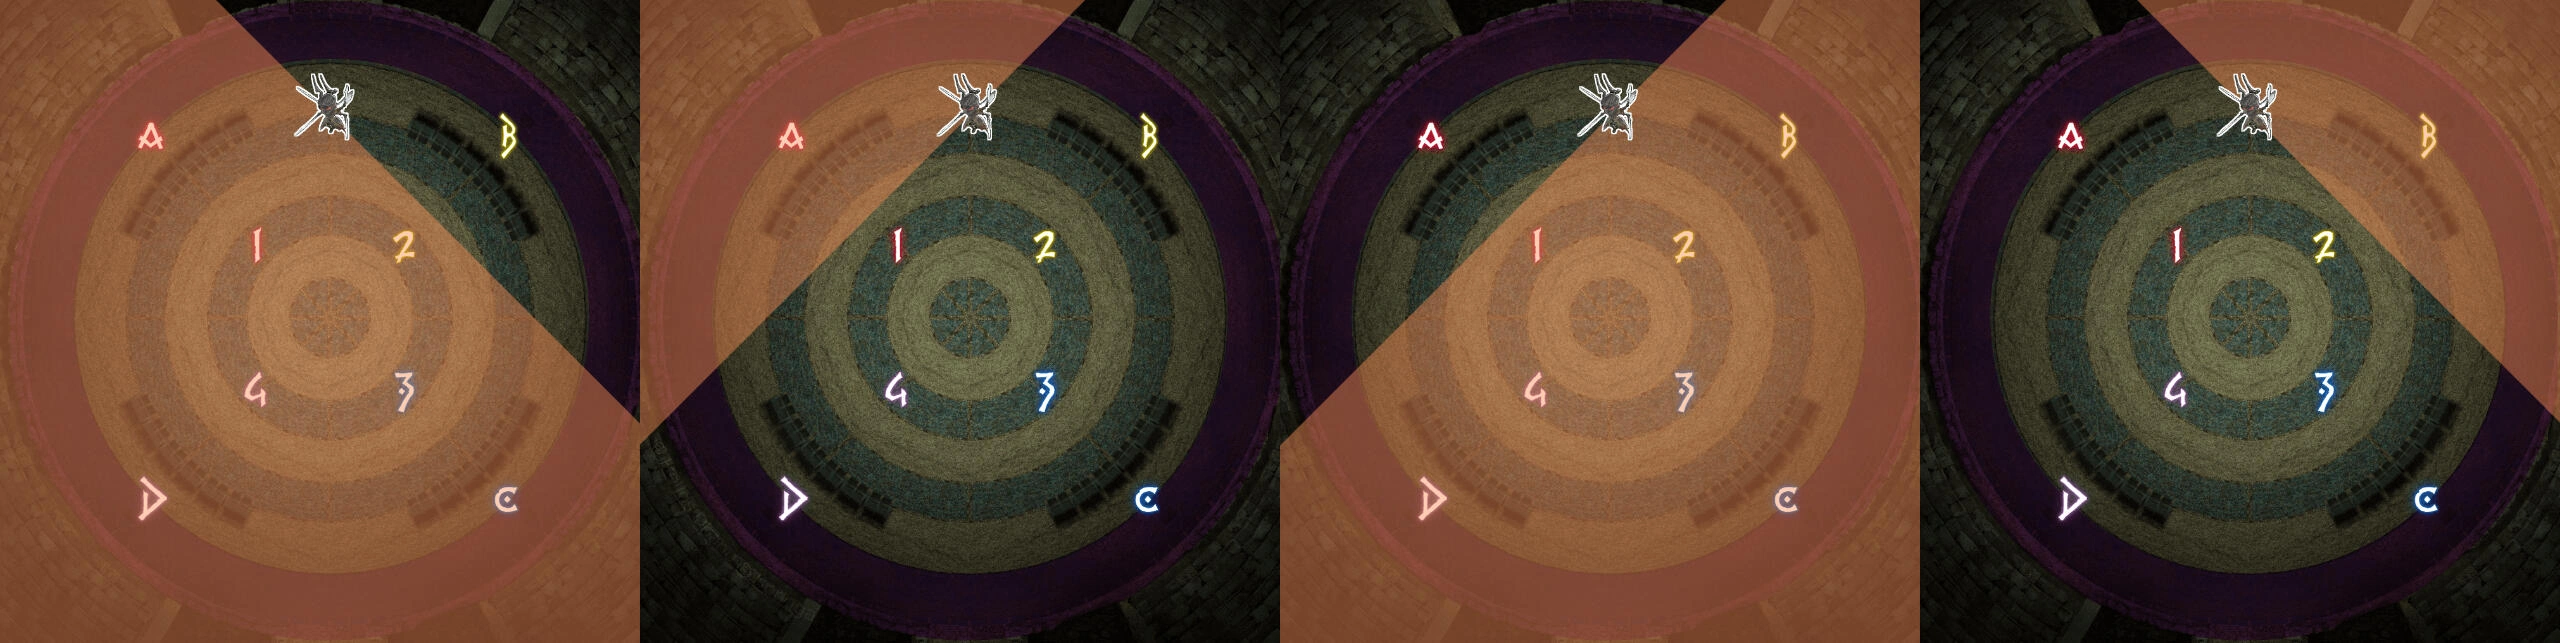
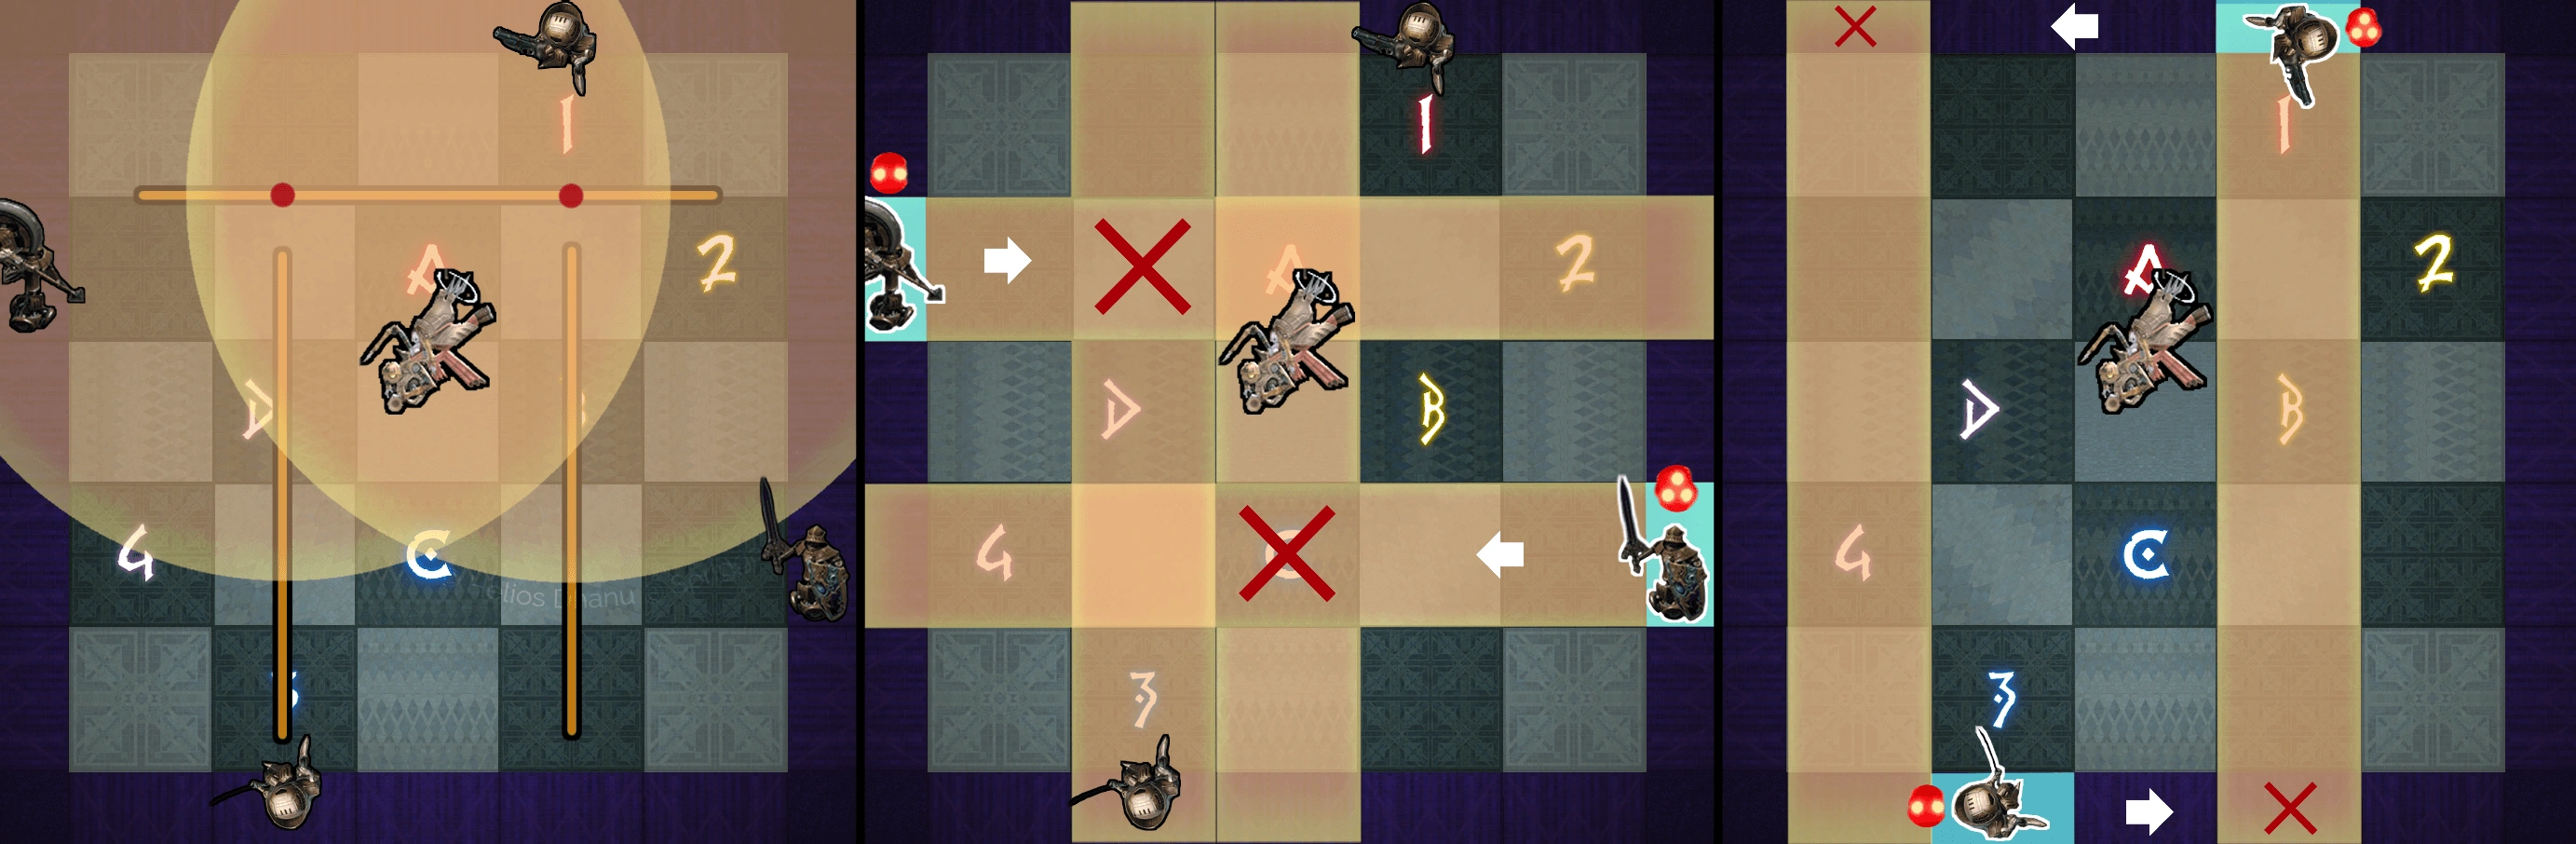
The Stygimoloch Warrior's 1st major mechanic is Entrapment, jumping North and sending the player to the other side of the arena shortly after. A labyrinth of hidden exploding traps is created, and the duelist must use Lost Perception to navigate the maze and get behind the boss before Lethal Blow finishes, a 180° cleave sweeping everything in front of it.
There are 5 unique patterns.
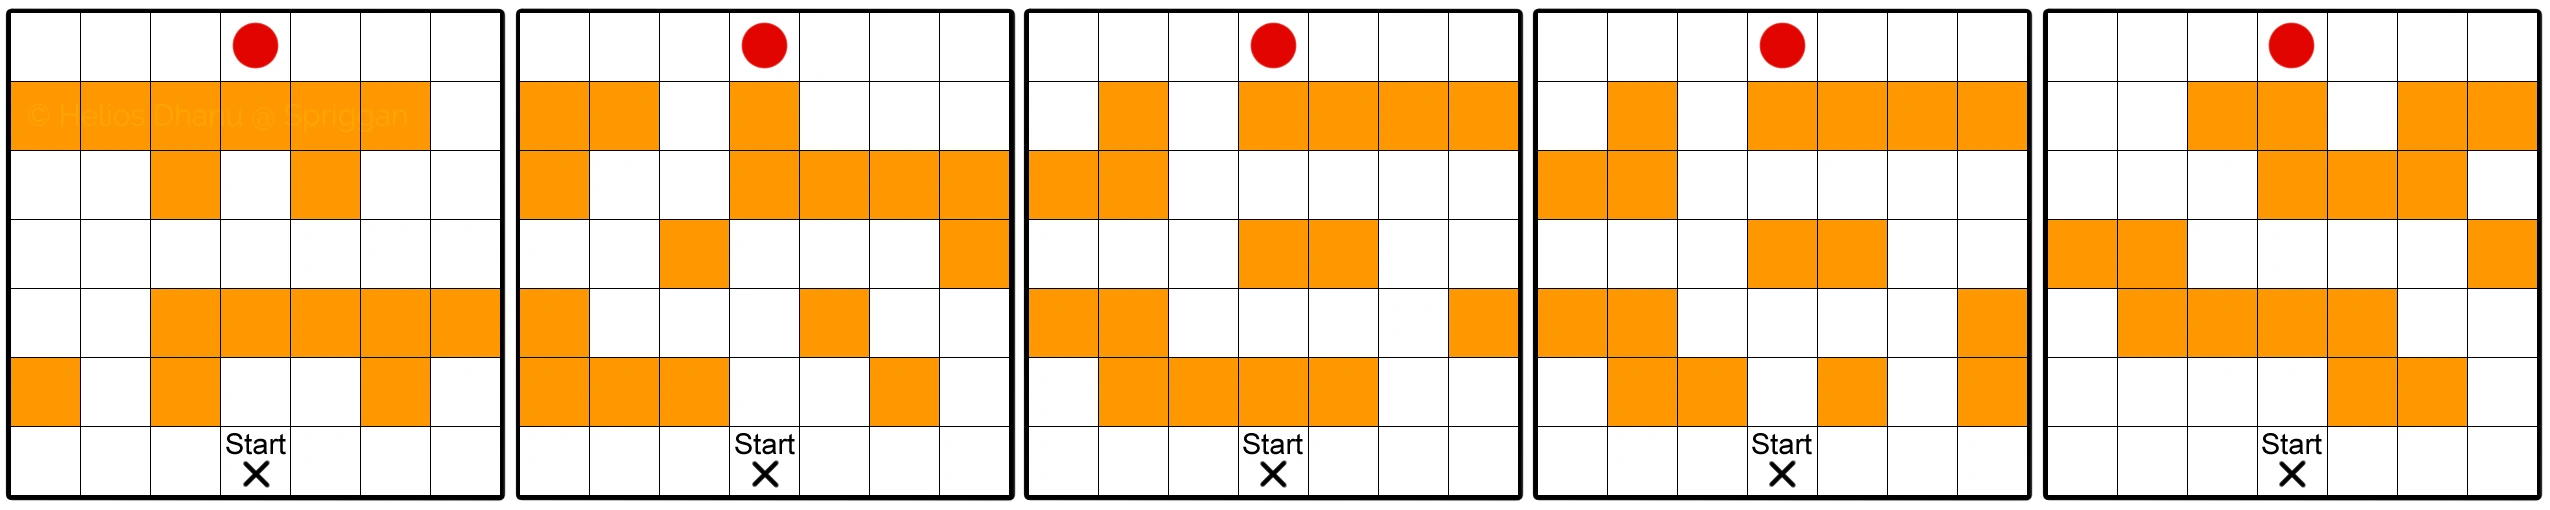
WARNING
Lethal Blow will also detonate any remaining traps. Make sure to stand away from all traps until they've detonated.
Following Lethal Blow, the Stygimoloch Warrior will use a Vicious Swipe -> Crazed Rampage combo. Vicious Swipe is a circle AoE around the boss, requiring the duelist to step away, and Crazed Rampage is a knock-back originating from the boss. The duelist will need to get close to the Stygimoloch Warrior after Vicious Swipe and avoid being knocked back into the wall from Crazed Rampage.
Focused Tremor will sequentially spawn 4 square AoEs, 1 for each quarter of the arena, resolving in the same order they were spawned. The boss will also jump to the 3rd AoE in sequence and begin casting Focused Slash, another 180° cleave in front of it. The duelist must dodge into the 3rd AoE after it has resolved and then get behind the boss, there are 2 methods to accomplish this.
- Starting in the 4th square and moving into each square after each resolve.
- Starting in the 4th square and stepping into the 3rd square as soon as it resolves.
For uptime, melee players can stand in the 3rd square and step out just after the 2nd square resolves, stepping back in afterwards.
The Stygimoloch Warrior's 2nd major mechanic is Inescapable Entrapment, jumping to the middle and placing hidden traps across the entire arena save for a small plus shape in the centre. This time, the duelist will need to use Lost Perception to discover unique traps and detonate the correct one to avoid the upcoming mechanic.
There are 4 unique patterns.
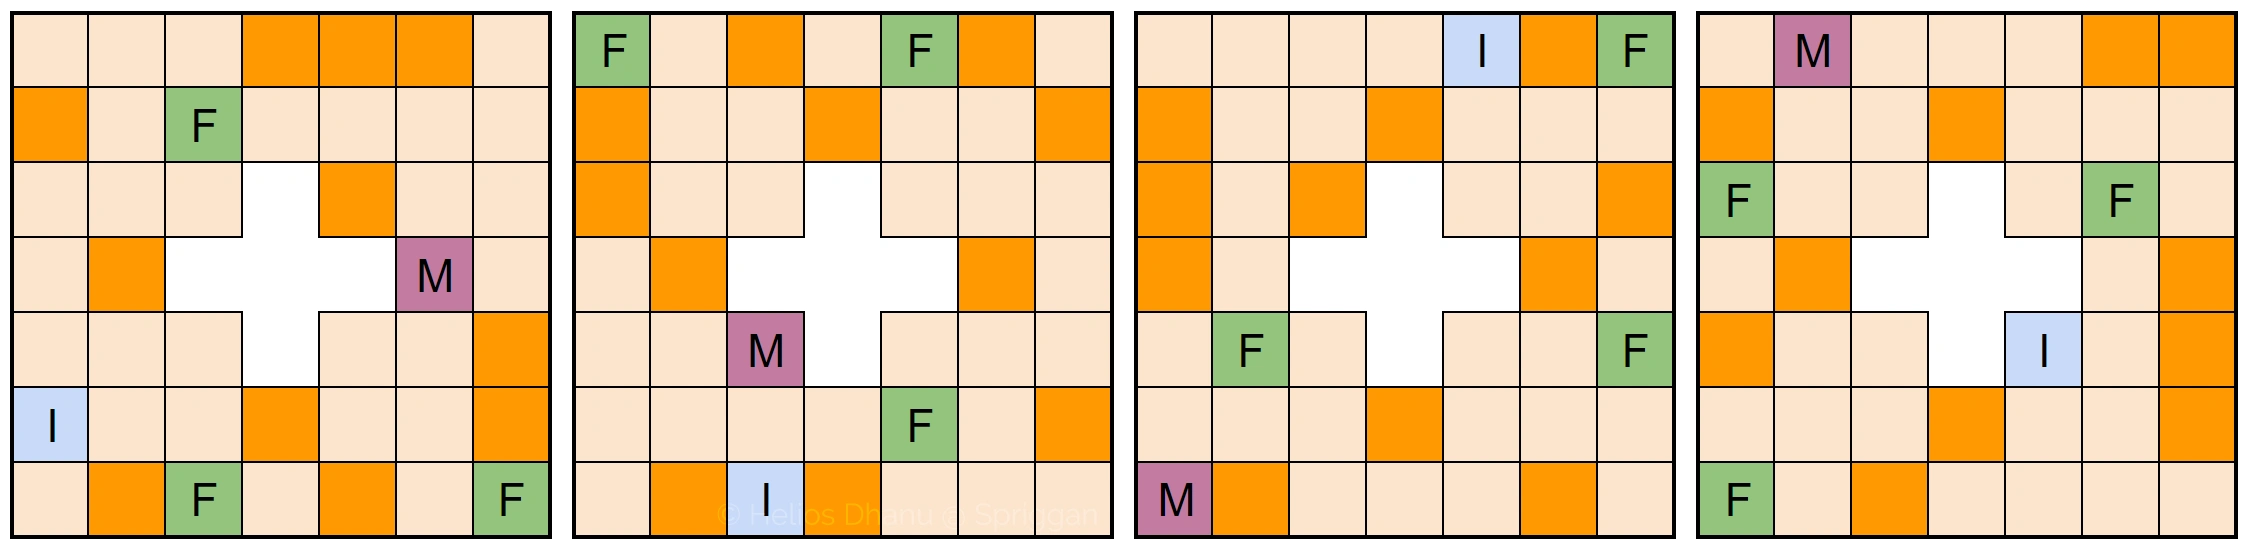
- Withering Curse will draw in the duelist if they are not afflicted with Mini when the castbar finishes. The player must detonate the Mini (M) trap, shown in pink. The Stygimoloch Warrior will also use Devour shortly after, a small frontal cone AoE that's unavoidable should the player be drawn in.
- Surging Flames will kill the duelist if they are not afficted with
 Deep Freeze when the castbar finishes. They player must detonate the Ice (I) trap, shown in blue.
WARNING
Withering Curse/Surging Flames will also detonate any remaining traps. Make sure to stand away from all traps until they've detonated.
Following Withering Curse/Surging Flames, the boss will use another Surge of Vigor to dispel, followed by another Focused Tremor, this time spawning 16 square AoEs sequentially, starting from the middle of the arena and spiralling out. This is combined with Flailing Strike, creating a tether between the Stygimoloch Warrior and the duelist, and when the castbar finishes, creating a telegraphed cone AoE that rotates counterclockwise (CCW) 5 times after the initial hit. The duelist can stand in the 2nd square to bait the 1st Flailing Strike, then move into the 4th square to dodge the first few resolving cones and squares.
Towards the end of the resolving squares, the boss will use another Vicious Swipe -> Crazed Rampage combo.
Afterwards, the Stygimoloch Warrior will use another Inescapable Entrapment, and the duelist can resolve this as before. Following the Withering Curse/Surging Flames however is an additional cast, Surging Flood. The duelist will need to be afflicted with  Toad before the castbar finishes by detonating a Toad (F) trap, shown in green. Finally, Leaping Spark will follow, targeting the duelist with 3 lightning AoEs, immediately killing them if they are still afflicted with Toad. The duelist will need to detonate another Toad (F) trap to remove the debuff early, or if time allows, the debuff can fall off naturally before the castbar finishes.
WARNING
Leaping Spark will also detonate any remaining traps. Make sure to stand away from all traps until they've detonated.
The boss's final new attack is Coerce, inflicting the duelist with a  Forced March debuff that will resolve later. For now, there is another Surge of Vigor to dispel, followed by Focused Tremor and Focused Slash. This is the same mechanic from before but the duelist must now position so that their Forced March leads them into the safe area, behind the Stygimoloch Warrior. This debuff resolves at the same time as the 2nd square's resolve. The safest way to resolve the Forced March is to stand on the 4th square and get forced marched into the 1st square.
From here, the boss will repeat Surge of Vigor, Unrelenting Charge and a Vicious Swipe -> Crazed Rampage combo before using Sun's Ire, a hard enrage at 5:30.
If the duelist is successful in slaying the Stygimoloch Warrior, they can claim their buff from the glowing lioness statue beyond the arena. Near the exit teleporter, there is one final trap. Be sure to use Lost Perception to avoid being caught by surprise.
Boss 2 - Queen's Guard
The Queen's Guard are the 2nd major boss in Delubrum Reginae (Savage). There are 3 major phases, each with hard enrages should they not be defeated in time.
WARNING
The following Lost Actions are required:
| Lost Action | Usage |
|---|---|
 Lost Spellforge Lost Spellforge + Lost Steelsting | The Queen's Guard buff themselves defensively to nullify all physical or magical damage, requiring players to deal damage of the opposite type. |
| Lost Dispel | The Warrior will grant itself a  damage buff that must be dispelled. damage buff that must be dispelled. |
 Lost Reflect Lost Reflect  Light Curtain Light Curtain | There are Spiritual Sphere adds that must die to their own magic via reflecting their damage back to them. |
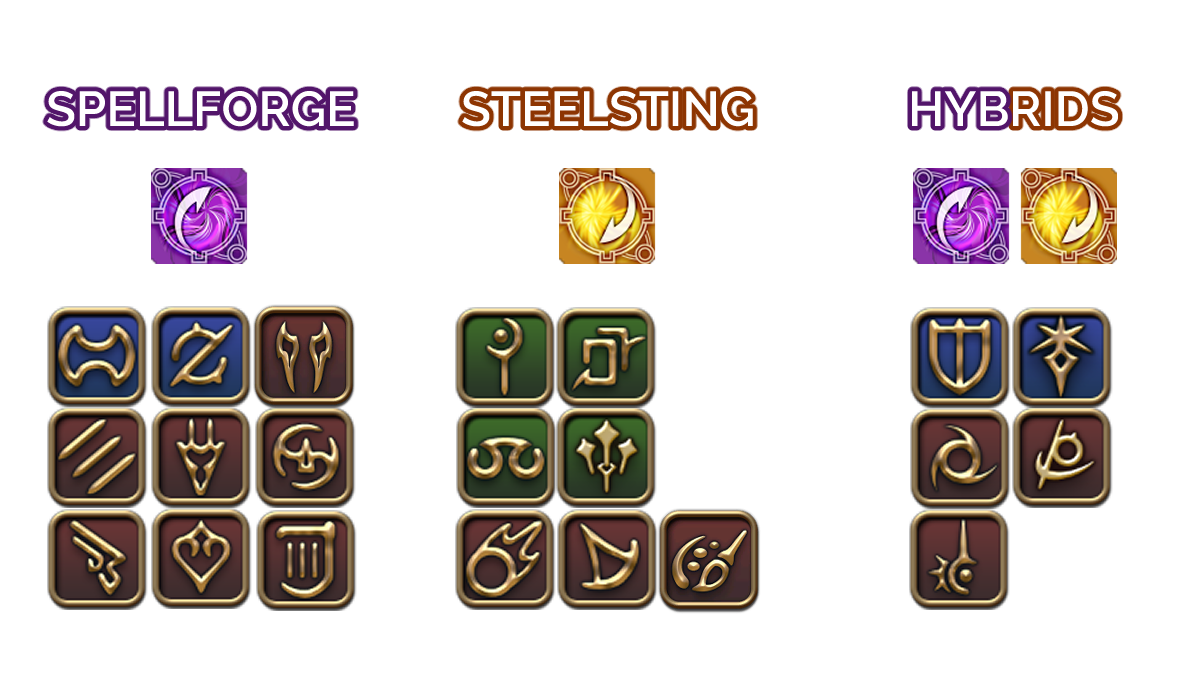
Before the fight begins, 1 healer in each group should provide their party members with the Lost Spellforge / Steelsting buffs opposite to the type of damage they deal. These buffs last for 5 minutes, and fall off upon death.
The fight will open with all 4 of them being targetable. They will only cast Blood and Bone/Queen's Shot, a raidwide, until each Guard has disappeared at 80% HP.
Knight & Warrior
The Knight and Warrior are up first.
- The Knight spawns in the West but is tanked in the middle of the arena, facing North. The letter alliance should attack this boss.
- The Warrior spawns in the East and is tanked along the East edge of the arena. The number alliance should attack this boss.
If they get too close to each other, they will tether and buff each other, making all their attacks lethal. They must also be defeated at the same time, as soon as one is defeated, the other will begin hardcasting its enrage.
To start, a coloured tether will chain the Knight and the Warrior together. Depending on what tether was shown, they will be invulnerable to either  physical or
  magical damage for an extended period of time. Each player will need to read the tether and individually determine what type of damage they want to be dealing.
- Yellow - The Knight and Warrior will be immune to physical attacks.
- All physical + hybrid jobs must have Lost Spellforge.
- All magical jobs must click off their Lost Steelsting if applicable.
- All physical + hybrid jobs must have
- Purple - The Knight and Warrior will be immune to magical attacks.
- All physical jobs must click off their Lost Spellforge if applicable.
- All magical + hybrid jobs must have Lost Steelsting.
- All physical jobs must click off their
TIP
This macro is useful for removing any Lost Spellforge / Steelsting buff.
   /statusoff "Lost Steelsting"
   /statusoff "Lost Spellforge"
   /macroerror off
Relentless Battery will indicate that the Queen's Guard will coordinate for the next set of mechanics, which is as follows:
- Either:
- Sword Omen - The Knight will augment its sword.
- Shield Omen - The Knight will augment its shield.
- Bombslinger - The Warrior will spawn big and small bombs.
- Reversal of Forces - The Warrior will tether the bombs and/or players, reversing their weight. If the player's weight is reversed, this is shown as a
 debuff.
 - Optimal Offensive - The Knight will teleport to an edge of the arena and dash towards an Aetherial Sphere add in the middle. There are different effects depending on which weapon is augmented.
- Sword Omen - The Knight continues dashing through the Aetherial Sphere, detonating in a large circle AoE in the middle of the arena.
- Shield Omen - The Knight knocks the Aetherial Sphere towards the opposite edge, the impact causing a knockback from the middle of the arena, and a large circle AoE from where the Aetherial Sphere lands.
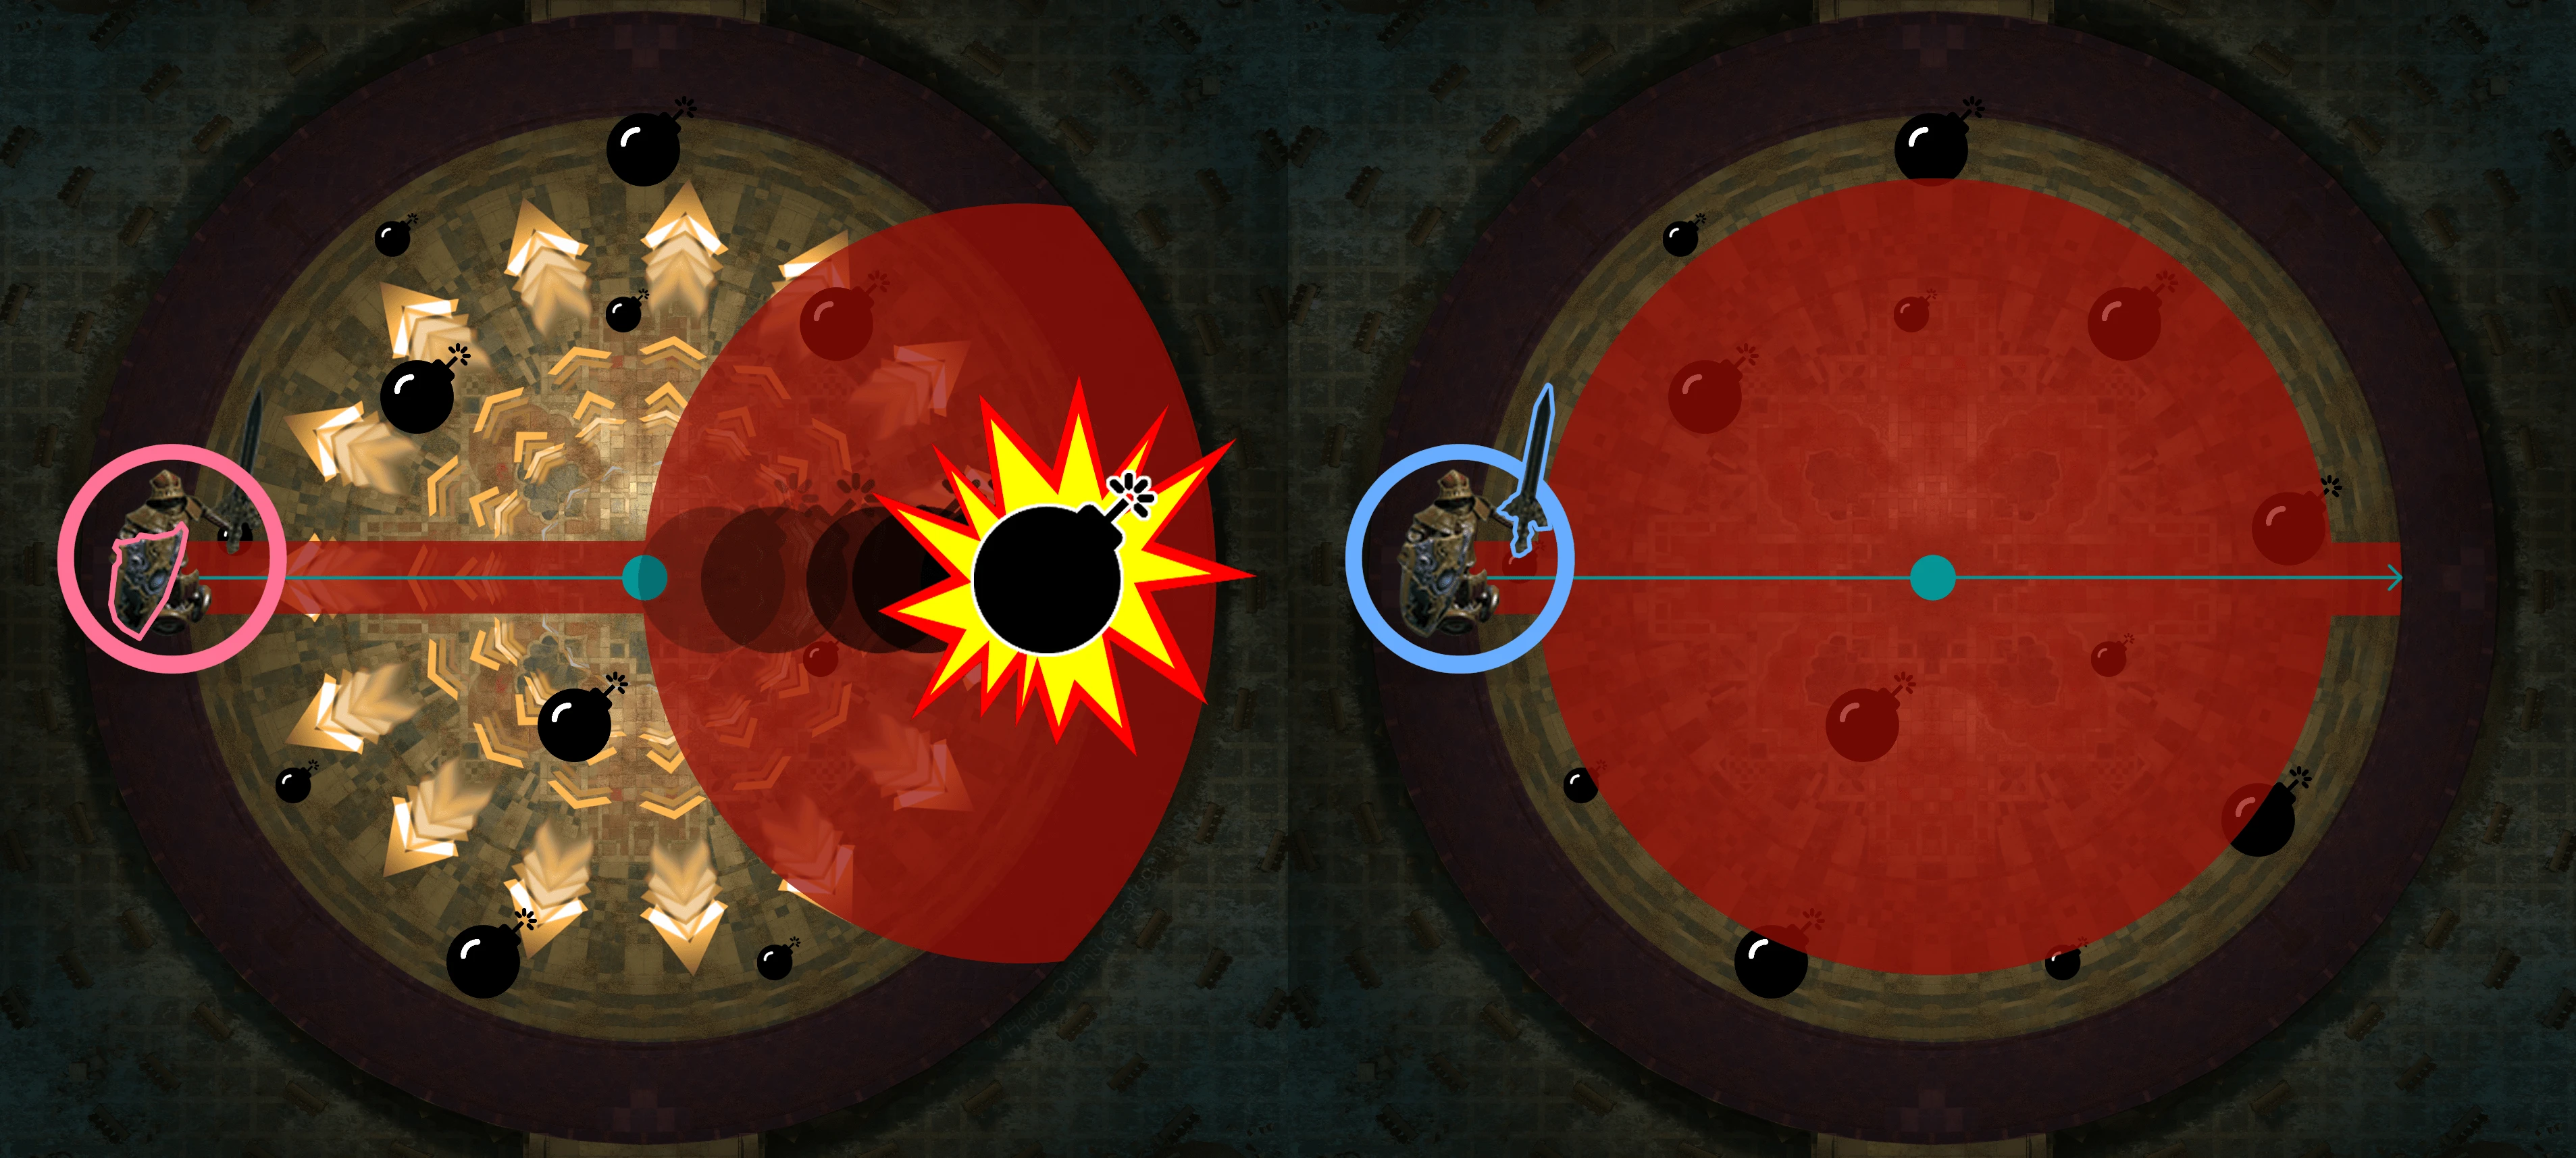
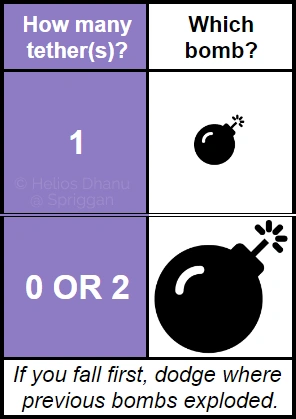
- Above Board - The Warrior sends all bombs and players into the air, then everything will drop in the order of Heaviest -> Lightest. By default, the big Bombs will drop first, then players and small Bombs. However, Reversal of Forces may have revered the bombs' or the player's own weight. An easy way to tell which bomb is safe is to read how many tethers there are during Reversal of Forces.
- 1 tether, on either bombs or yourself - Go to a small bomb.
- 2 tethers, on both bombs and yourself or 0 tethers - Go to a big bomb.
Following the end of this combo, the Warrior will cast Boost, granting itself Boosted, a massive damage buff that must be dispelled with Lost Dispel. Shortly after, both the Knight and the Warrior will cast their Blood and Bone raidwide, killing healers and DPS if the Warrior is still buffed.
Relentless Battery will happen once again, indicating that the Queen's Guard will coordinate for the next set of mechanics:
- Reversal of Forces - Any tethered player's weight is reversed.
- Winds of Weight - 4 large circle AoEs spawn, each AoE covering a quandrant of the arena, 2 are wind-aspected and 2 are gravity-aspected. Usually, players are lightweight but anyone that was tethered and recieved the debuff will instead be heavyweight.
- Lightweight players should stand on the gravity AoEs to avoid being knocked upwards by wind AoEs.
- Heavyweight players should stand on the wind AoEs to avoid being dragged down by gravity AoEs.
- Optimal Play - The Knight will perform a 270° cleave, based on 3 telegraphed claws aimed at 1 quadrant each. The safe spot is in the empty quadrant without a claw. Additionally, there is an extra AoE depending on which weapon is augmented.
- Sword Omen - Circle AoE around the Knight.
- Shield Omen - Donut AoE around the Knight.
Finally the Warrior will use another Boost, each boss will use Blood and Bone and then each will use Rapid Sever, a single-target tankbuster on the highest emnity target.
All mechanics explained will loop once after Rapid Sever, with a hard enrage should the bosses not die before then.
Soldier & Gunner
The Soldier and the Gunner are up next.
- The Soldier spawns in the West and is tanked along the West edge of the arena. The letter alliance should attack this boss.
- The Gunner spawns in the East but is tanked in the middle of the arena, facing North. The number alliance should attack this boss.
If they get too close to each other, they will tether and buff each other, making all their attacks lethal. They must also be defeated at the same time, as soon as one is defeated, the other will begin hardcasting its enrage.
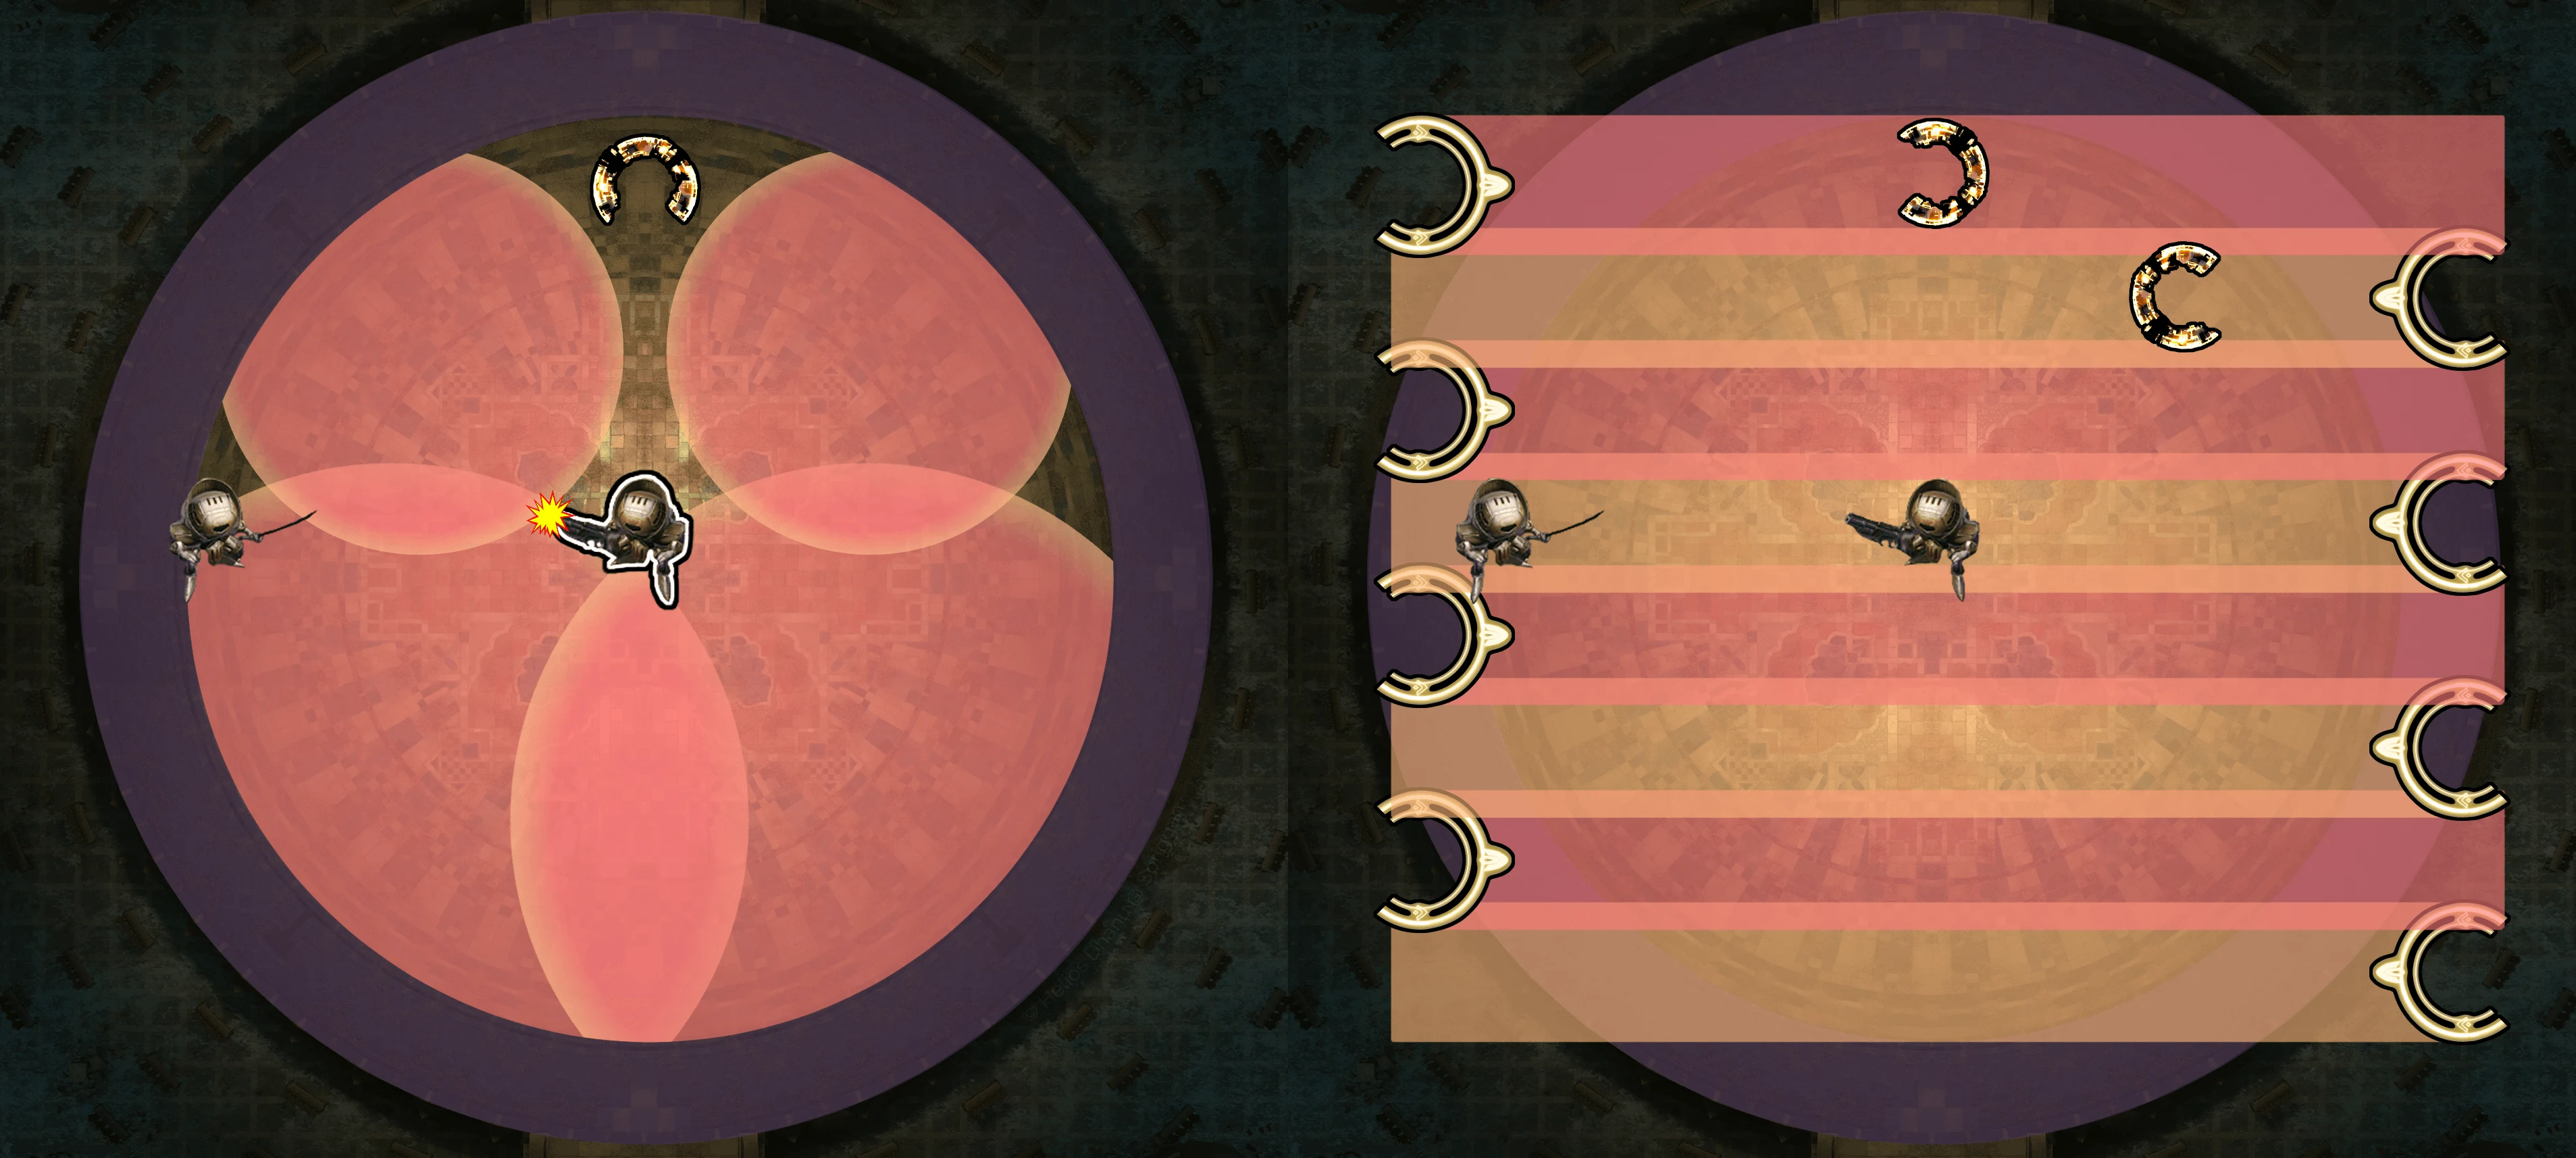
The Soldier and Gunner immediately open with a Relentless Battery, signifying a combination attack:
- Great Ball of Fire - The Soldier spawns 4 fireballs, 2 are large and 2 are small. They will all resolve as circle AoEs later into the mechanic, the bigger fireballs creating bigger circle AoEs.
- Fool's Gambit - The Soldier will transform all fireballs into frogs that will then hop around the arena, moving the AoE with them. Players should remember and follow where the 2 small fireballs were before this cast, as there is a large safe spot between them when they resolve a little later.
- Automatic Turret - The Gunner will spawn several turrets along the East and West of the arena. These will do line AoEs through the arena later.
- Reading - The Gunner will inflict all players with


 Unseen, a debuff that inflicts critical damage from 3 directions, shown as the yellow quadrants on characters. The empty quadrant is actually the safe direction, and players should point this direction towards all sources of damage for the duration of the debuff.
 - Queen's Shot - The Gunner's raidwide. Since all players are inflicted with Unseen, they will need to point their safe direction towards the Gunner, the source of the raidwide. The fireballs will also detonate during this cast.
- Automatic Turret: Fire - The turrets along the East and West wall will resolve their line AoE here. Players should point their safe direction towards the turret that will hit them, as they are the source of the damage.
Following this combination attack, both Soldier and Gunner will use Rapid Sever and Shot in the Dark respectively, single-target tankbusters on the highest threat target, and a Blood and Bone and Queen's Shot respecively, their raidwides. They will then use Relentless Battery again, beginning their 2nd combination attack:
- Gun Turret - The Gunner summons 2 large turrets in the East and West of the arena. They will use a hard enrage if not killed in time, so all players should divert their attention to destroying these turrets.
- Higher Power - The Gunner will empower each turret with a Damage Up buff. This is dispellable.
- Sniper Shot - A single-target tankbuster from each turret on the highest threat targets. With the Damage Up, this is lethal.
Tanks should grab aggro of a turret and can use an invulnerablity to survive the hit.
- Blood and Bone + Queen's Shot
- Either:
- Icy Portent - The Soldier will inflict Deep Freeze on all players that aren't moving at the end of the cast.
- Feiry Portent - The Soldier will inflict
 Pyretic on all players at the end of the cast, prohibiting all actions and movement until the debuff expires.
- Icy Portent - The Soldier will inflict
Both the Soldier and Gunner use Relentless Battery once again, beginning their 3rd combination attack:
- Double Gambit - The Soldier summons 4 clones of itself, 1 in each cardinal. Each clone will each jump around the arena twice before casting a large but fake circle AoE around itself.
- Secrets Revealed + Automatic Turret - The Soldier will tether to 2 of the clones, making those fake circle AoEs real. Players must watch where the tethered clones jump and stay out of their real AoEs.
- Reading
- Queen's Shot - Players must point their safe direction towards the Gunner, in the middle of the room.
- Automatic Turret: Fire - Players must point their safe direction towards the turret in their lane.
Another Blood and Bone + Queen's Shot and Rapid Sever + Shot in the Dark leads into the 4th Relentless Battery combination:
- Automatic Turret - The Gunner will summon 4 turrets inside the arena, much like the Normal mode.
- Turret's Tour - The Gunner will aim at 2 turrets, which are aiming at the other 2 remaining turrets. Players must stay out of line of all the turrets' facing directions.
- Either:
- Icy Portent
- Feiry Portent
Finally, there is one more Blood and Bone + Queen's Shot and Rapid Sever + Shot in the Dark before the hard enrage if they aren't defeated in time.
Aetherial Wards
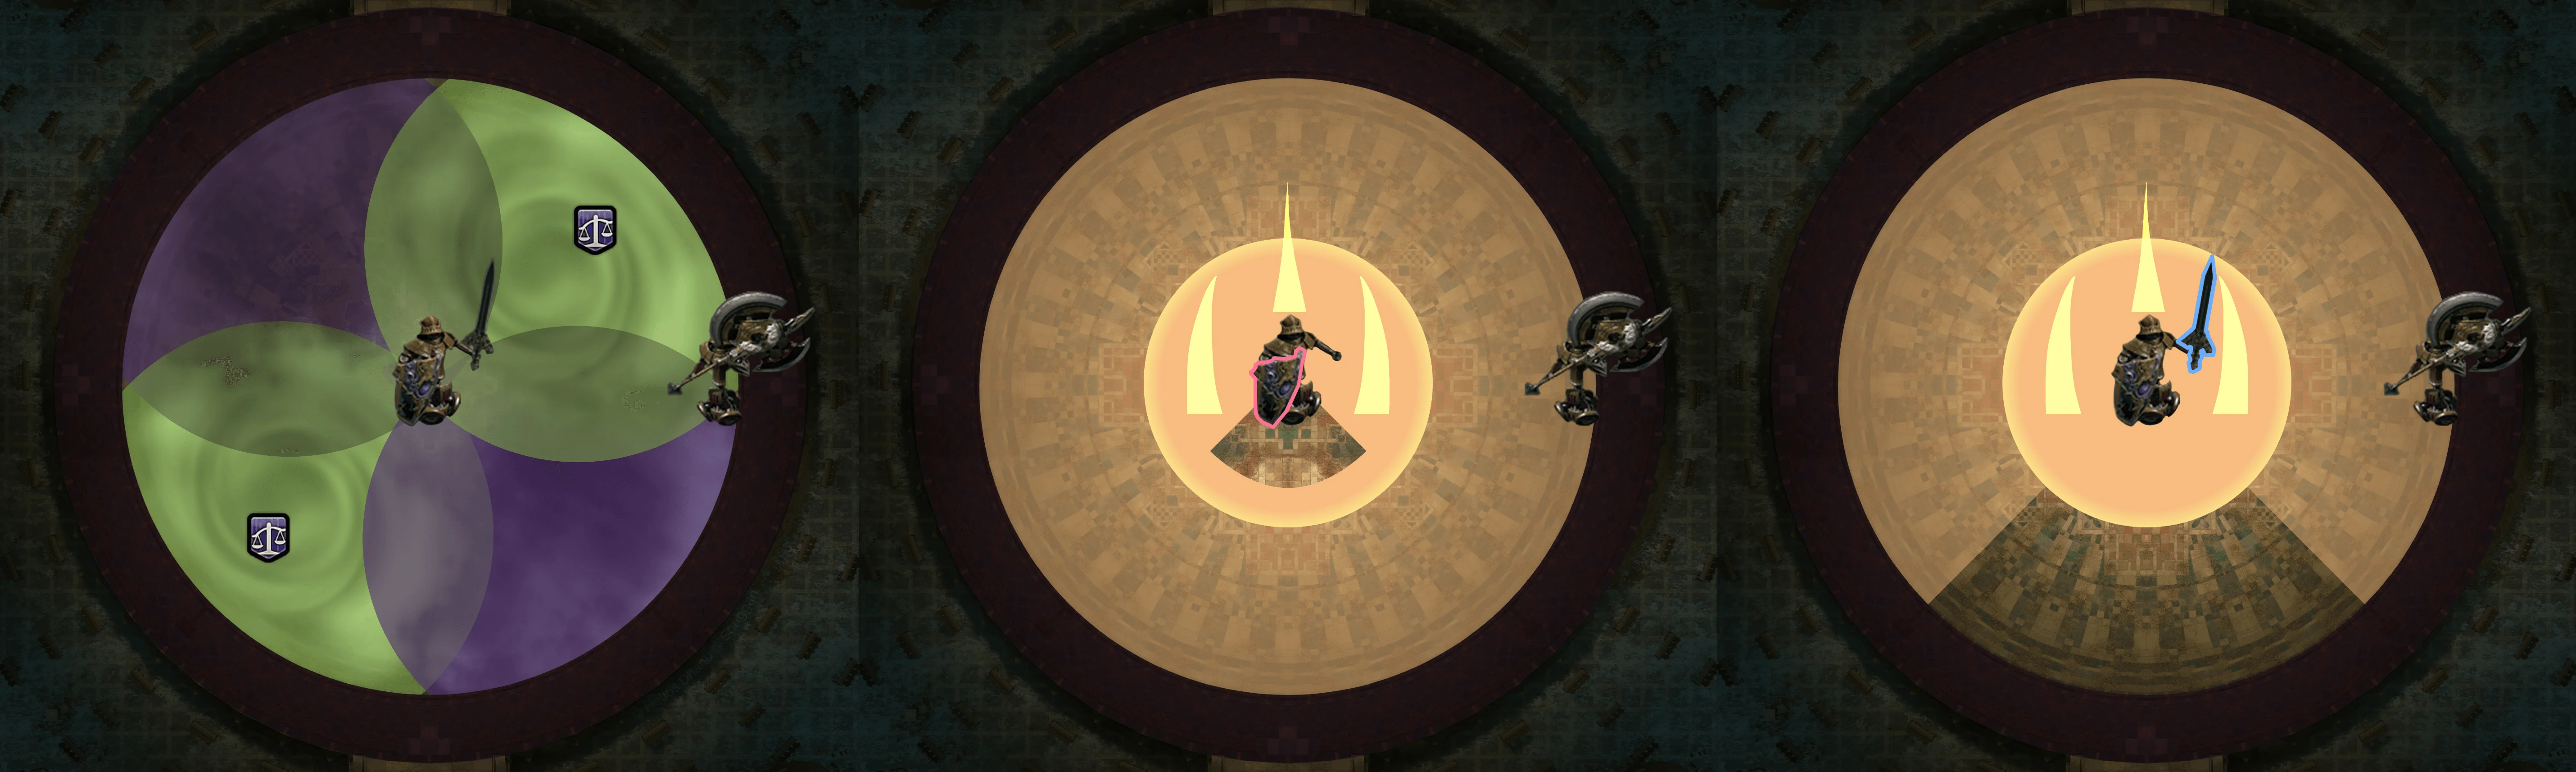
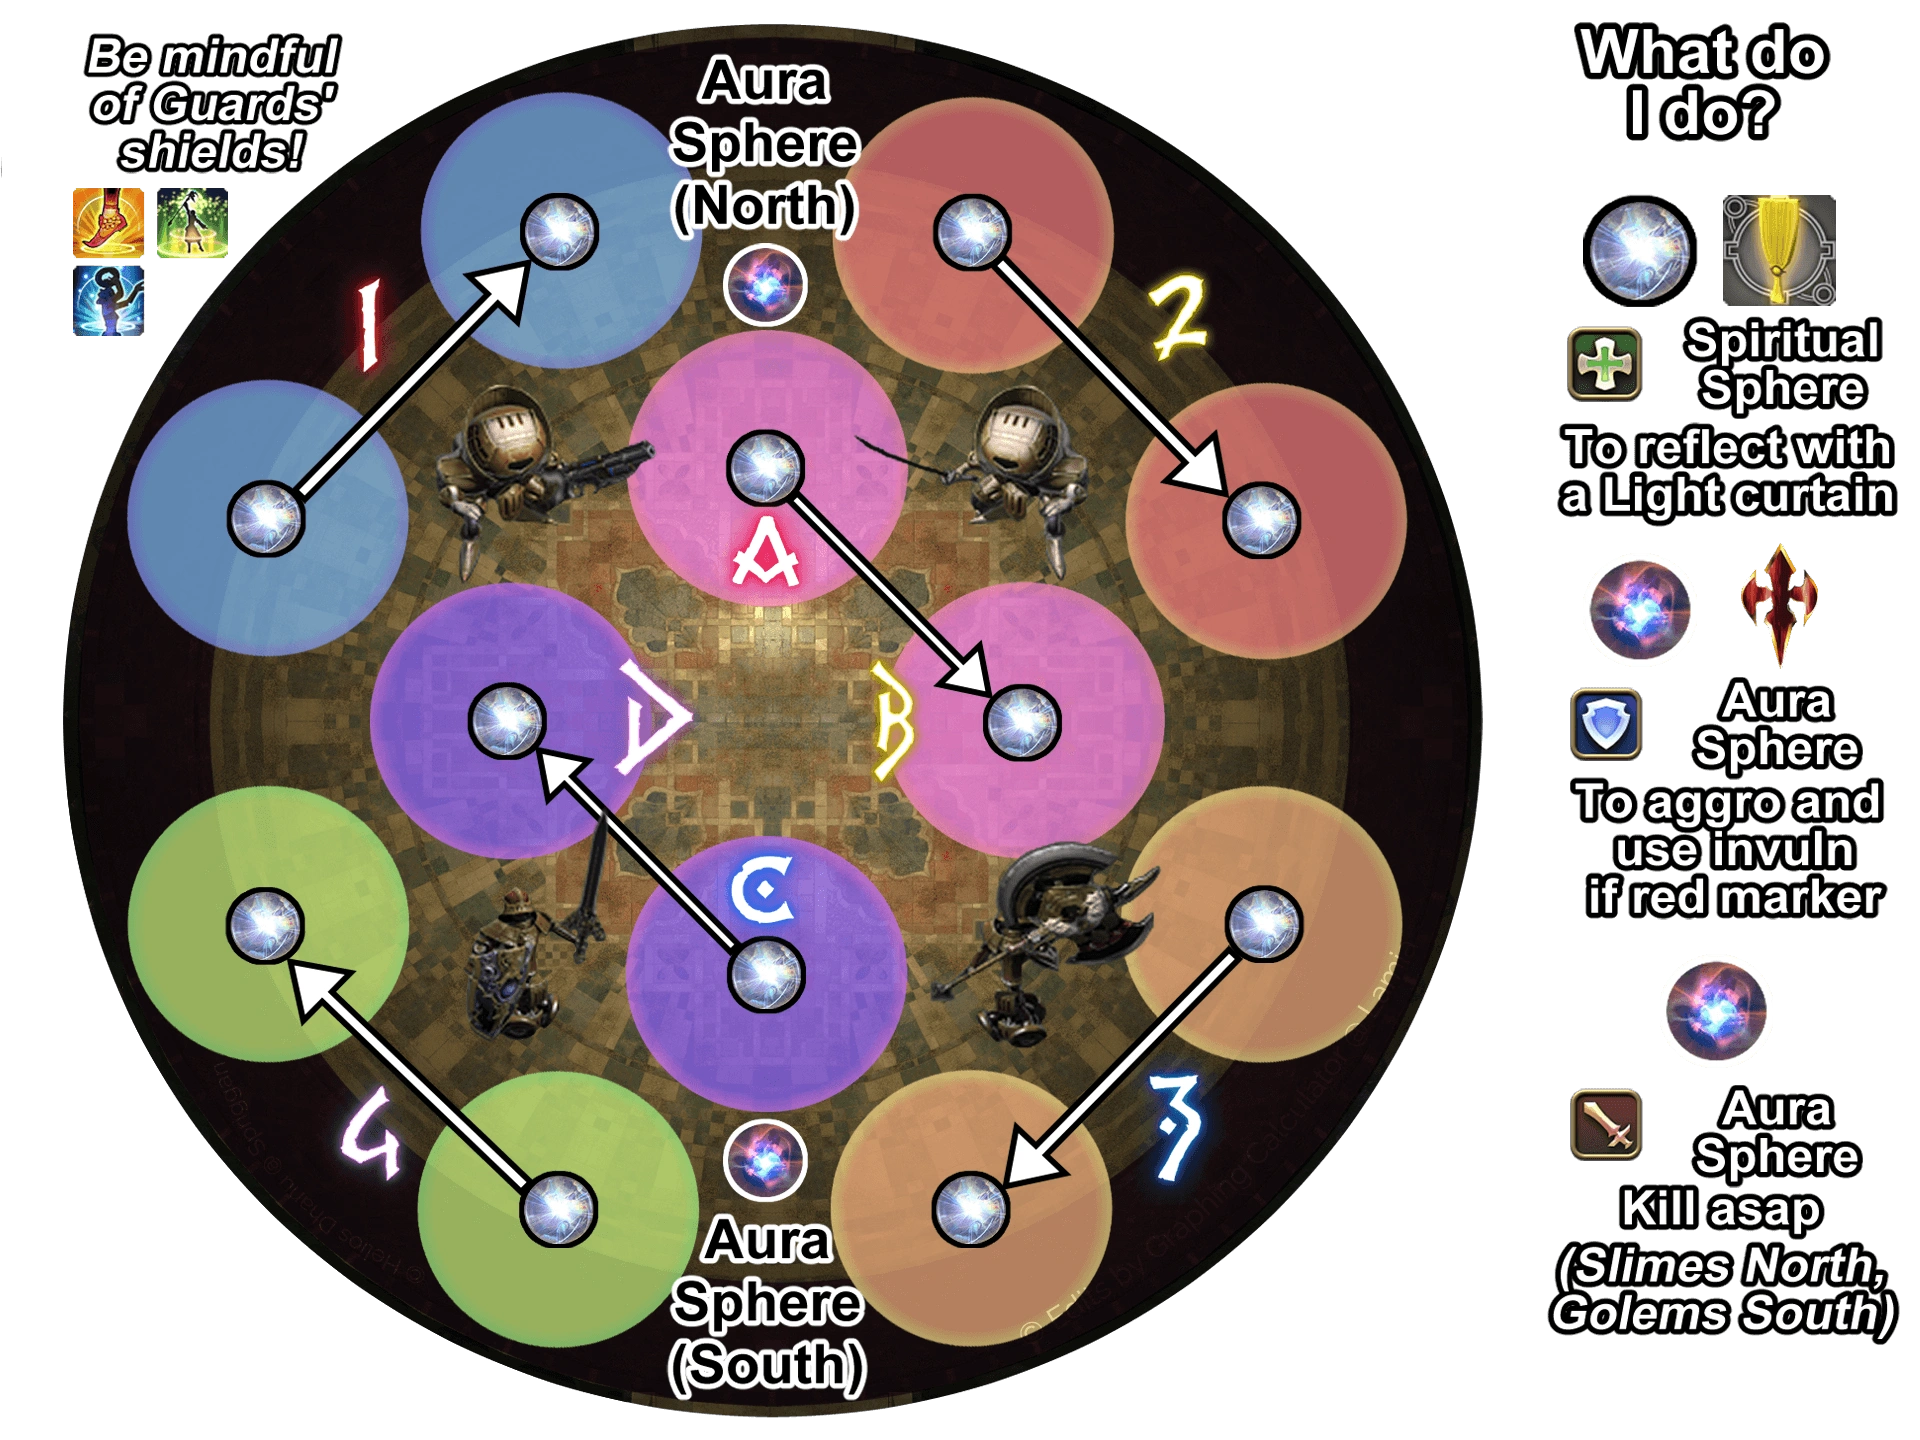
All the Queen's Guards return, shield themselves with Aetherial Wards and begin casting a hard enrage. All Aetherial Wards must be destroyed to stop the cast and finish the fight. Occasionally, they will all cast Coat of Arms, fortifying 2 opposing directions (front/back or left/right). Any player that attacks the fortified side will be knocked back, get  Stunned for a few seconds and reveive a stack of Thrice-come Ruin.
Additionally there are 2 waves of Spheres that appear in the arena, with 2 types of Spheres spawning. Players will need to ensure that these are destroyed before returning to DPS down the Aetherial Wards
Spiritual Spheres
- 12 spawn around the entire arena.
- Pulse with a circle AoE around itself twice before exploding, inflicting all players with
 Damage Down.
 - Players can use Light Curtains or Lost Reflect to
 reflect the damage from the pulse back to the Spiritual Sphere destroying it.
 - Spots are usually assigned to
healers.
Aura Spheres
- 2 spawn, 1 each in the North and South of the arena.
- Target the highest threat target for Spite Check when it dies, a lethal single-target attack.
Tanks will need to get aggro of the Aura Spheres before it dies and use their invulnerability to survive Spite Check.
Letter tanks will aggro the North Aura Sphere and
Number tanks will aggro the South Aura Sphere.
DPS will need to destroy these Aura Spheres immediately as they spawn.
Letter DPS should target the North Aura Sphere and
Number DPS should target the South Aura Sphere.
Trash 3 - Bozjan Phantom
POVThe Bozjan Phantom is the 3rd trash encounter of Delubrum Reginae (Savage). It has no enrage and will repeat mechanics until it is dead.
WARNING
The following Lost Actions are required:
| Lost Action | Usage |
|---|---|
 Lost Banish III Lost Banish III | As an undead enemy, the Bozjan Phantom will take increased damage from the applied debuff. |
| Lost Dispel | The Bozjan Phantom will use a  defensive buff that can be removed. defensive buff that can be removed. |
The Bozjan Phantom will begin with Malediction of Agony, a raidwide. It will then use Weave Miasma, spawning 3 different types of symbols along the North edge of the arena. These spawn in a row of 4 and there are 2 rows for a total of 8 symbols. Each AoE will travel down the arena, and players can determine the type of AoE from the symbols shown below.
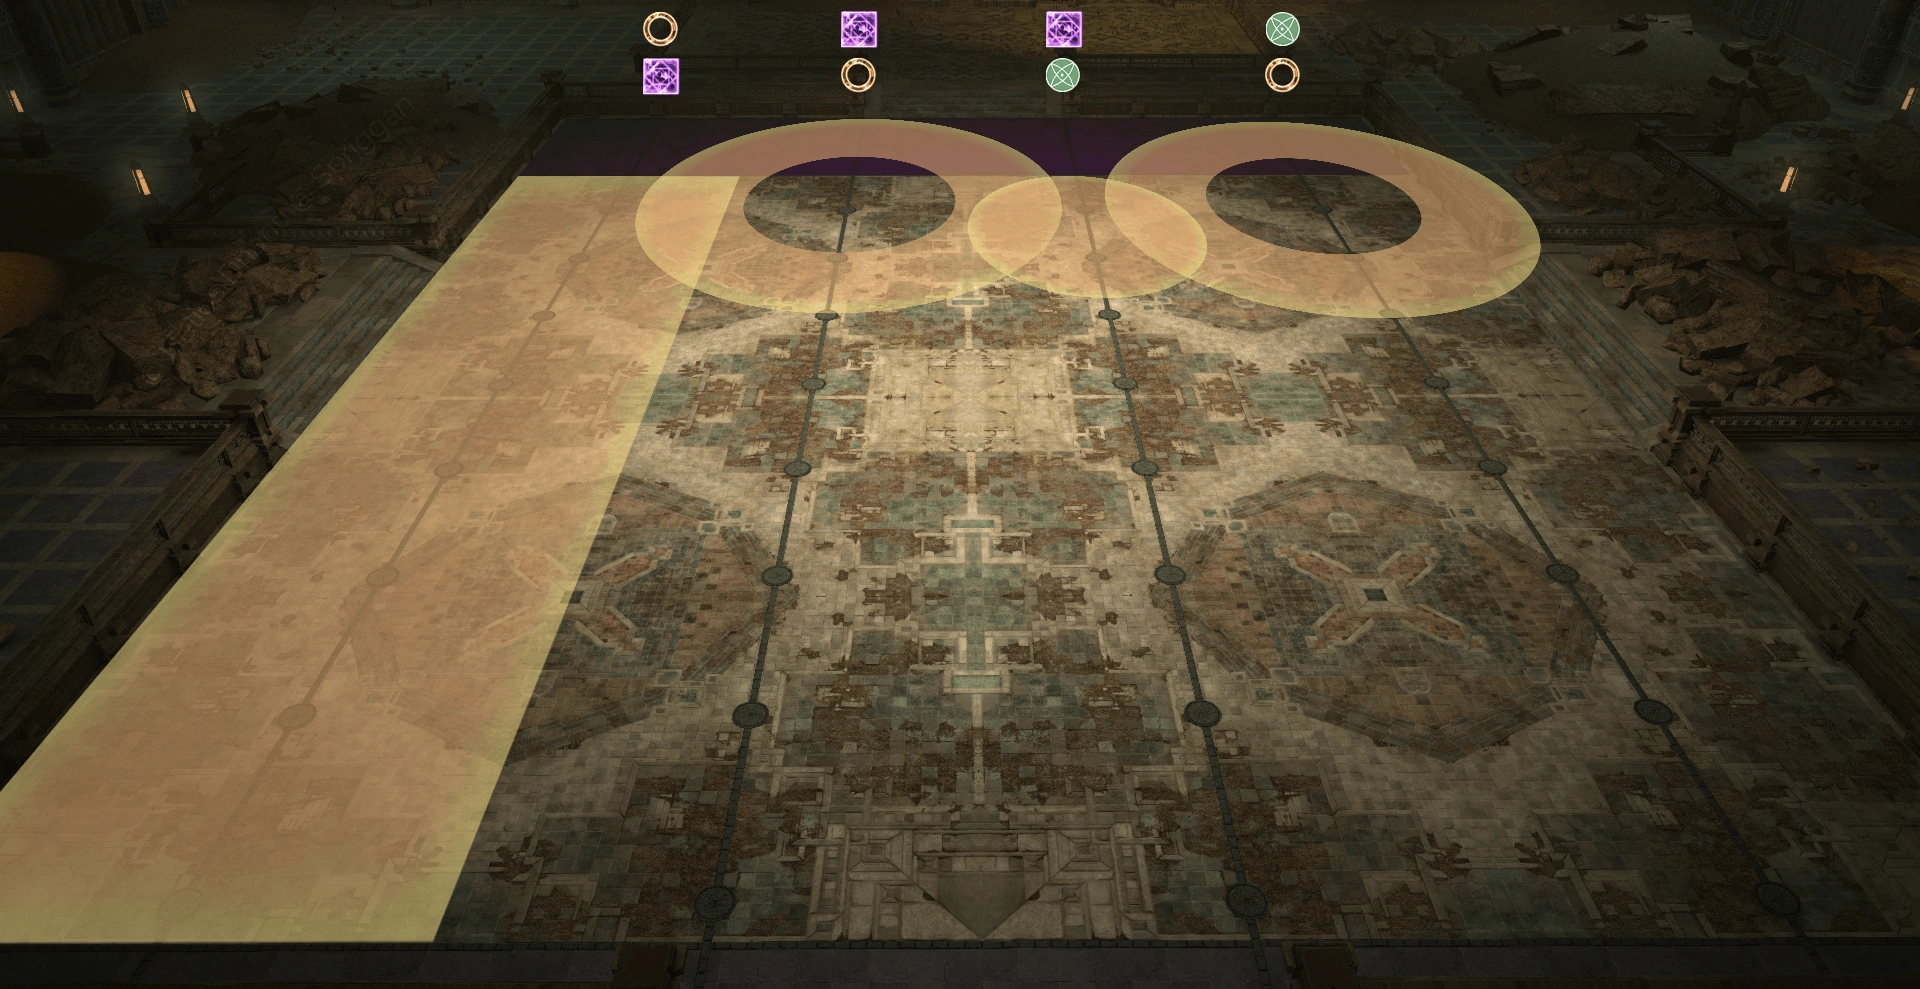
The boss will then use Manipulate Miasma detonating the lower row of symbols first. Players should look for a donut symbol and stand under the AoE as it travels down the arena. Once players reach the South edge of the arena, they should stand next to a rectangle AoE, stepping in after it's flashed 3 times.
The Bozjan Phantom will use Weave Miasma once again, this time following the cast with Invert Miasma, detonating the top row of symbols first, then the bottom row.
After both sets of Weave Miasmas, the boss will move to the middle of the room, become untargetable and begin casting Malediction of Ruin, an interruptible hard enrage. There are 3 waves of 2 different types of Wraiths.
- Bloody Wraith - Must be killed.
- Misty Wraith - Must be healed to full HP.
Once all 3 waves have been dealt with, the boss will be targetable once again and Malediction of Ruin can be interrupted.
After this mini-phase, the Bozjan Phantom will use Weave Miasma again, and then summon a Wraith either North or South. This Wraith will knock all players towards the opposite side of the arena before detonating the symbols with either Manipulate Miasma or Invert Miasma. As players are positioning to be knocked back, they should read the boss's castbar to determine the correct lane to be in.
Finally, the boss will turn to a player and cast Vile Wave, an un-telegraphed frontal cone AoE. Then Ice Spikes, a dispellable buff that hurts and inflicts  Slow on any players that attack it. Then Excrutiation a single-target tankbuster on the highest threat target, and finally, a Malediction of Agony.
The Bozjan Phantom will loop its attacks from here until it is defeated.
Players should be aware of the hidden traps in the forthcoming hallways, and be especially aware to not detonate the Mini trap located before Trinity Avowed, as it plays an essential role in clearing the raid after that boss is defeated.
Boss 3 - Trinity Avowed
Trinity Avowed is the 3rd major boss in Delubrum Reginae (Savage). There are 2 major phases with 3 mini-phases each. It has a hard enrage at 9:00.
WARNING
The following Lost Actions are required:
| Lost Action | Usage |
|---|---|
 Lost Aethershield Lost Aethershield | Raidwides from Trinity Avowed deal significant damage, each party's designated Lost Aethershield. |
 Lost Shell II Lost Shell II | Raidwides from Trinity Avowed deal significant damage, all players should have Lost Shell II applied before combat for extra survivability. |
To start, Trinity Avowed will open with the following sequence of attacks:
- Wrath of Bozja - Shared tankbuster. Requires at least
3 tanks to soak together.
- Glory of Bozja - Raidwide.
Tanks must mitigate with Lost Aethershield.
- Allegiant Arsenal 1 -> 3 - Summons 3 unique weapons in a random sequence and performs its corresponding attack. This also dictates the order of mini-phases within each major phase
- Staff - Circle AoE.
- Bow - 270° cleave in front of itself.
- Sword - 270° cleave behind itself.
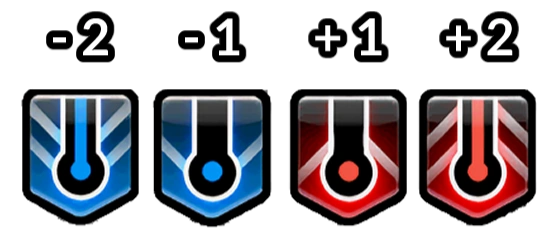
Temperature
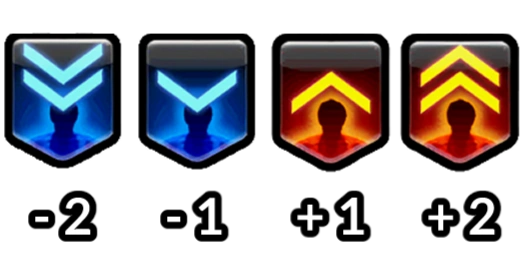
Temperature is the core mechanic of the fight. At the beginning of each miniphase all players are inflicted with a debuff according to their corresponding temperature. This is also shown above the player's head. The goal is to purposefully stand in certain attacks from Trinity Avowed during each miniphase to reach a  neutral temperature. Players still with an
  imbalanced temperature at the end of each miniphase will immediately die.
Staff 1
- Allegiant Arsenal -> Staff
- Hot and Cold - Inflicts all players with a random
Temperature debuff.
- Quick March - Inflicts all players with a


 Forced March in a random direction. The distance walked during the resolve is equivalent to 2 tiles on the arena.
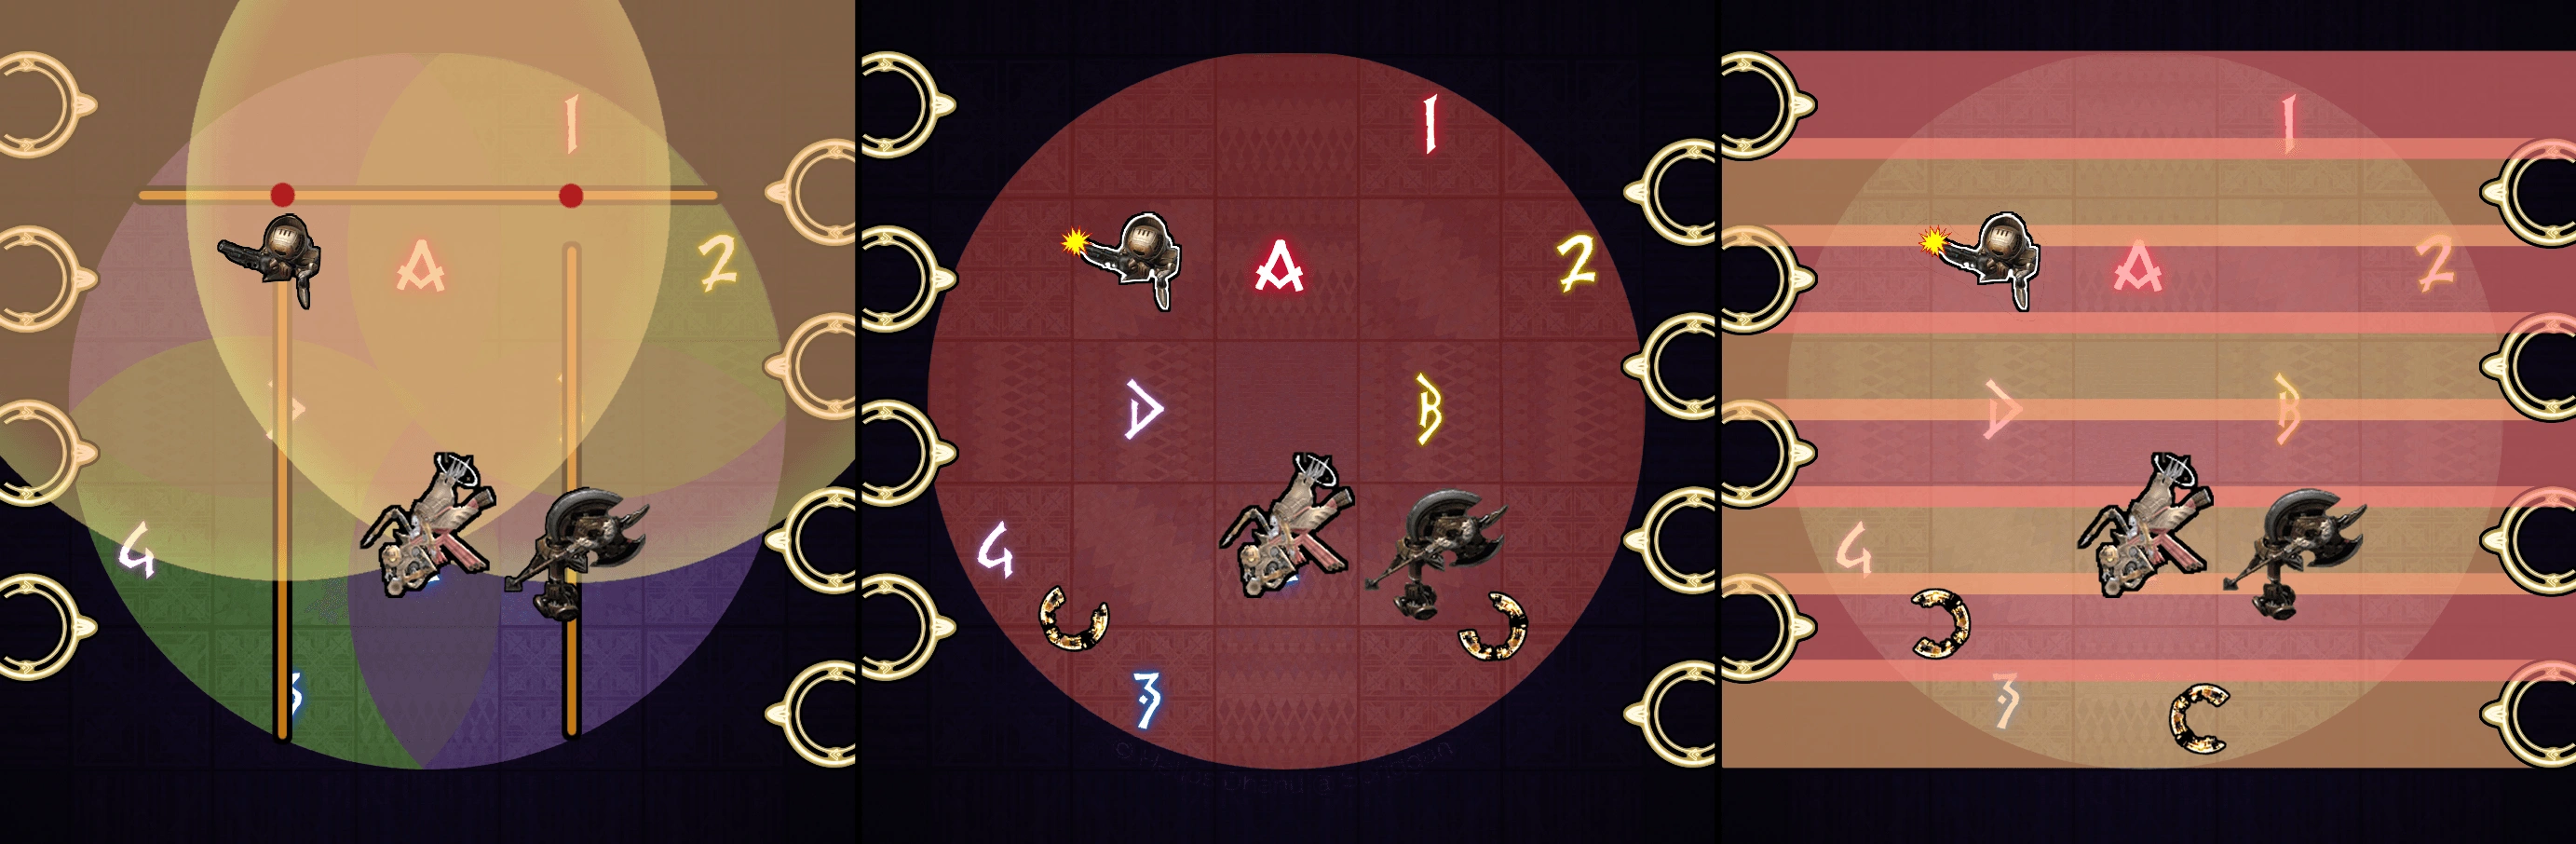
 - Freedom of Bozja - 4 Proximity AoEs spawn in each corner of the arena, all players must move to the middle to reduce the damage taken. Each AoE will spawn a meteor with different temperatures.
- Elemental Blast - Each meteor will explode in a circle AoE around itself, inflicting hit players with its temperature.
WARNING
Players should avoid being raised until these AoEs have resolved, as there are no safe spots to avoid the temperatures inflicted by them.
The Temperature goal of this mini-phase is to use the Forced March debuff to walk into the meteor that will neutralise the player's temperature.
- Glory of Bozja - Use Lost Aethershield.
Bow 1
- Allegiant Arsenal -> Bow
- Quick March - Inflicts all players with a Forced March in a random direction. The distance walked during the resolve is equivalent to 2 tiles on the arena.
- Wrath of Bozja
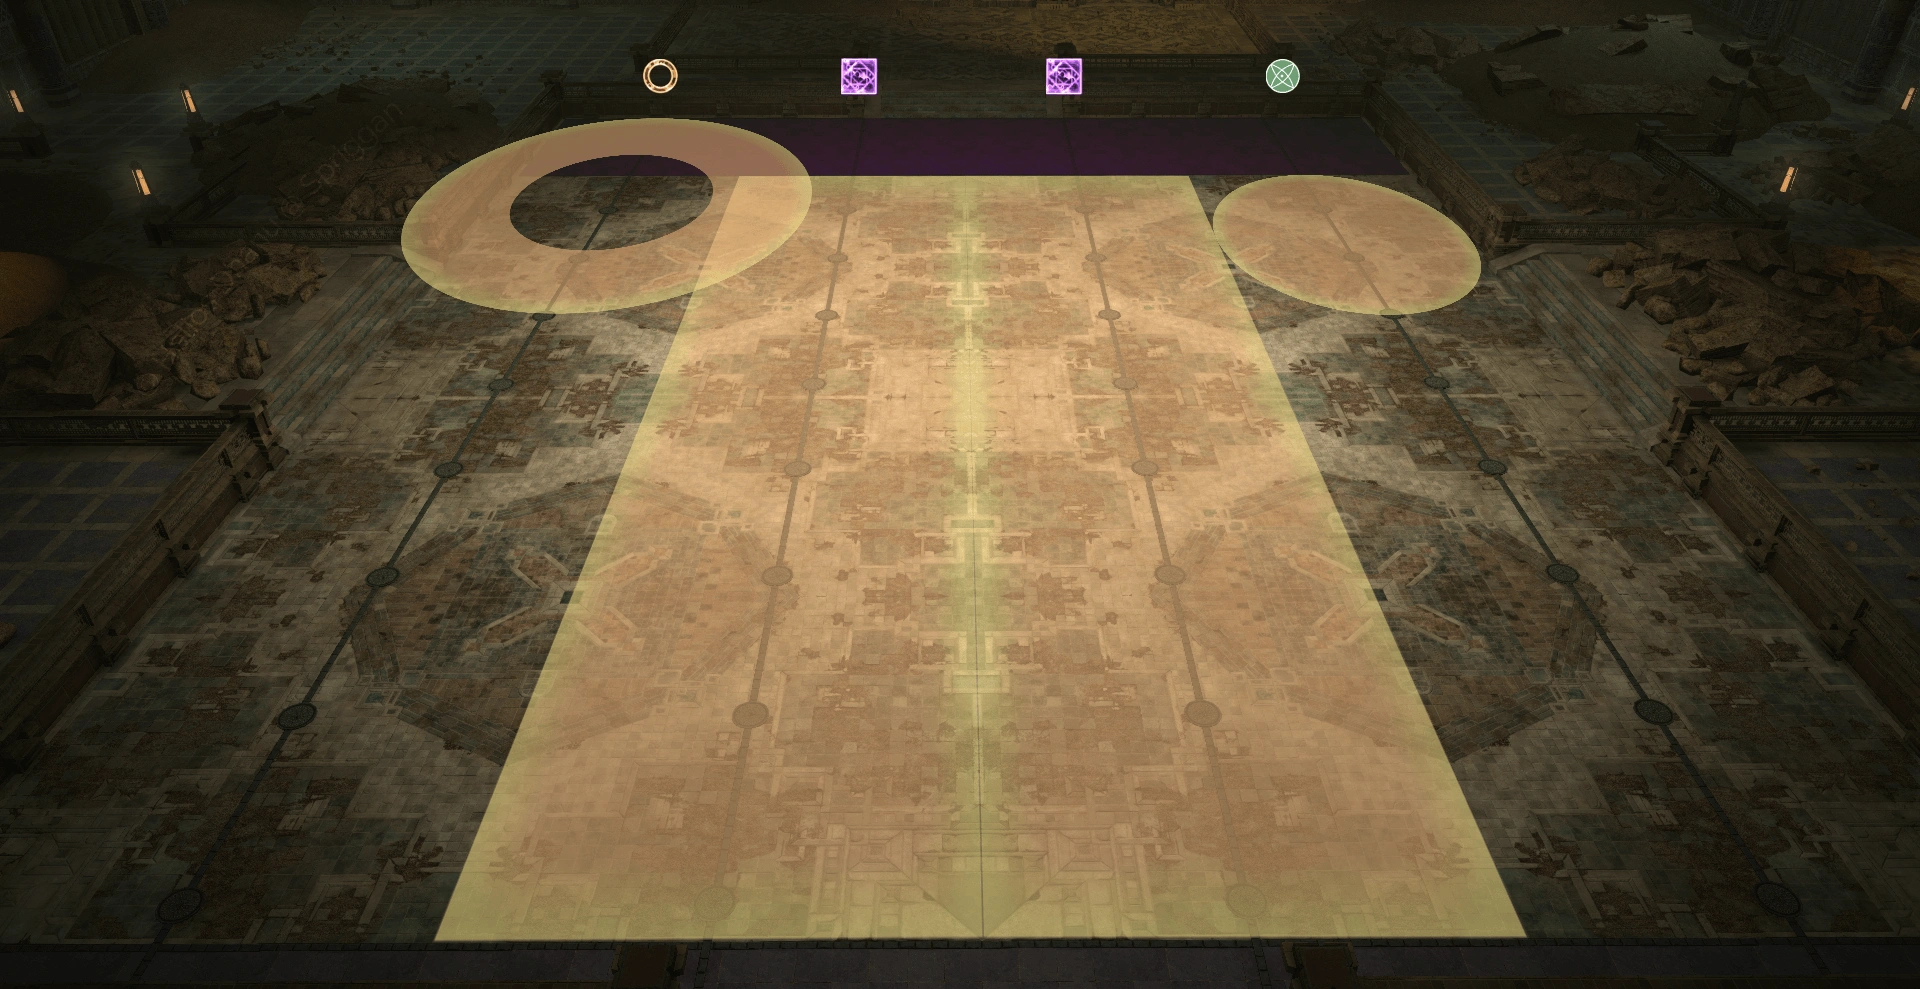
- Flames of Bozja - Creates a giant 5x4 rectangle AoE from the East/West wall, indicated by erupting fire. Players must use their Forced March to walk from the middle of the arena to the safe column, opposite the eruption. The AoE created will linger for the remainder of the miniphase.
- Hot and Cold - Inflicts all players with a random
Temperature debuff.
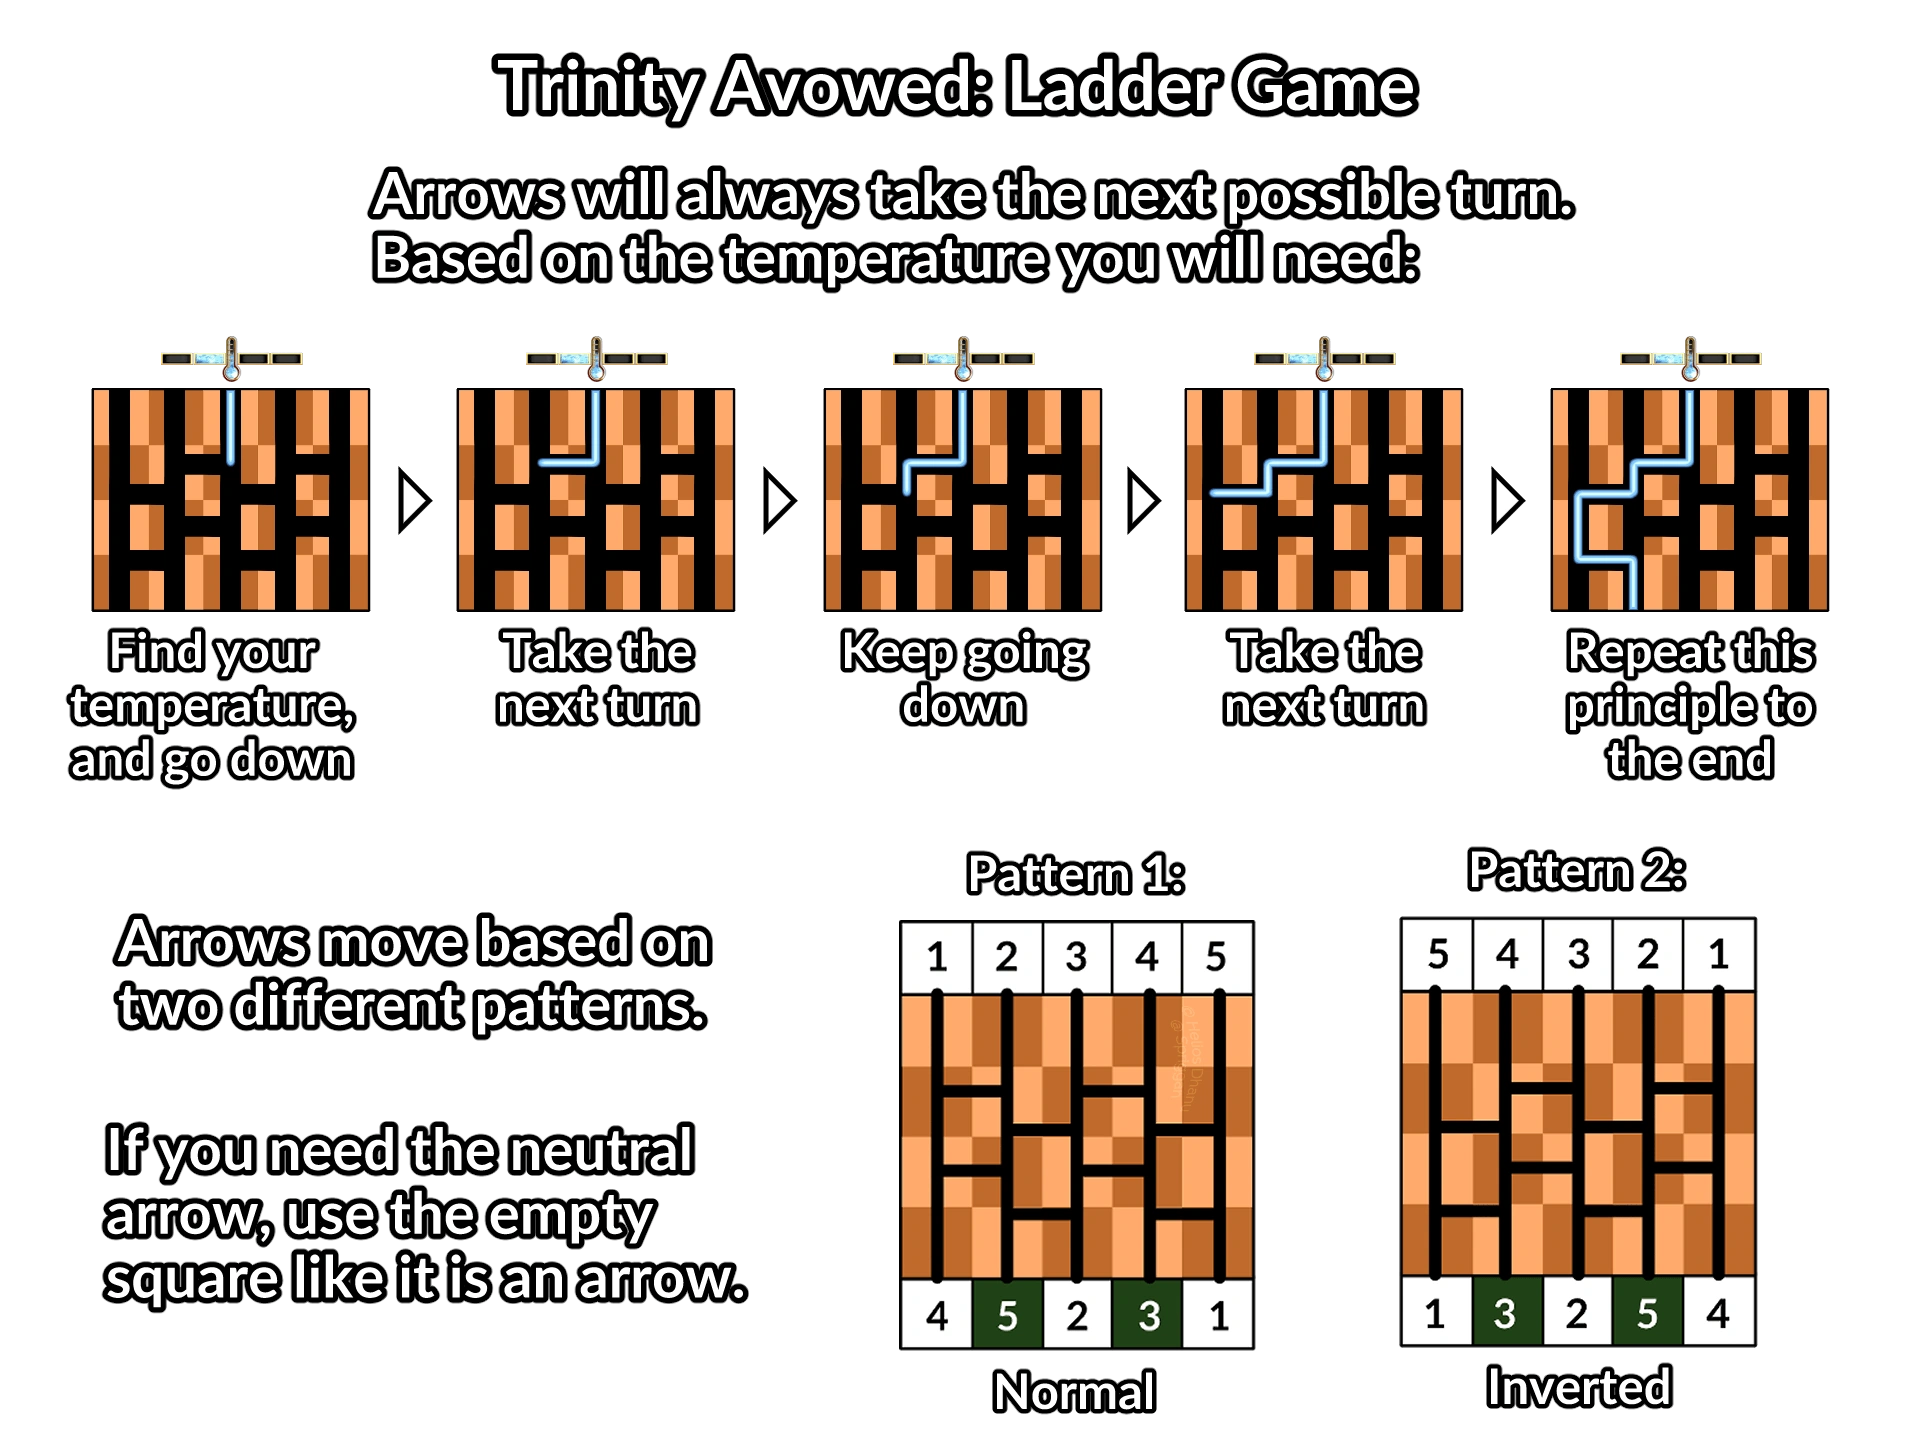
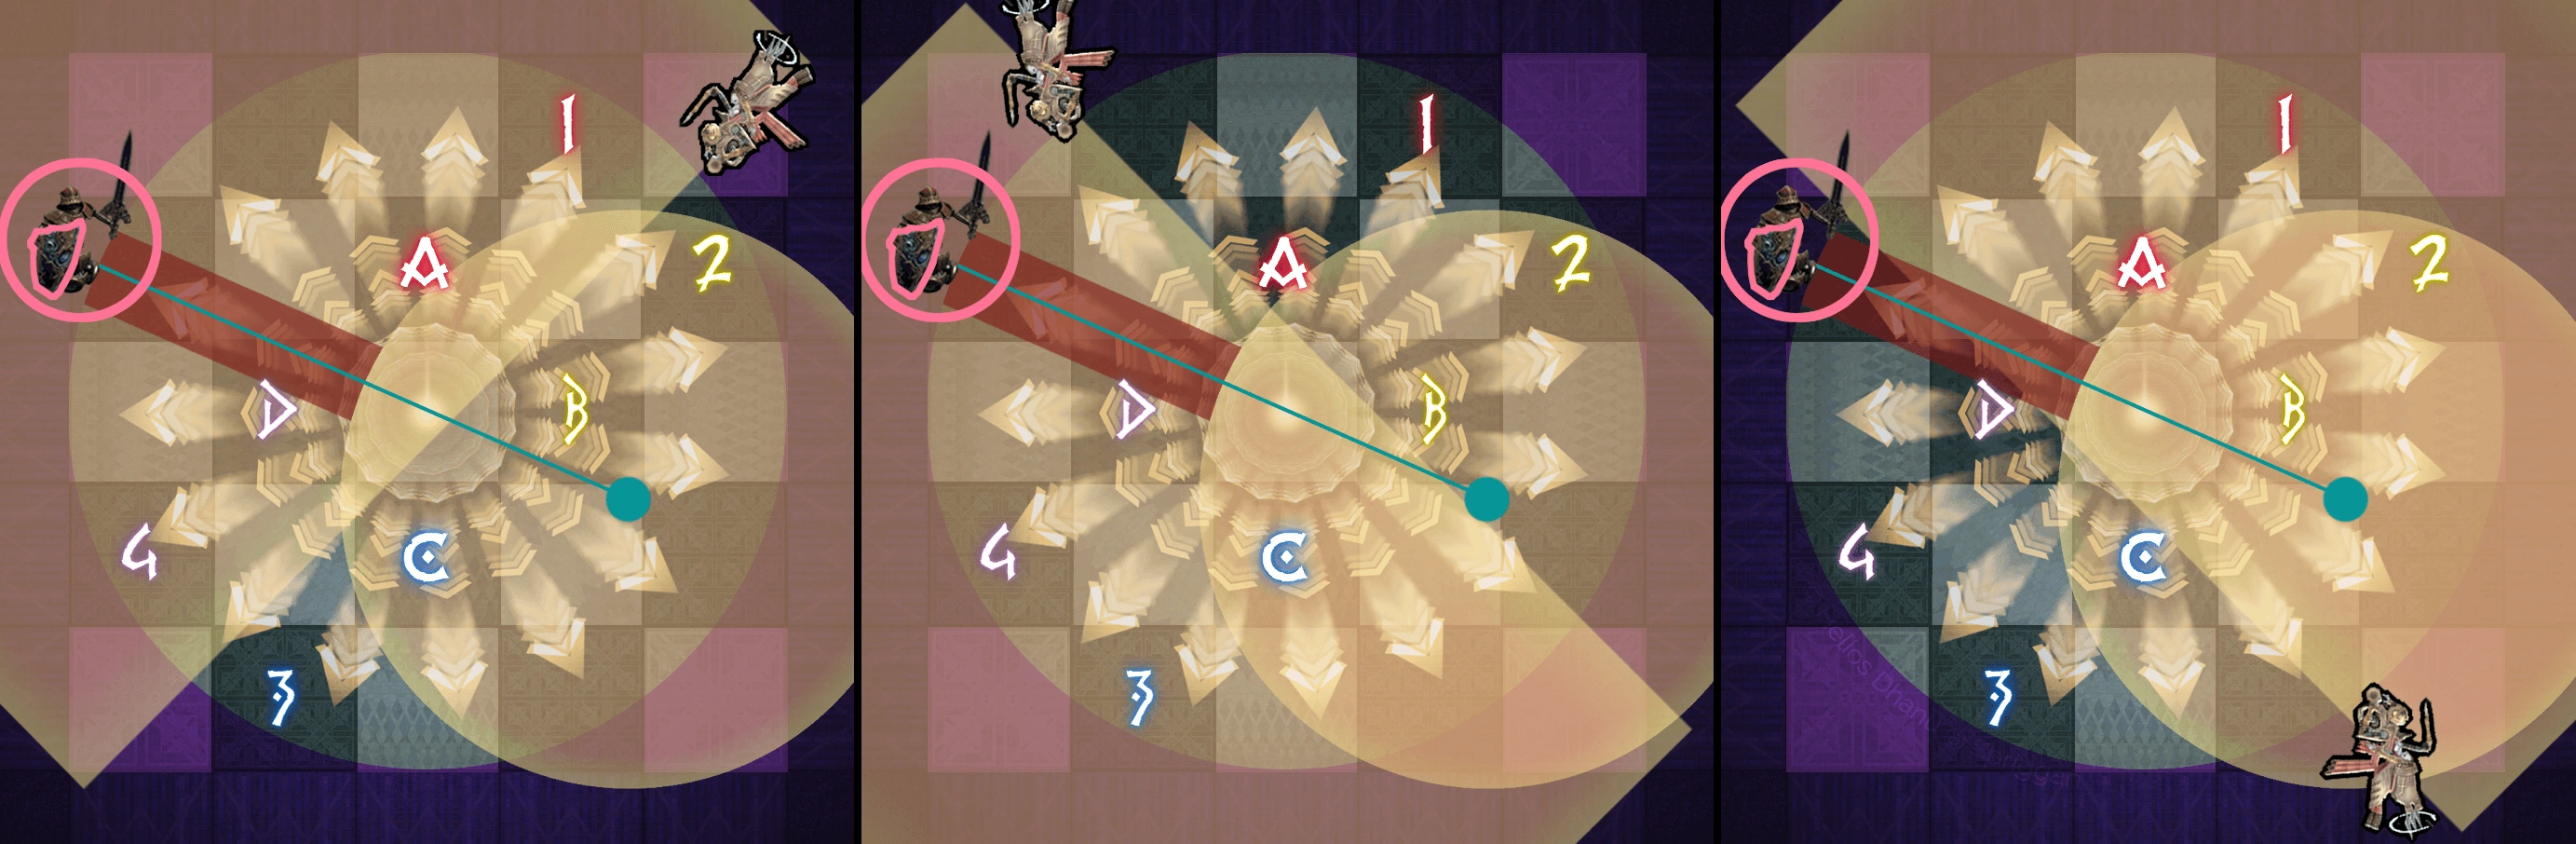
- Shimmering Shot - Shoots 4 arrows from the unsafe East/West wall that will travel down the lingering AoE like a "ladder game" taking any turns it comes across.
The Temperature goal of this mini-phase is to find the arrow that will neutralise the player's temperature. And play the ladder game to determine which square that arrow will arrive at.
- Glory of Bozja - Use Lost Aethershield.
Sword 1
- Allegiant Arsenal -> Sword
- Hot and Cold - Inflicts all players with a random
Temperature debuff.
- Unwavering Apparition - Summons 3 clones of itself, then become untargetable.
- Blade of Entropy x4 - Trinity Avowed and its clones will perform a half-room cleave. Out of the 2x2 square they each stand at a cardinal of, 1 single square will be safe. Additionally, the North, South, East, and West square of this safe square will only be hit by a single temperature.
- Blade of Entropy x4
The Temperature goal of this mini-phase is to determine the safe square that isn't being cleaved by any boss. From there, players will need to determine which cardinal from that safe square has the temperature needed to neutralise their own temperature.
- Glory of Bozja - Use Lost Aethershield.
Brands
After the first 3 mini-phases are complete, Trinity Avowed will introduce
Brands. These are additional debuffs that will apply the temperature shown at the end of each of the following mini-phases. The goal then, is to reach a temperature opposite of the Brand, to allow the debuff to
Neutralise the temperature. For example, players with a -2 Brand will want to be
+2 Temperature at the end of the mini-phase so the effects cancel out (
2 +
-2 =
0)
Staff 2
- Allegiant Arsenal -> Staff
- Hot and Cold
- Elemental Brand - Inflicts all players with a random
Brand debuff.
- Freedom of Bozja
- Unseen Eye - Summons 6 clones along the sides of the arena. Each clone will perform a line AoE infront of itself, leaving only a few squares safe.
- Elemental Blast
WARNING
Players should avoid being raised until these AoEs have resolved, as there are no safe spots to avoid the temperatures inflicted by them.
The Temperature goal of this mini-phase is to find the meteor that will help players reach a
Temperature opposite of their
Brand. Additionaly, players will need to watch the clones to determine a safe square to stand in within their meteor's AoE.
- Glory of Bozja - Use Lost Aethershield.
Bow 2
- Allegiant Arsenal -> Bow
- Unseen Eye - Summons 6 clones along the sides of the arena. Each clone will perform a line AoE infront of itself, leaving only a few squares safe.
- Flames of Bozja - Players must dodge the clones first, then move towards the safe side.
- Hot and Cold
- Elemental Brand - Inflicts all players with a random
Brand debuff.
- Quick March
- Shimmering Shot
- Wrath of Bozja
The Temperature goal of this mini-phase is to find the arrow that will help players reach a
Temperature opposite of their
Brand, playing the "ladder game" again. Once players have found their square, they must aim their
Forced March to walk into that square. The distance of the Forced March remains at 2 tiles.
- Glory of Bozja - Use Lost Aethershield.
- Wrath of Bozja
Sword 2
- Allegiant Arsenal -> Sword
- Hot and Cold
- Elemental Brand - Inflicts all players with a random
Brand debuff.
- Unwavering Apparition
- Blade of Entropy x4
- Blade of Entropy x4
The Temperature goal of this mini-phase is to determine the safe square that isn't being cleaved by any boss. From there, players will need to determine which cardinal from that safe square has the temperature needed to help players reach a
Temperature opposite of their
Brand. With certain combinations of Brands and starting Temperatures, players may need to be cleaved twice to reach their desired Temperature.
- Glory of Bozja - Use Lost Aethershield.
After all 6 mini-phases have concluded, Trinity Avowed will close out with its hard enrage at 9:00.
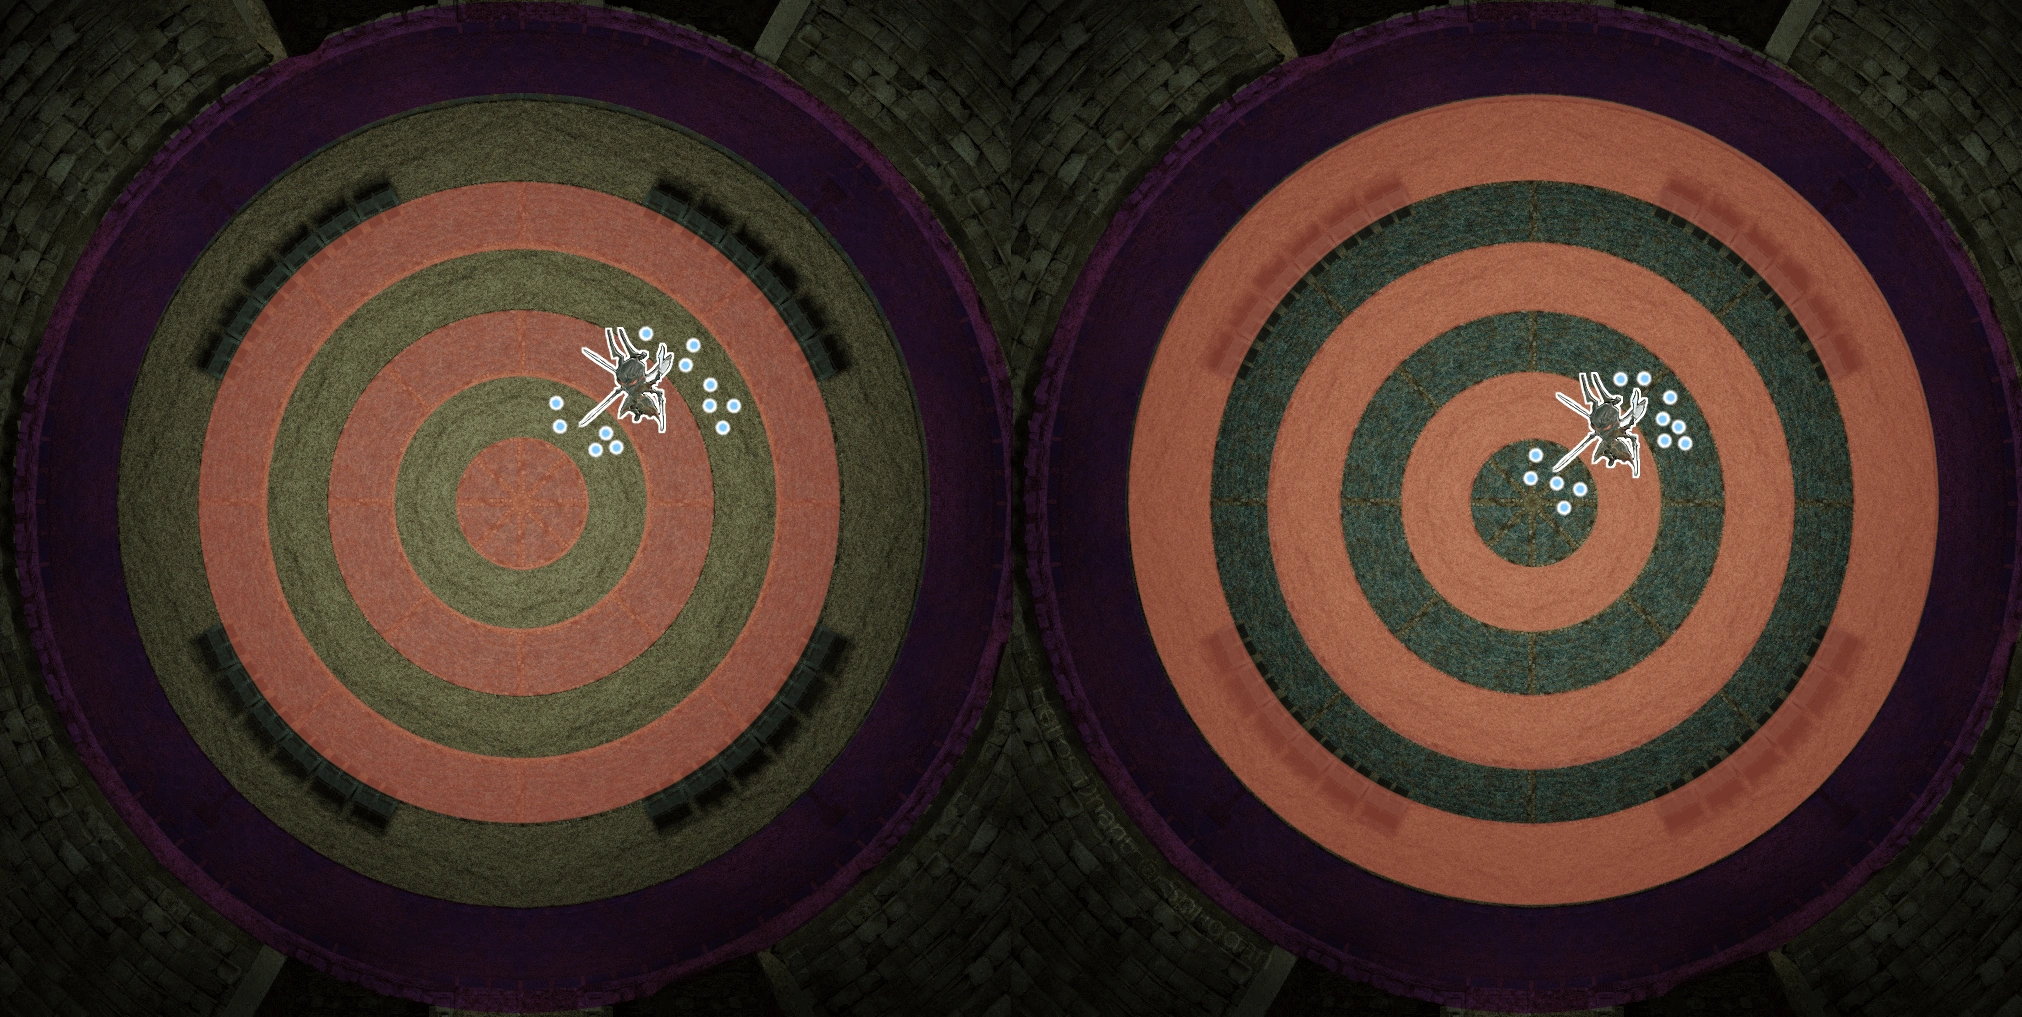
Trash 4 - Stygimoloch Lord
The Stygimoloch Lord is the final trash encounter of Delubrum Reginae (Savage). While alive, it applies  Royal Favor to The Queen, preventing her from dropping below 1HP and making all damage she deals highly lethal.
To reach the Stygimoloch Lord, at least 1 player must slip through the iron bars located beyond Trinity Avowed's arena via Mini. This player can then unlock the entrance to the mini-boss's lair for everyone else. Players should huddle around the Mini Trap located before Trinity Avowed, detonate it as a group and then make their way through the iron bars. Players should also be aware of the traps located just after entering its lair.
WARNING
The following Lost Actions are required:
| Lost Action | Usage |
|---|---|
| Lost Reflect Light Curtain | There are Ball of Fire adds that must die to their own magic via reflecting their damage back to them. |
| Lost Dispel | There are Ball of Earth adds that grant  Stoneskin to itself, requiring players to remove it. Stoneskin to itself, requiring players to remove it. |
The Stygimoloch Lord begins with the following looping sequence of attacks until its HP reaches below 70%:
- Foe Splitter - Single target conal-cleaving tankbuster. The
MT should stand away from everyone.
- Vicious Swipe - Small circle AoE around itself that damages and knocks back any players hit. Players can use Knockback immunity.
- Whack x3 - 3 telegraphed conal AoEs targeting random players.
- 1111-tonze Swing - Large untelegraphed circle AoE around itself. Players should retreat to the edge of the arena.
- Rapid Bolts - Targeted AoEs on 3 players that after resolving, will pulse multiple times. Marked players should move away from the group and place these AoEs at the edge of the arena.
- Rapid Bolts
- Rush - Targets a random player and charges towards them. Any other players caught between the Stygimoloch Lord and its target receive a stack of Twice-come Ruin.
- Rapid Bolts
- Rapid Bolts
- Crushing Hoof - Places a proximity marker at a random player's location and jumps towards it shortly after.
- Whack
Once pushed below 70%, the Stygimoloch Lord will jump to the middle of the arena and become untargetable, marking the start of its adds phase. This phase makes up the bulk of the fight and there are different responsibilities for each role.
To start, the arena will be split into an inner ring and outer ring, all other areas in the arena will turn purple and immediately kill the player if walked into. Additionaly, players should note the small notches that jut out of the ring both towards and away from the Stygimoloch Lord, and the orange strips located between each cardinal notch in the outer ring.
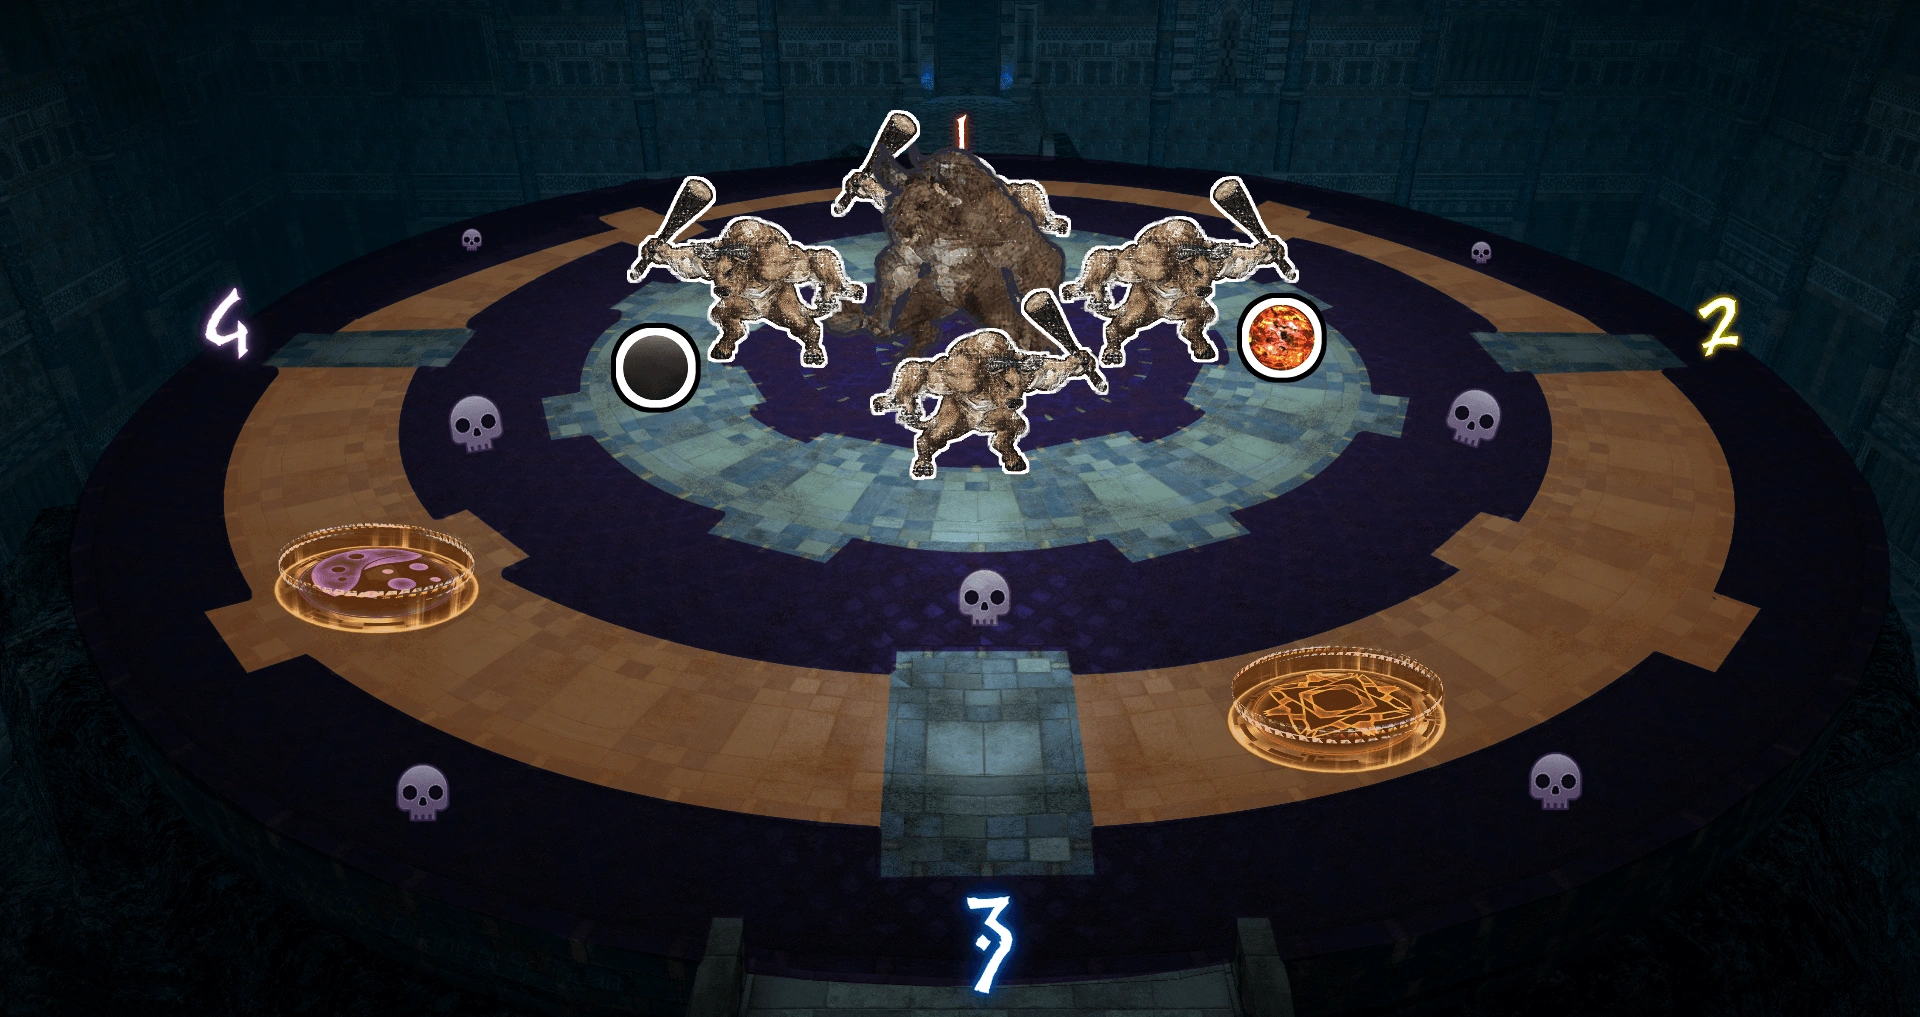
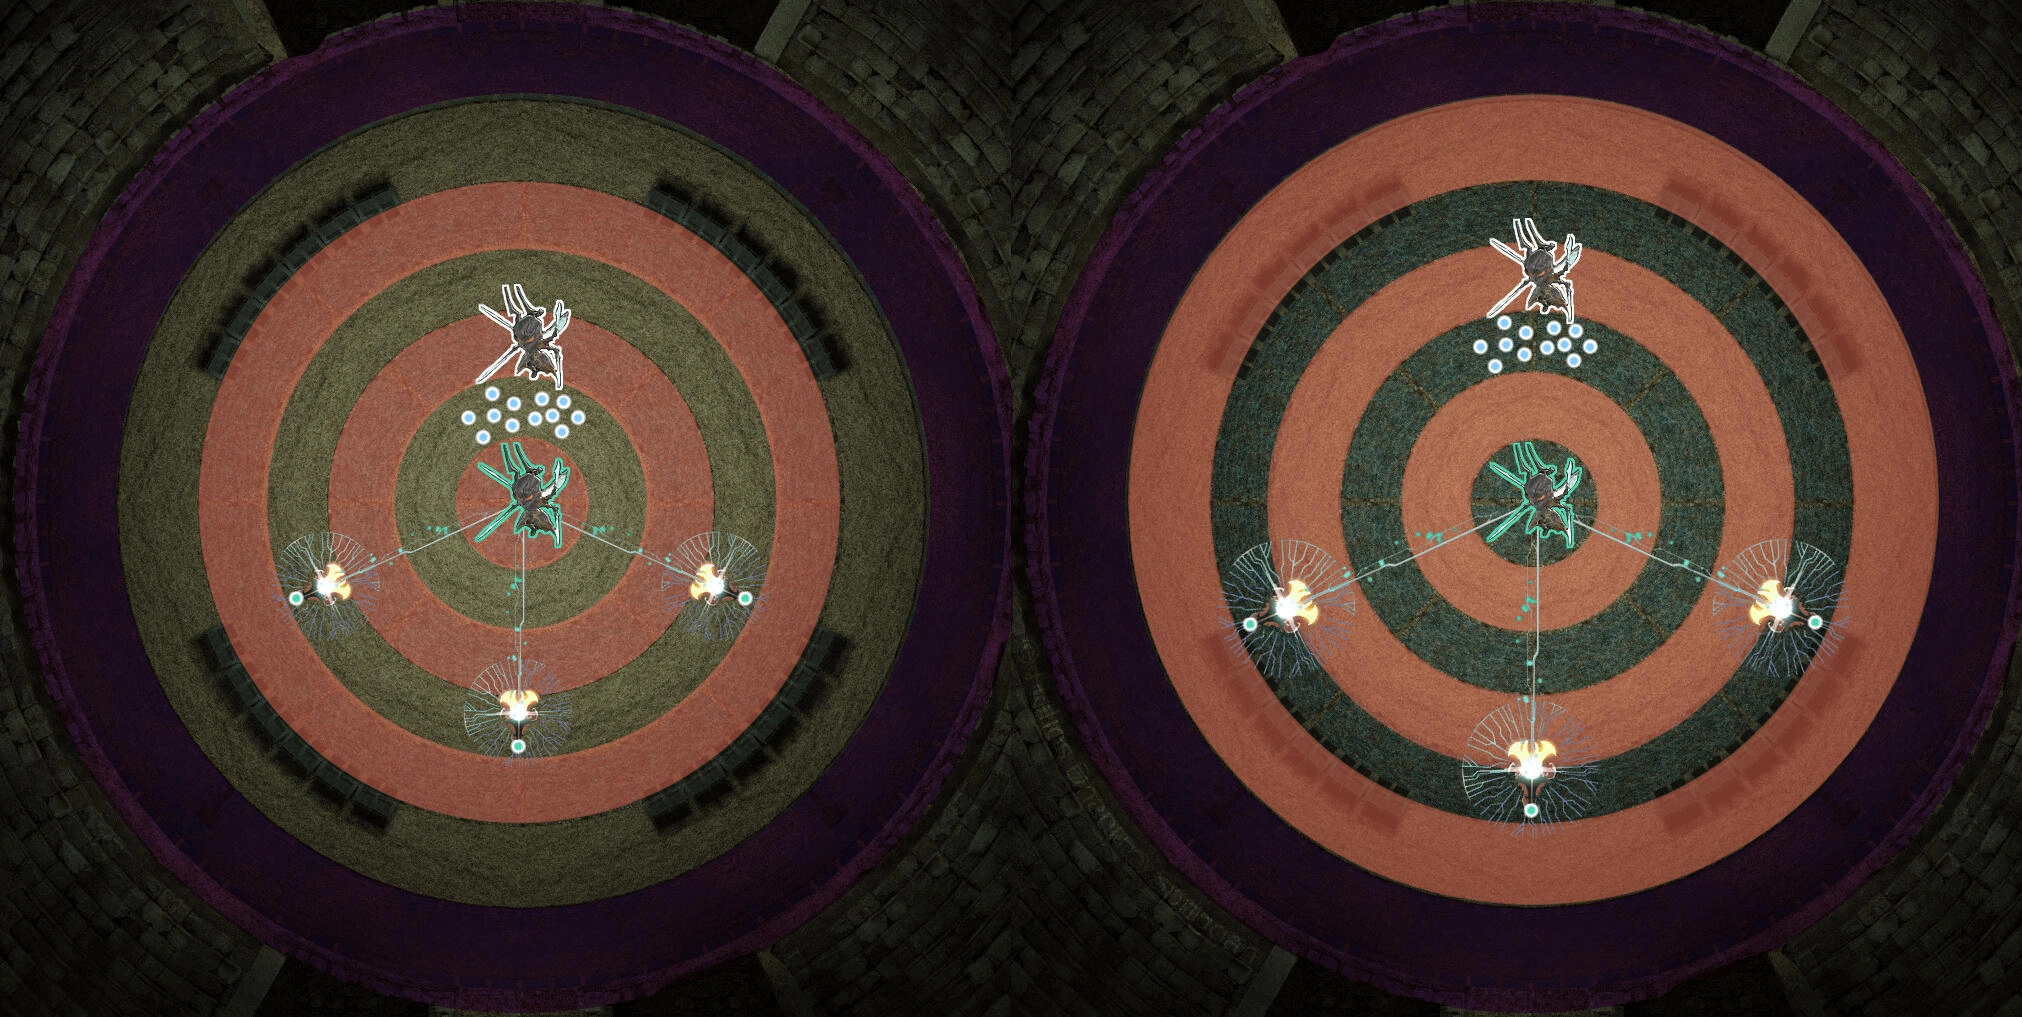
There are 3 types of adds spawned during this phase:
- 4 Stygimoloch Monks
- Spawn at a cardinal and slowly walk towards their main threat, inflicting a with its auto-attacks should it get too close. Being in proximity of another Stygimoloch Monk will massively speed itself up.
- 1
tank should position at each Cardinal in the outer ring, ready to provoke a Stygimoloch Monk and kite it clockwise around the arena.
DPS should start at the South of the outer ring, ready to defeat the Stygimoloch Monks one-by-one.
- 1
- Cast Entrapment, placing hidden traps along the intercardinal strips of the outer ring.
- 1
tank in each cardinal should be ready to use their invulnerability and sprint along each strip, detonating and surviving any traps they come across.
- 1
- Spawn at a cardinal and slowly walk towards their main threat, inflicting a
- Ball of Fire
- Periodically spawn in the inner ring of the arena, will inflict the raid with Twice-come Ruin if not destroyed in time.
- Casts Mana Flame, a point blank AoE.
- Players in the inner ring can use Light Curtains to reflect the AoE back at the Ball of Fire, destroying it instantly.
- This role is commonly assigned to
healers.
- This role is commonly assigned to
- Players in the inner ring can use Light Curtains to
- Casts Mana Flame, a point blank AoE.
- Periodically spawn in the inner ring of the arena, will inflict the raid with
- Ball of Earth
- Periodically spawn in the inner ring of the arena, will inflict the raid with Twice-come Ruin if not destroyed in time.
- Casts Stoneskin, becoming unkillable.
- Players in the inner ring can use Lost Dispel to remove its Stoneskin and destroy it.
- This role is commonly assigned to
healers.
- This role is commonly assigned to
- Players in the inner ring can use Lost Dispel to remove its
- Casts
- Periodically spawn in the inner ring of the arena, will inflict the raid with
While players contend with these adds, the Stygimoloch Lord will cast several mechanics of its own, requiring players to stay on their feet:
- Labyrinthine Fate - Inflicts all players with either:
 Wanderer's Fate, a small knockback.
 Sacrifice's Fate, a small draw-in.
Players should identify which debuff they have, moving to an inner notch for a knockback and an outer notch for the draw-in, ready to be pushed.
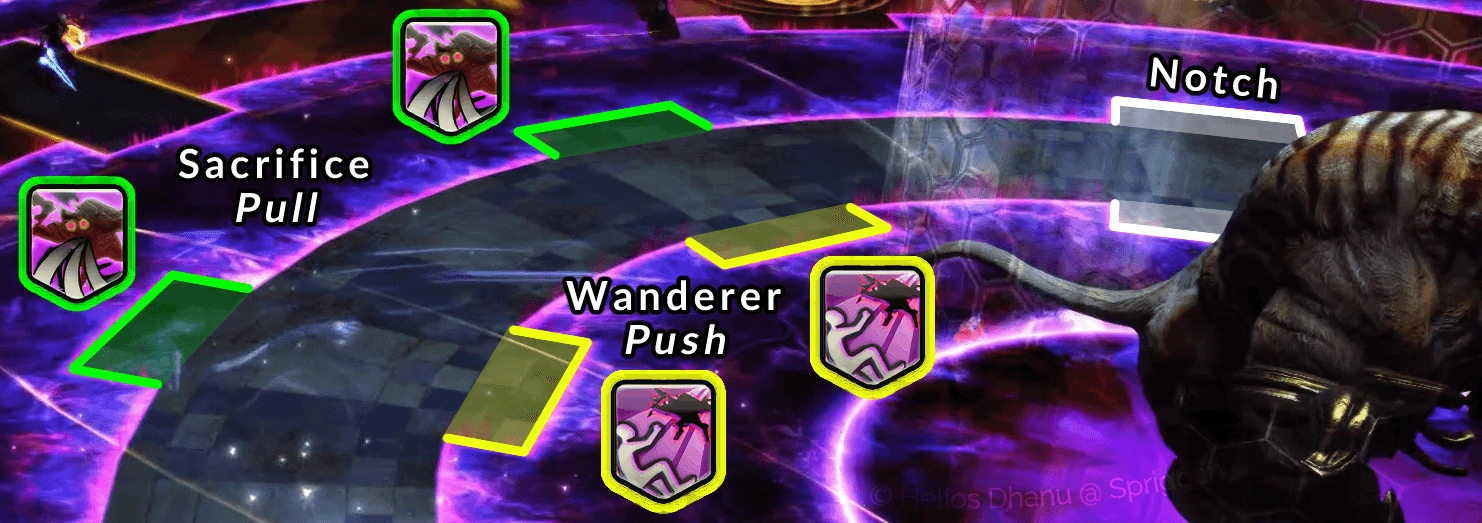
- Fateful Words - Resolves all debuffs inflicted by Labyrinthine Fate, knocking back or drawing in players.
- Devastating Bolt - Creates a lightning AoE that fills out the middle strip of boh rings of the arena. The only safe areas are the notches.
- Rending Bolt - Creates several small telegraphed circle AoEs underneath random players.
- Labyrinthine Fate
- Devastating Bolt
- Rending Bolt
- Fateful Words
- Rending Bolt
- Devastating Bolt
This string of mechanics will loop until all Stygimoloch Monks are defeated.
After this adds phase, the Stygimoloch Lord will loop the following attacks until it is defeated:
- Thunderous Discharge - Raidwide
- Rapid Bolts
- 1111-tonze Swing
- Rapid Bolts
- Rapid Bolts
- Crashing Hoof
- Whack x3
- Foe Splitter
- Vicious Swipe
- Whack x3
Upon being defeated, players can proceed to the final boss knowing she is now vulnerable.
Boss 4 - The Queen
The Queen is the final boss of Delubrum Reginae (Savage). The Queen's Guard return to assist her in some mechanics, and she has a hard enrage at 9:30.
WARNING
The following Lost Actions are required:
| Lost Action | Usage |
|---|---|
| Lost Aethershield | Raidwides from The Queen deal significant damage, each party's designated Lost Aethershield. |
| Lost Shell II | Raidwides from The Queen deal significant damage, all players should have Lost Shell II applied before combat for extra survivability. |
| Lost Reflect Light Curtain | There are Ball Lightning adds that must die to their own magic via reflecting their damage back to them. |
| Lost Dispel | The Queen will grant herself multiple     damage buffs that must be dispelled. damage buffs that must be dispelled. |
The Queen will begin with the following sequence of attacks:
- Empyrean Iniquity - Raidwide.
Tanks must mitigate with Lost Aethershield.
- Queen's Will - Summons a Queen's Guard at each cardinal edge of the arena. Each Queen's Guard will perfom a + shape AoE when instructed, stretching in all 4 cardinal directions.
- Northswain's Glow - Summons 3 orbs at the intercardinals of the arena. These will begin to form horizontal or vertical lines, creating a large circle AoE at the intersection of any lines. Players can look for the 2 parallel lines and move inbetween them towards the wall.
- Beck and Call to Arms - Tethers to 2 Queen's Guards and orders them to march. The Guards will march in their facing direction the amount of tiles shown as dots on their body, performing their AoE shortly after. It's important to note that the AoEs from Northswain's Glow will resolve at the same time here.
- Beck and Call to Arms - Repeats this cast for the remaining 2 Queen's Guards.
- Cleansing Slash - Multi-hit Tankbuster on the highest threat target. Each hit will apply
 Doom and
  Physical Vulnerability Up unless the player being hit recieves 0 damage. This can be achieved through an Invulnerability or barriers.
 - Empyrean Iniquity - Use Lost Aethershield.
Super Chess
Super Chess SimulatorThe following mechanic is one of the most well known in Delubrum Reginae (Savage), known colloquially as Super Chess.
- Queen's Edict - The Queen does multiple actions:
- Becomes untargetable and teleports to the middle of the arena.
- Summons the Queen's Guards at each edge of the arena.
- Creates a blue tile either North or South.
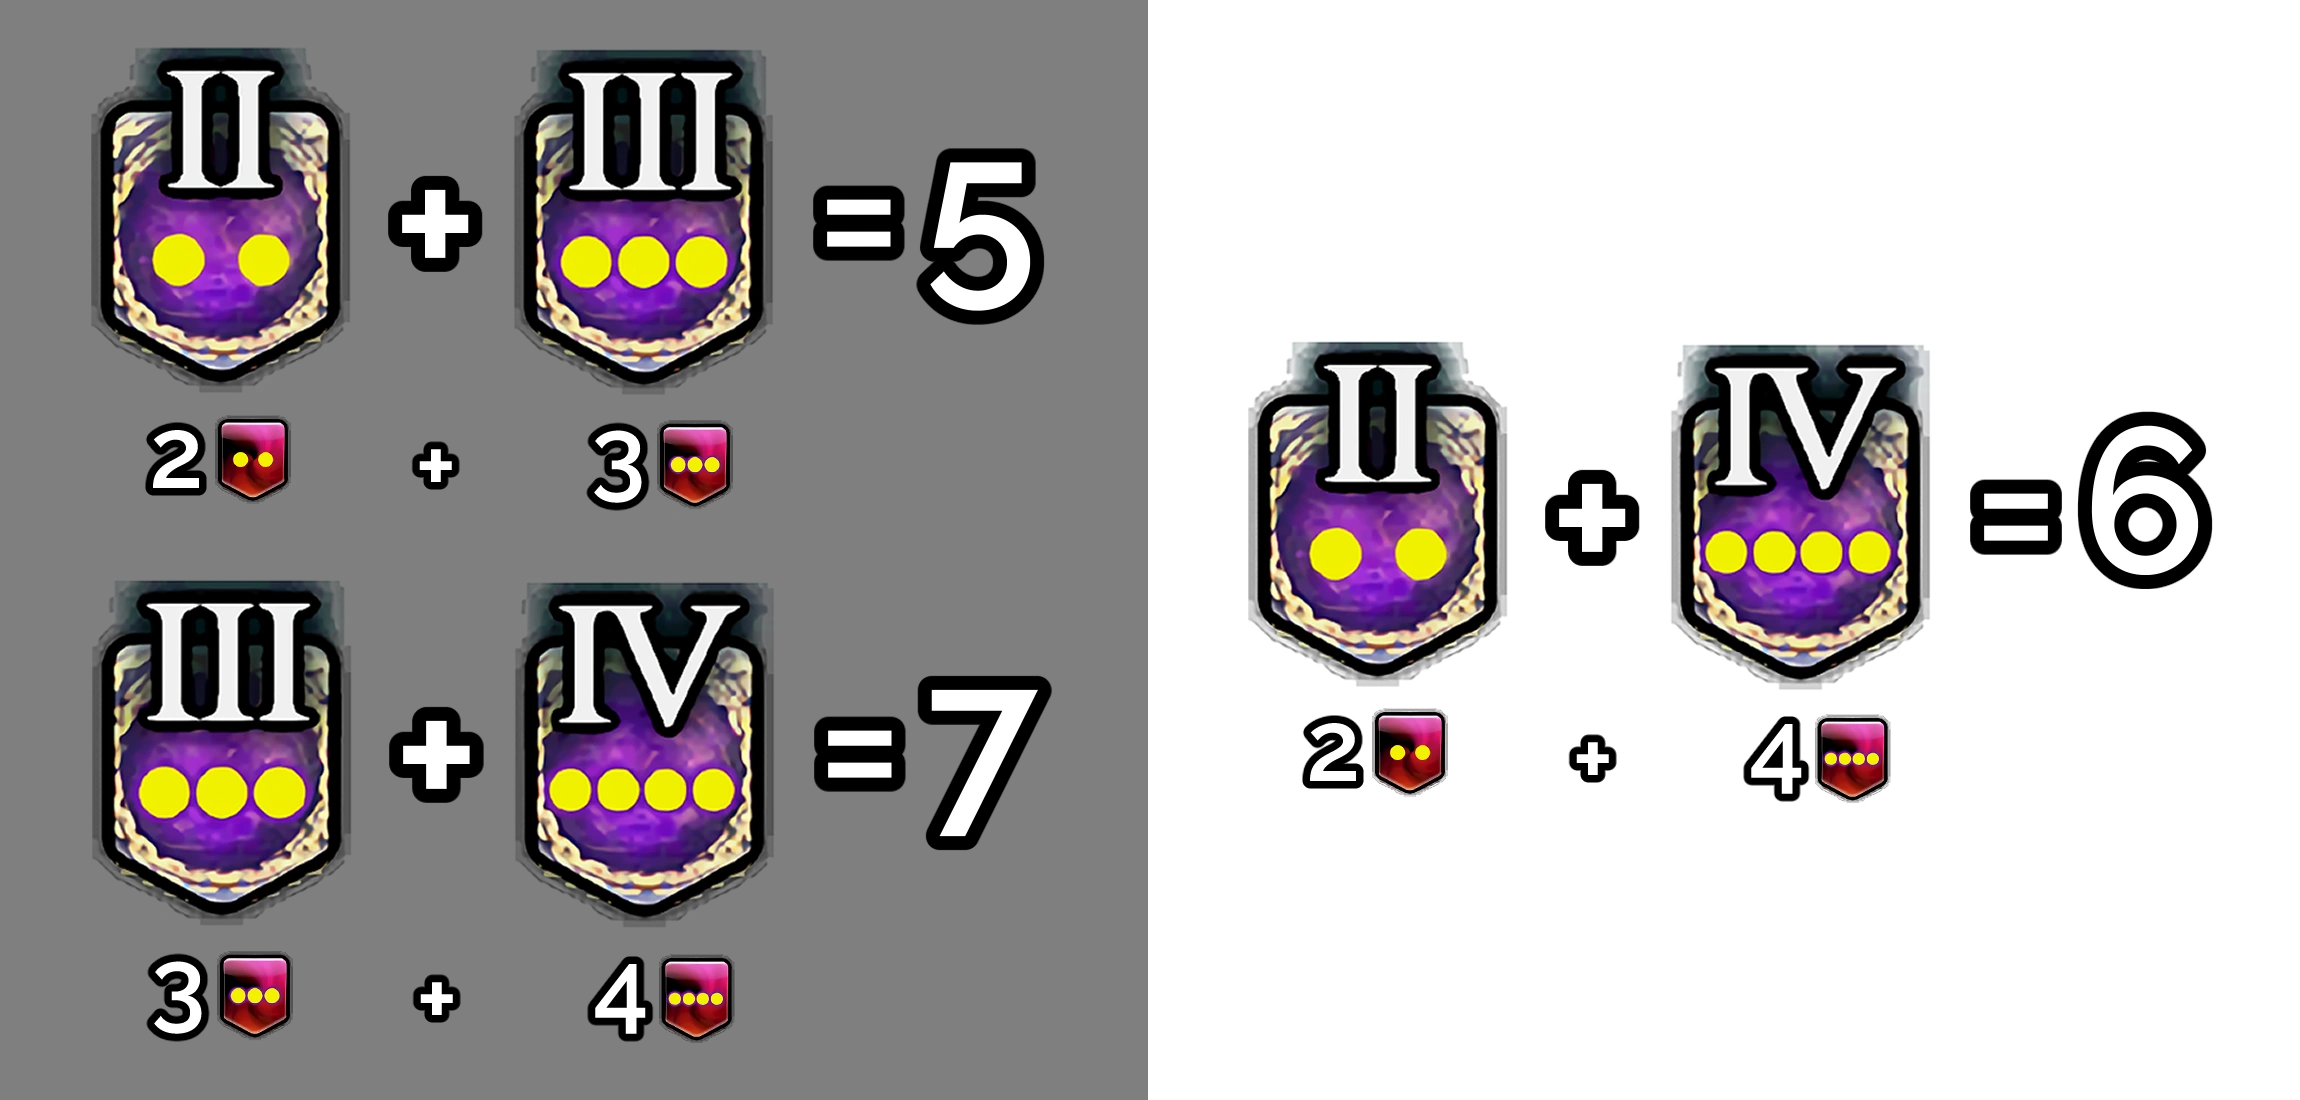
- Afflicts all players with 2
Movement Edict debuffs.
- When the timer expires, these will turn into
Your Move, requiring players to move the designated amount of tiles shown on the debuff. Moving further than allowed will begin a short timer, killing the player if they do not move back into the allowed distance.
- When the timer expires, these will turn into
Since all players are required to move the total amount of tiles shown on their debuffs, the number on each can be added together to find the total amount of tiles needed to travel.
- Beck and Call to Arms
- Beck and Call to Arms
Each Beck and Call to Arms will happen while all players are stunned. As such, there is no room to adjust any incorrect positioning and players will need to resolve the entire mechanic ahead of time.
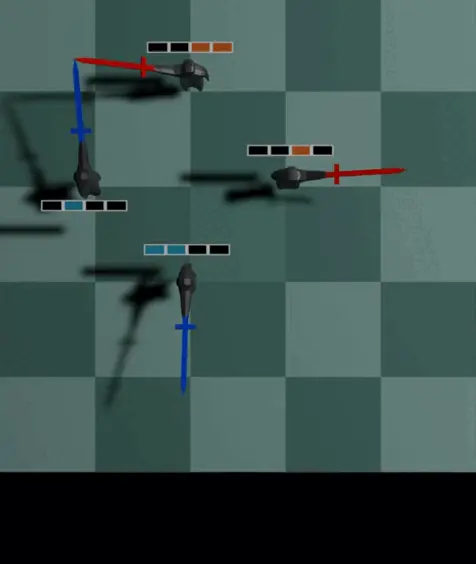
To start, all players should treat the blue tile as Relative North, and should move South. Each player will need to read the Queen's Guard facing towards the South and the Queen's Guard facing towards either the East or West wall. Depending on how many dots are shown, players must determine whether the given Queen's Guard will reach the wall with their AoE or not. This creates the starting spots needed to resolve the mechanic, either along the wall or along the AoE should the wall be unsafe.
Each starting spot shown below is marked with 5, 6 or 7, denoting the total amount of tiles a player must travel. Players can stand on their starting position to avoid the 1st Beck and Call to Arms, and walk along the wall (or AoE) to avoid the 2nd Beck and Call to Arms.
| East Wall | West Wall |
|---|---|
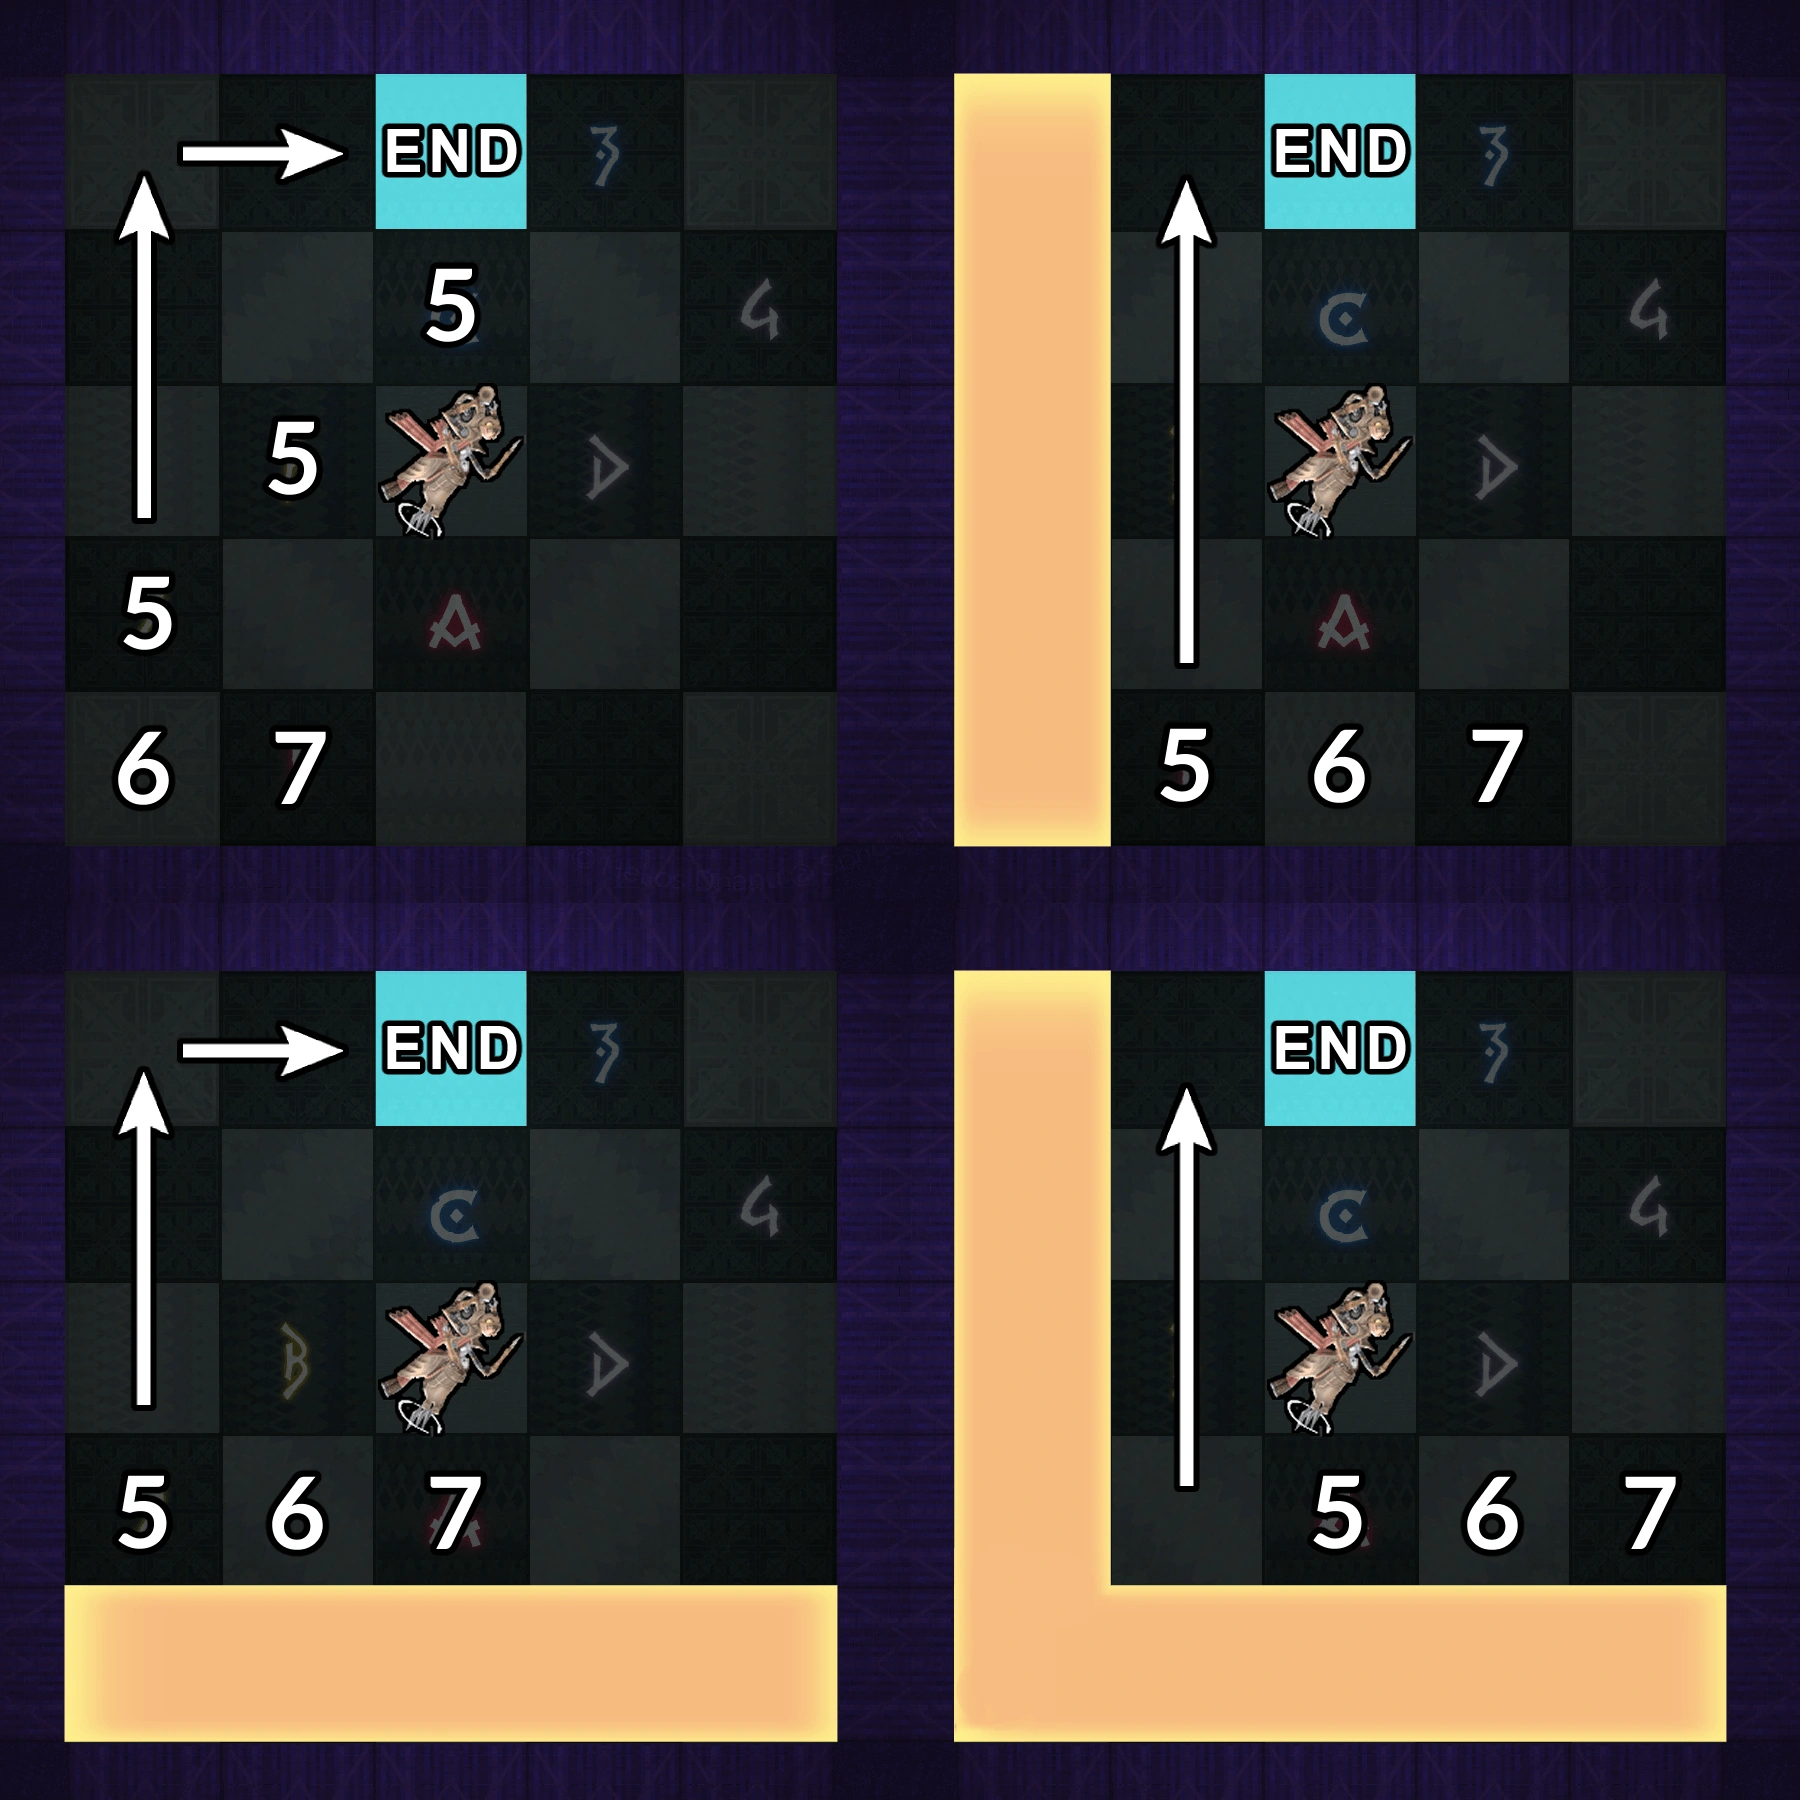 | 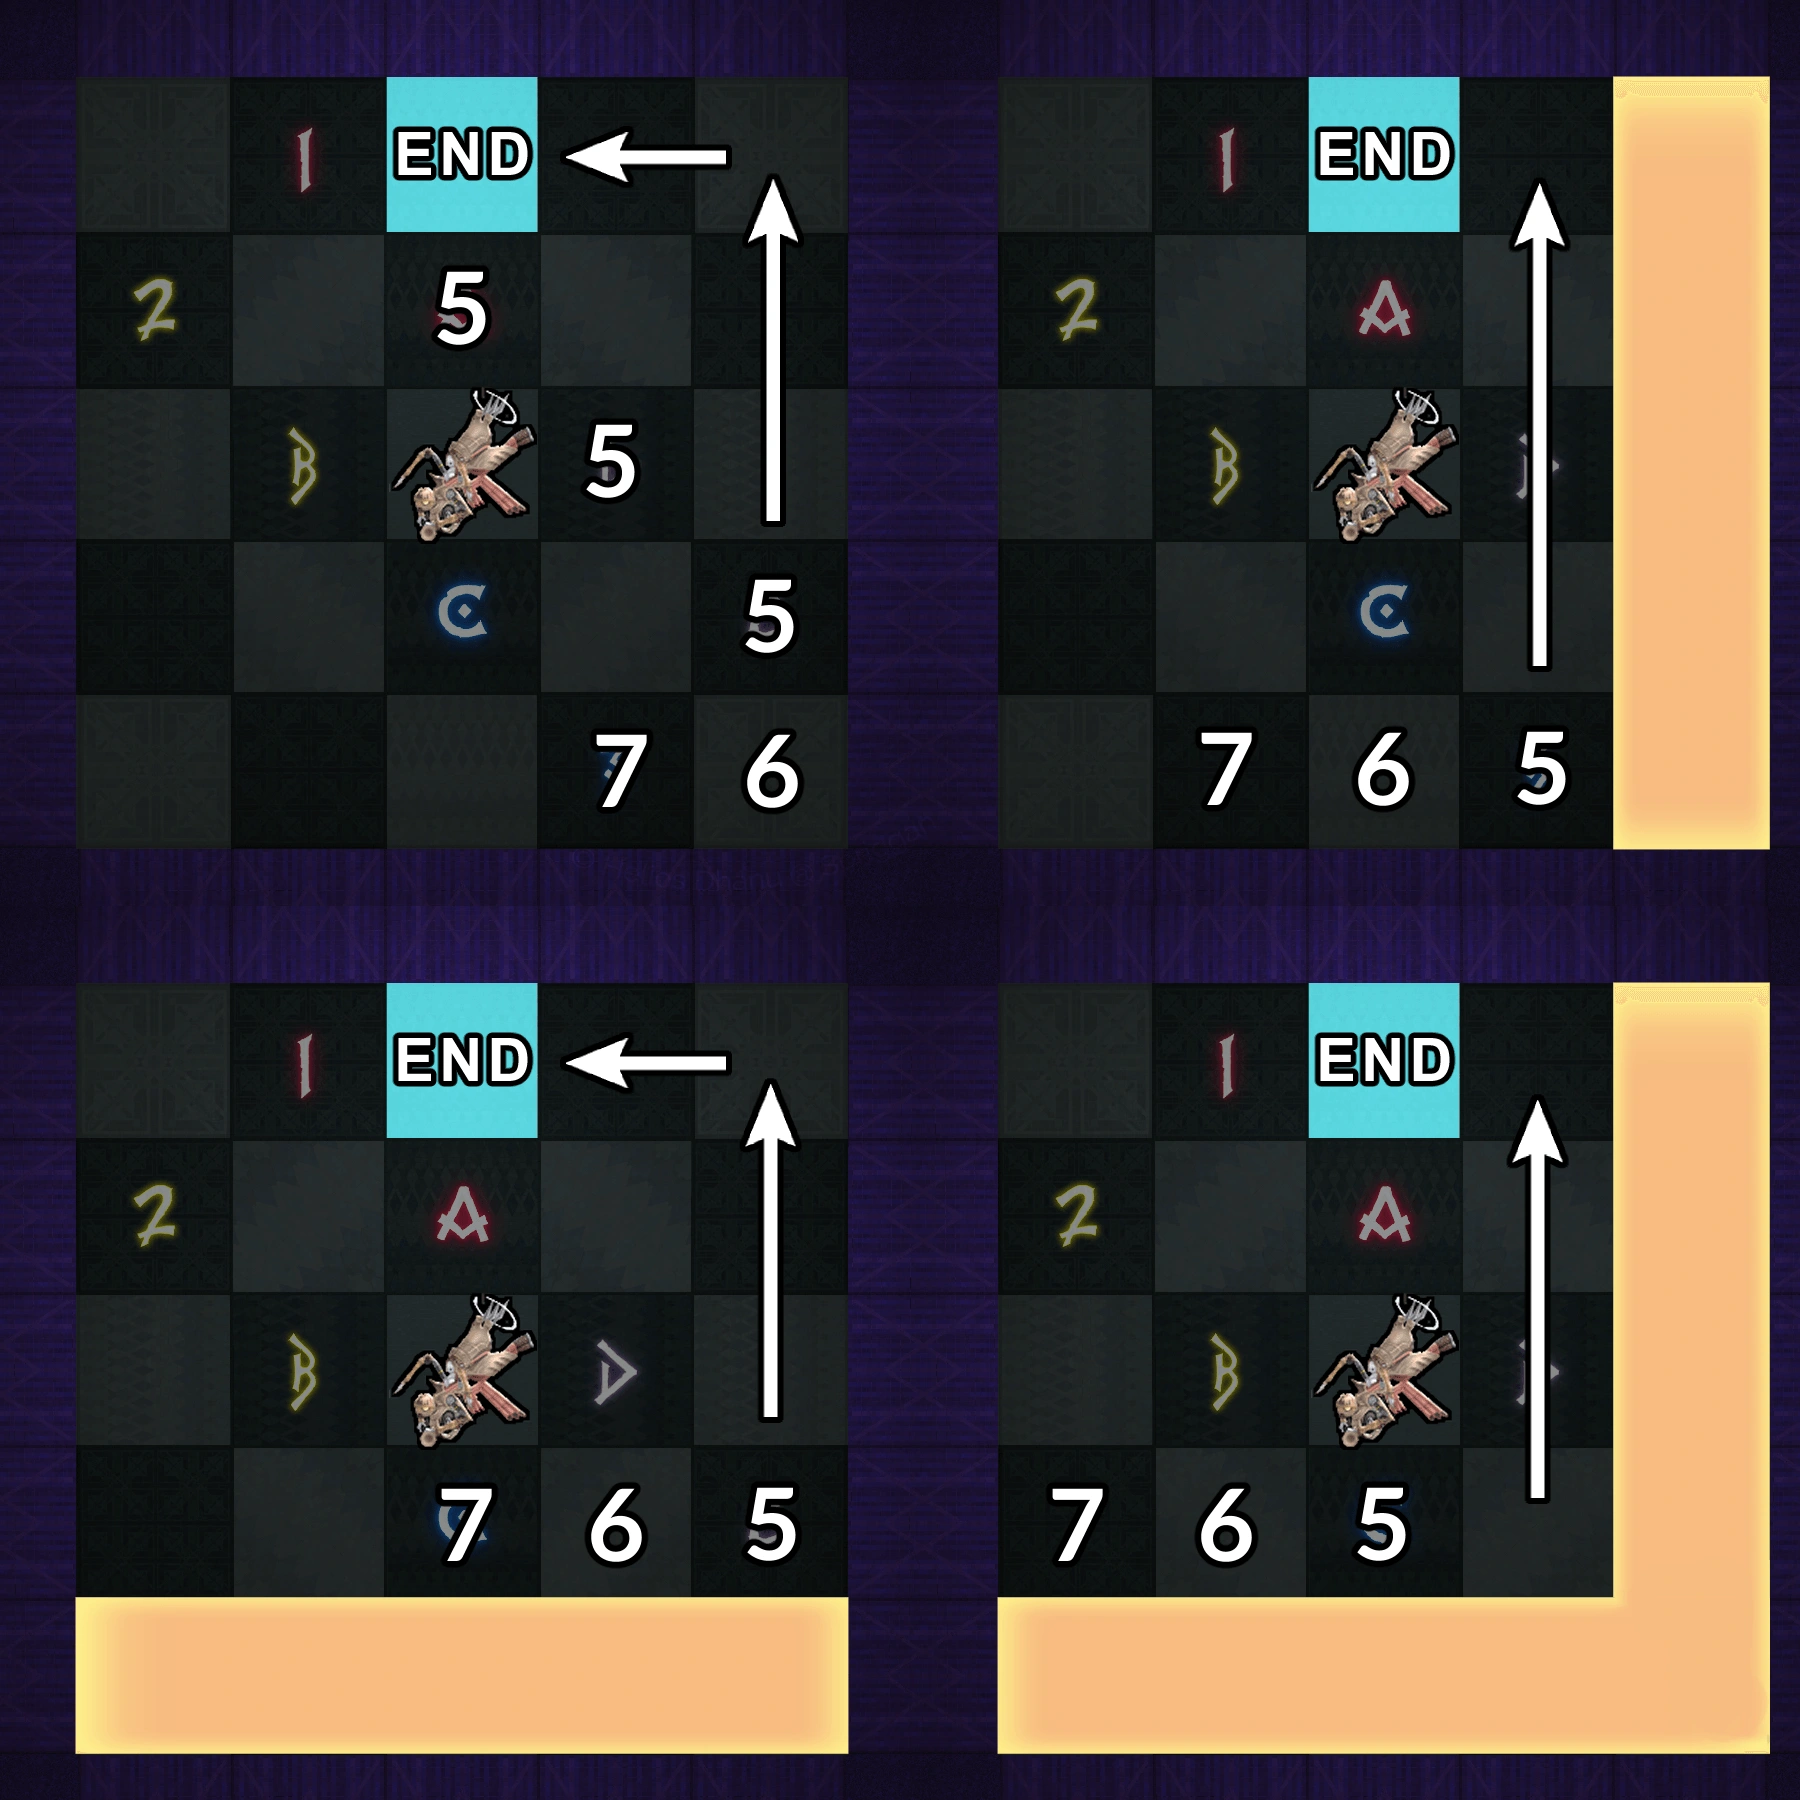 |
NOTE
Players with either 5 or 7 steps total always start on a black tile.
Players with 6 steps total always start on a white tile.
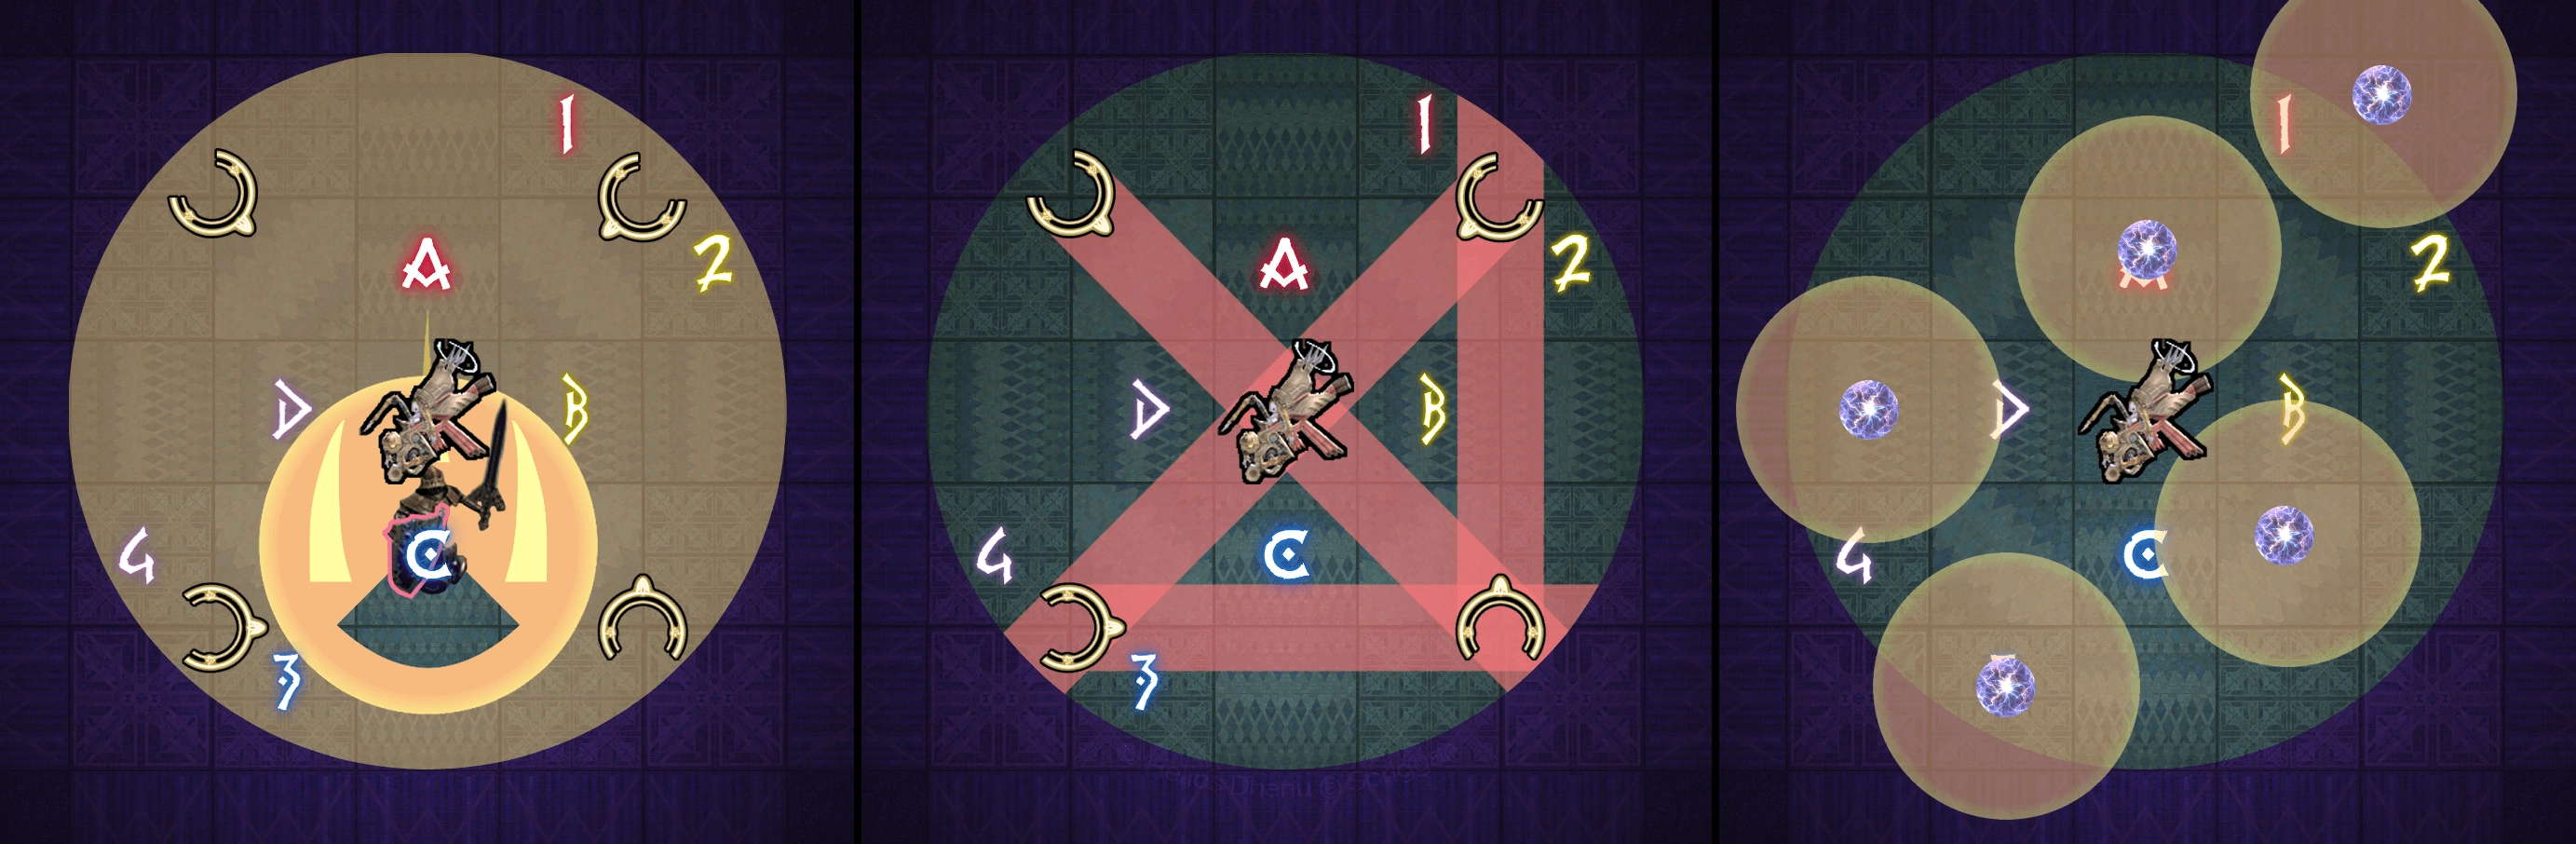
- Gunnhildr's Blades - Creates an AoE hitting the entire arena except the blue tile. Inflicts any players hit with Doom.
After the 2nd Beck and Call to Arms, players should move directly to the blue tile, ignoring the amount of tiles they have left to travel. Players that resolved the mechanic correctly, by moving within their allotted amount of tiles and finishing their movement at the blue tile, get to live.
To practice this mechanic, players can use the simulator linked at the beginning of the mechanic.
Upon finishing Super Chess or falling below 50%, The Queen will transition into her next sequence of attacks.
- Gods Save the Queen - Raidwide.
Tanks must mitigate with Lost Aethershield.
- Sovreignty (100) - The boss will introduce a Sovreignty Gauge, at which upon reaching 100, will confer multiple buffs to her. Players should use Lost Dispel to remove these buffs.
Additionally, multiple Ball Lightning adds will appear around the arena and cast Unlucky Lot, an untelegraphed PB-AoE. Players able to reflect this attack, either with Lost Reflect or a Light Curtain should stand under the same Ball Lightning and reflect its attack to destroy it. A destroyed Ball Lightning will create a bubble that grants  Lightning Resistance Up to all players standing within it.
- Maelstrom's Bolt - A lightning-aspected raidwide. Players will need Lightning Resistance Up to survive. This also resets the Sovreignty Gauge to 0.
For the rest of the fight, The Queen will work in-tandem with the Queen's Guard, borrowing mechanics previously seen.
Relentless Play 1
- Relentless Play (Warrior + Gunner) - Summons the Warrior in the south-east and the Gunner in the north-west.
- Reversal of Forces + Automatic Turret
- Players can look for a tether or their debuff to see if their weight has been reversed.
- Players can look for a tether or their
- Reading + Northswain's Glow
- Players can look at themselves to see which safe direction to point at the sources of damage.
- Move away from the intersection of the lines.
- Players can look at themselves to see which
- Winds of Weight + Queen's Shot
- Move into the gravity AoE (if lightweight) and the wind AoE (if heavyweight).
- Aim the safe direction towards the Gunner in the north-west.
- Move into the gravity AoE (if lightweight) and the wind AoE (if
- Turret's Tour
- Aim the safe direction towards the appropriate turret in the same lane.
- Aim the
- Cleansing Slash
Relentless Play 2
- Relentless Play (Knight + Soldier) - Summons the Knight in the north-east and the Soldier in the south-west.
- Shield Omen
- Double Gambit + Optimal Offensive + Judgement Blade
- Remember which clones of the Soldier were tethered for later.
- Aim to be knocked away from the orb and The Queen's 3-tile wide room cleave.
- Secrets Revealed + Judgement Blade
- Move to the untethered clones of the Soldier and avoid The Queen's 3-tile wide room cleave.

- Empyrean Iniquity - Use Lost Aethershield.
- Queen's Edict (Super Chess)
- Beck and Call to Arms
- Beck and Call to Arms
- Gunnhildr's Blades
- Cleansing Slash
Relentless Play 3
- Relentless Play (Knight + Gunner) - Summons the Knight in the north-east and the Gunner in the north-west.
- Sword/Shield Omen + Automatic Turret
- The Knight can cast either, but does not change the resolve beyond dodging the appropriate AoE.
- These turrets spawn in the intercardinals and will fire in the direction they're facing.
- Optimal Play - The Knight teleports to a random player, imitating their position and rotation, and executes their attack.
- All players should stand South and look North to make dodging the following attack easier. 4 Turret's Tour
- Sovreignty (100)
- Maelstrom's Bolt
- Empyrean Iniquity - Use Lost Aethershield.
Relentless Play 4
- Relentless Play (Warrior + Soldier) - Summons the Warrior in the south-east and the Soldier in the south-west.
- Bombslinger
- Reversal of Forces
- Players can look for a tether or their debuff to see if their weight has been reversed.
- Players will also need to check if the bombs have had their weights reversed.
- Players can look for a tether or their
- Heavens Wrath - The Queen summons a blue line AoE down the arena, knocking all players back from it by 2 tiles.
- Icy/Feiry Portent
- Above Board
After all 4 Relentless Plays have completed, The Queen will begin her enrage sequence, summoning the Queen's Guards and using repeated raidwides.
- Blood and Bone x2 - Use Lost Aethershield.
- Blood and Bone + Queen's Shot - Use Lost Aethershield.
- Blood and Bone x2 - Use Lost Aethershield.
- Blood and Bone + Queen's Shot - Use Lost Aethershield.
- Empyrean Iniquity - Use Lost Aethershield.
- Blood and Bone
- Blood and Bone
- Blood and Bone
- Queen's Shot
- Sovereignty (100)
There is no need to dispel The Queen's buffs after this final Sovereignty, as she will cast Gods Save the Queen, her hard enrage, at 9:30.
Defeating The Queen completes Delubrum Reginae (Savage). Congratulations!
First-timers can claim their Cerberus mount from the Achievements window.