Forked Tower: Blood Overview
The Forked Tower: Blood is the first raid available within The Occult Crescent, introduced in Dawntrail. The raid features multiple bosses and small-scale encounters, requiring a large group of players with good coordination to complete. The raid is designed for up to 48 players, but parties may enter with as little as 24 players should they still meet the entry requirements.
Entry to The Forked Tower: Blood is located within The Occult Crescent: South Horn and will require completing several prerequisites before players can enter the raid.
Read on for more information about Occult Crescent or click below to jump to the Raid Guide.
Raid GuideOccult Crescent Overview
Occult Crescent allows players to progress their character's power in several different ways, each serving to help the player in all Occult Crescent zones.
These upgrades are not strictly required to clear the raid, but are generally recommended for players that plan to spend a lot of time in this series of Field Operations.
Phantom Jobs
The Phantom Job system allows players to temporarily take on the unique abilities and traits of various jobs. and there are currently 16 Phantom Jobs available in Occult Crescent. Some are purchased with currency unique to Occult Crescent, while others are randomly dropped from certain Critical Encounters (CEs).
Detailed Phantom Job Info| Default (Starting jobs) | Enlightenment Silver Pieces (1000 per job) | Enlightenment Gold Pieces (1600 per job) | CE Drop (Listed below) |
|---|---|---|---|
 Freelancer Freelancer |  Time Mage Time Mage |  Thief Thief |  Berserker (The Unbridled) Berserker (The Unbridled) |
 Knight Knight |  Chemist Chemist |  Samurai Samurai |  Ranger (The Black Regiment) Ranger (The Black Regiment) |
 Monk Monk |  Cannoneer Cannoneer |  Geomancer Geomancer |  Oracle (On The Hunt) Oracle (On The Hunt) |
 Bard Bard |  Mystic Knight Mystic Knight |  Gladiator Gladiator | |
 Dancer Dancer |
Phantom Jobs can level up by earning Phantom EXP, earned through FATEs, CEs and Chain Bonuses.
Reaching the maximum level on a Phantom Job will add a stack of  Phantom Mastery, a permanent buff increasing damage dealt and healing potency by 2% for each stack, as well as adding 1 level to Phantom Freelancer.
Arcanaut Sets
Arcanaut Sets are obtainable gear that offer substantial increases in universal offence while in Occult Crescent zones.
Each gear piece costs 4000 Enlightenment Silver Pieces and provide the following bonuses:
- +40 Main Stat (Strength, Dexterity, Intelligence, Mind)
- +1 Special Attribute
Special Attribute scales up damage from all Phantom Job abilities that have "Scale with item level" in their tooltip description.
Arcanaut gear pieces can be upgraded with various materials obtained within South Horn:
- Aetherspun Silvers can be purchased for 1200 Enlightenment Silver Pieces each.
- 3 are required to augment a single gear piece to "+1".
- Aetherial Fixatives can be purchased for 1600 Enlightenment Gold Pieces each.
- 3 are required to augment a single gear piece to "+1".
- Aetherspun Gold can be found in Treasure Coffers scattered around South Horn.
- 3 are required to augment a single gear piece to "+2".
- X-Fixatives can be purchased for 10 Sanguinite each.
- 6 are required to augment a single gear piece to "+2".
Each augment will add another +40 Main Stat and +1 Special Attribute to the selected gear piece.
Occult Accessories
Occult accessories are another set of obtainable gear that offer substantial increases in universal offence while in Occult Crescent-related Field Operations.
Split into "Blood" (DoW) and "Magic" (DoM), accessories can be obtained by various means within South Horn and offer the following bonuses:
- +40 Main Stat (Strength, Dexterity, Intelligence, Mind)
- +1 Special Attribute
Special Attribute scales up damage from all Phantom Job abilities that have "Scale with item level" in their tooltip description.
There is also a special accessory, an "Occult Ring of Deep Blood"/"Magic", that offers +80 Main Stat and +2 Special Attribute as a set bonus if all other accessories are equipped.
- Earrings, Necklaces and Bracelets are obtained from CEs at a ~0.1% chance and from treasure coffers at a ~0.06% chance.
- Rings are obtained from Gold Persistent Pot coffers, at a ~10% drop rate.
- Deep Rings are obtained from Happy Bunny coffers, discoverable through the use of Fortune Carrots, at a ~20% drop rate.
Raid: The Forked Tower: Blood
WARNING
This guide will entail setups and strategies for an ANYPROG run, meaning that any player at any prog-point in the raid can join.
Depending on what type of run it is and who is running it, the assigned roles and Phantom Jobs in the raid can change considerably. Please confirm the roles and Phantom Jobs with the raid leader's linked resources and be sure to ask questions if any player is unsure.
For those looking to host their own runs on Materia, this Google Sheet can assist in allocating roles and Phantom Jobs, with additional resources such as macros and raidplans. Players will need to create a copy of the sheet via 'File -> Make a copy' to make edits.
Raidplans
Raidplans are an interactive guide that allow you to click through each phase individually and review the mechanics in an easy to understand manner.
Boss 1 - Demon TabletVideo Guides, Macros & Waymarks
Video guides by Kobe.
The macros are designed to be used with /yell. For party use, remove the "/y" and "<wait.2>".
Waymarks can be imported to the game using Waymark Preset Plugin, or you can ask a friend to import them for you and save a copy for yourself.
Boss 1 - Demon Tablet
Video Guide
Macro
/y ━━━━━━━━━━━━━━━━━━━━━━━━ <wait.2>
/y ■Towers / Adds ■ Towers 2 <wait.2>
/y B ※ A/1, B/2, C/3 <wait.2>
/y C A share tower position <wait.2>
/y ━━★━━ <wait.2>
/y 1 3 ※ If crossing through <wait.2>
/y 2 levitate up <wait.2>
/y ■Meteors <wait.2>
/y ※ Meteor Players to Meteor Marker <wait.2>
/y ※ Point Stack direction at boss <wait.2>Waymarks
{"Name":"Demon Tablet","MapID":1018,"A":{"X":705.0,"Y":-481.0,"Z":366.0,"ID":0,"Active":true},"B":{"X":700.0,"Y":-481.0,"Z":354.0,"ID":1,"Active":true},"C":{"X":695.0,"Y":-481.0,"Z":366.0,"ID":2,"Active":true},"D":{"X":0.0,"Y":0.0,"Z":0.0,"ID":3,"Active":false},"One":{"X":695.0,"Y":-481.0,"Z":392.0,"ID":4,"Active":true},"Two":{"X":700.0,"Y":-481.0,"Z":404.0,"ID":5,"Active":true},"Three":{"X":705.0,"Y":-481.0,"Z":392.0,"ID":6,"Active":true},"Four":{"X":0.0,"Y":0.0,"Z":0.0,"ID":7,"Active":false}}Hallways & Boss 2 - Dead Stars
Video Guide
Macro
/y ━━━━━━━━━━━━━━━━━━━━━━━━━ <wait.2>
/y ■Targets ■Snowballs + Wildcharge Order <wait.2>
/y B/2 ※ North : A → B → C <wait.2>
/y ★ ※ SW : 1 → 2 → 3 <wait.2>
/y ★ ★ ※ KB opposite your Snowball <wait.2>
/y A/1 C/3 <wait.2>
/y ■Fireballs <wait.2>
/y ※ ABC : Follow Letter WMs <wait.2>
/y ※ 123 : Follow Number WMs <wait.2>
/y ※ Healer → Sides, DPS → Wall <wait.2>
/y ※ Tank soak order : A/1 → B/2 <wait.2>Waymarks
{"Name":"Dead Stars","MapID":1018,"A":{"X":-817.0,"Y":-876.0,"Z":350.0,"ID":0,"Active":true},"B":{"X":-800.0,"Y":-876.0,"Z":340.0,"ID":1,"Active":true},"C":{"X":-783.0,"Y":-876.0,"Z":350.0,"ID":2,"Active":true},"D":{"X":0.0,"Y":0.0,"Z":0.0,"ID":3,"Active":false},"One":{"X":-783.0,"Y":-876.0,"Z":370.0,"ID":4,"Active":true},"Two":{"X":-800.0,"Y":-876.0,"Z":380.0,"ID":5,"Active":true},"Three":{"X":-817.0,"Y":-876.0,"Z":370.0,"ID":6,"Active":true},"Four":{"X":0.0,"Y":0.0,"Z":0.0,"ID":7,"Active":false}}Bridges & Boss 3 - Marble Dragon
Video Guide
Macro
/y ━━━━━━━━━━━━━━━━━━━━━━ <wait.2>
/y ■Adds + Towers ■Frigid Twister 2 <wait.2>
/y B <wait.2>
/y ↓A C↓ ※ B flex N/E <wait.2>
/y ★ <wait.2>
/y ↑3 1↑ ※ 2 flex S/W <wait.2>
/y 2 <wait.2>
/y ※ Burst B/2 Golems <wait.2>Waymarks
{"Name":"Marble Dragon","MapID":1018,"A":{"X":-346.898,"Y":-840.0,"Z":147.0,"ID":0,"Active":true},"B":{"X":-337.0,"Y":-840.0,"Z":143.0,"ID":1,"Active":true},"C":{"X":-327.0,"Y":-840.0,"Z":147.0,"ID":2,"Active":true},"D":{"X":-309.0,"Y":-840.0,"Z":157.0,"ID":3,"Active":true},"One":{"X":-327.0,"Y":-840.0,"Z":167.0,"ID":4,"Active":true},"Two":{"X":-337.0,"Y":-840.0,"Z":171.0,"ID":5,"Active":true},"Three":{"X":-347.0,"Y":-840.0,"Z":166.0,"ID":6,"Active":true},"Four":{"X":-365.0,"Y":-840.0,"Z":157.0,"ID":7,"Active":true}}Lockwards & Boss 4 - Magitaur
Video Guide
Macros
Lockwards
/y ━━━━━━━━━━━━ <wait.2>
/y ■Interrupt Order <wait.2>
/y ★Mechanism★ <wait.2>
/y A/1 B/2 C/3 <wait.2>
/y A - MT B - MT C - MT <wait.2>
/y A - D3 B - D3 C - D3 <wait.2>
/y 1 - MT 2 - MT 3 - MT <wait.2>
/y 1 - D3 2 - D3 3 - D3 <wait.2>Boss 4 - Magitaur
/y ━━━━━━━━━━━━━━━━━━━━━━━━━━━━━━ <wait.2>
/y ■Basic Positons + Rune Axe ■Assassin's Dagger <wait.2>
/y A/1 C/3 1. Letter/Number WM <wait.2>
/y ★ 2. Dodge In/Out <wait.2>
/y B/2 3. Chill at D <wait.2>
/y ※ Big AoE → Purple Can at Wall 4. Dodge Out/In <wait.2>
/y ※ Small AoE → Middle of Square <wait.2>
/y ※ 2nd Set : NW Safe <wait.2>
/y ■Holy Lance <wait.2>
/y ┏━━━━━Spears━━━━━━━┓ <wait.2>
/y ┃ 2, 3, 4 ┃ 6, 7, 8 ┃10, 11, 12 ┃ <wait.2>
/y ┃C/3 Out┃B/2 Out┃ A/1 Out ┃ <wait.2>
/y  ̄ ̄ ̄ ̄ ̄ ̄ ̄ ̄ ̄ ̄ ̄ ̄ ̄ ̄ ̄ ̄ <wait.2>Waymarks
BAP Group A/1
{"Name":"Magitaur (A/1)","MapID":1018,"A":{"X":694.0,"Y":-476.0,"Z":-682.0,"ID":0,"Active":true},"B":{"X":696.0,"Y":-476.0,"Z":-665.0,"ID":1,"Active":true},"C":{"X":710.0,"Y":-476.0,"Z":-675.0,"ID":2,"Active":true},"D":{"X":690.0,"Y":-476.0,"Z":-677.0,"ID":3,"Active":true},"One":{"X":691.0,"Y":-476.0,"Z":-673.0,"ID":4,"Active":true},"Two":{"X":706.0,"Y":-476.0,"Z":-667.0,"ID":5,"Active":true},"Three":{"X":704.0,"Y":-476.0,"Z":-683.0,"ID":6,"Active":true},"Four":{"X":0.0,"Y":0.0,"Z":0.0,"ID":7,"Active":false}}BAP Group B/2
{"Name":"Magitaur (B/2)","MapID":1018,"A":{"X":694.0,"Y":-476.0,"Z":-682.0,"ID":0,"Active":true},"B":{"X":696.0,"Y":-476.0,"Z":-665.0,"ID":1,"Active":true},"C":{"X":710.0,"Y":-476.0,"Z":-675.0,"ID":2,"Active":true},"D":{"X":703.0,"Y":-476.0,"Z":-664.0,"ID":3,"Active":true},"One":{"X":691.0,"Y":-476.0,"Z":-673.0,"ID":4,"Active":true},"Two":{"X":706.0,"Y":-476.0,"Z":-667.0,"ID":5,"Active":true},"Three":{"X":704.0,"Y":-476.0,"Z":-683.0,"ID":6,"Active":true},"Four":{"X":0.0,"Y":0.0,"Z":0.0,"ID":7,"Active":false}}BAP Group C/3
{"Name":"Magitaur (C/3)","MapID":1018,"A":{"X":694.0,"Y":-476.0,"Z":-682.0,"ID":0,"Active":true},"B":{"X":696.0,"Y":-476.0,"Z":-665.0,"ID":1,"Active":true},"C":{"X":710.0,"Y":-476.0,"Z":-675.0,"ID":2,"Active":true},"D":{"X":707.0,"Y":-476.0,"Z":-682.0,"ID":3,"Active":true},"One":{"X":691.0,"Y":-476.0,"Z":-673.0,"ID":4,"Active":true},"Two":{"X":706.0,"Y":-476.0,"Z":-667.0,"ID":5,"Active":true},"Three":{"X":704.0,"Y":-476.0,"Z":-683.0,"ID":6,"Active":true},"Four":{"X":0.0,"Y":0.0,"Z":0.0,"ID":7,"Active":false}}Entry Requirements
Any player who is Knowledge Level 20 and has completed the final quest in the South Horn questline, "Mysteries Abide", can enter The Forked Tower: Blood.
To enter the raid, a minimum of 24 players must have this quest completed to spawn the Auroral Mirages weather and begin the entry process.
To successfully complete the entry process, at least 24 players must offer a Sanguine Cipher, to the torches found at Solitary Pavilion, located at X: 22.7, Y: 21.5. Sanguine Ciphers can be purchased from the Expedition Antiquarian, located within South Horn's base camp, for 600 Enlightenment Silver Pieces or 960 Enlightenment Gold Pieces.
WARNING
Each player aiming to enter The Forked Tower: Blood must offer at least 1 Sanguine Cipher, even should the group exceed the minimum 24 offerings required to begin the raid.
Should the entry process fail, all offerings of Sanguine Ciphers will be returned to the group. They will only be consumed if the entry process succeeds, regardless of if players are selected for the raid or not.
If there are more than 48 players standing on the platform when the entry process succeeds, entry priority will be given to those that offered more ciphers.
Finding a Group
Two major communities support Field Operations in OCE, the Content Achievers Discord covers a wide variety of content beyond Field Operations, while the Murder of Geese (MOG) Discord focuses specifically on coordinating groups for raids in Field Operations.
Content Achievers DiscordMurder of Geese (MOG) DiscordSet Up
Phantom Jobs
The nature of Phantom Jobs may allow players to take on other roles to cover any missing bases of tanking, healing and damage.
Detailed Phantom Job InfoWhen players first spawn in, the elevated glowing platform they are standing on will allow them to change both Job and Phantom Job. Ensure that everyone is on their intended jobs before dropping off the platform.
At a baseline, each party should aim for:
x1 Tank
x1 Healer
x2 DPS
Each party will also have a Letter / Number designation, used for mechanic positions. These are:
Letter Alliance
- Party A
- Party B
- Party C
Number Alliance
- Party 1 / D
- Party 2 / E
- Party 3 / F
Additionally, the raid should have the following Phantom Jobs to successfully clear the raid:
| Phantom Job | Amount | Responsibilities |
|---|---|---|
| Knight | x1 |  Phantom Guard - 90% personal mitgation. Phantom Guard - 90% personal mitgation.  Pledge - Self/Targeted Invulnerability. Pledge - Self/Targeted Invulnerability.  Pray - 10% party mitigation for 30 minutes. Pray - 10% party mitigation for 30 minutes. |
| Thief | x1 per Alliance (ABC / 123) | Trap Detection - Reveals hidden explosive traps and passages. Lockpicker - Opens locked doors to receive bonus loot.  Pilfer Weapon - Removes a damage buff Pilfer Weapon - Removes a damage buff  from the Guardian Weapon. from the Guardian Weapon. |
| Geomancer | x1 per Alliance (ABC / 123) |  Suspend - Negates the lightning floors in the Hallways and the Bridges. Suspend - Negates the lightning floors in the Hallways and the Bridges. |
| Time Mage | x1 per Alliance (ABC / 123) |  Occult Slowga - Slows enemies. Occult Slowga - Slows enemies. Occult Dispel - Removes most enemies' buffs. |
| Bard | x1 per Alliance (ABC / 123) |  Romeo's Ballad - Interrupts Tower Idols' Aero III cast. Romeo's Ballad - Interrupts Tower Idols' Aero III cast. |
| Chemist | x2 per Alliance (ABC / 123) |  Revive - Only means of resurrecting players besides Healer LB3. Revive - Only means of resurrecting players besides Healer LB3. |
| Berserker | x1 per Raid (ABC123) |  Rage - Negates the Rage - Negates the  Hysteria debuff from the Universal Empowerment Conduit. Hysteria debuff from the Universal Empowerment Conduit. |
| Oracle | x1 per Raid (ABC123) |  Phantom Doom - Applies Doom; instakill option for Guardian Berserker. Phantom Doom - Applies Doom; instakill option for Guardian Berserker. |
| Cannoneer OR Dancer | x1 per Raid (ABC123) | Phantom Fire - Instakill option for Guardian Berserker.  Silver Cannon - Decreases target's damage dealt by 10% and increases damage taken by 5%. Will overwrite Silver Cannon - Decreases target's damage dealt by 10% and increases damage taken by 5%. Will overwrite  Mesmerize. Mesmerize - Decreases target's damage dealt by 10% and increases damage taken by 5%. Damage dealt for the first 4 seconds is decreased by 40%. Will overwrite Silver Sickness. Mesmerize. Mesmerize - Decreases target's damage dealt by 10% and increases damage taken by 5%. Damage dealt for the first 4 seconds is decreased by 40%. Will overwrite Silver Sickness.  Quick Step - 2% party damage buff for 30 minutes. Quick Step - 2% party damage buff for 30 minutes. |
| Mystic Knight | x1 per Raid (ABC123) |  Blazing Spellblade - Increases target's damage taken by 5%. Blazing Spellblade - Increases target's damage taken by 5%. |
| Samurai | As many as possible | Iainuki - Instakill option for Guardian Berserker. Zeninage - Accuracy option for Guardian Bats. |
| Ranger | Optional | Occult Falcon - Trigger traps from a distance.  Phantom Aim - Accuracy option for Guardian Bats. Phantom Aim - Accuracy option for Guardian Bats. |
Additional Information
 Phantom Chemists and
  Phantom Samurai should ensure they have their consumable items, Occult Potions/Elixirs and Occult Coffers respectively, in their inventory. These can be purchased for Enlightenment Silver/Gold Pieces and Gil in South Horn's base camp or on the Marketboard.
 Rangers and
 Tanks should ensure they communicate clearly with the team when deciding to pop traps.
Finally, below are in-depth guides for certain Phantom Jobs within The Forked Tower: Blood. Players can follow these to maximise their Phantom Job's effectiveness:
Encounters
Boss 1 - Demon Tablet
Boss 1 - Demon TabletDemon Tablet is the first boss of The Forked Tower: Blood. It features several simple mechanics, but with harsh punishments and a hard enrage at 6:40.
WARNING
The following Occult Actions are required:
| Phantom Job | Occult Action | Usage |
|---|---|---|
| Time Mage |  Occult Dispel Occult Dispel | The Summoned Arch Demon adds have a  defensive buff requiring players to remove it in order to destroy them. defensive buff requiring players to remove it in order to destroy them. |
The Demon Tablet itself is a wide enemy, splitting the room into two square platforms at the North and South and preventing players from walking through itself, unless it is raised into the air while casting an attack.
Additionally, throughout the fight, the Demon Tablet will combine its primary attacks with one of two late-telegraphed attacks. To understand which attack the boss will use, players can read the suffix of the castbar. These are:
- [Attack] of Dangers Near - PB-AoE. Players should be about half a platform's length away from the boss.
- [Attack] of Expulsion Afar - Linear knockback originating from the boss. Players should be close to the middle, but not directly under the boss.
Finally, The Demon Tablet's auto attacks will target the top three enmity players.
The fight begins with Demonic Dark II, a very heavy hitting raidwide.
After the raidwide, the Demon Tablet will cast Ray of Dangers Near/Expulsion Afar, which will fire persistent AoE lasers down one half of the arena after the cast finishes. Players can determine which half will be unsafe by the presence of three large glowing orbs that spawn in front of Demon Tablet. While casting this attack, the boss will raise into the air, allowing players to cross through to the safe side. This attack is repeated once more before moving on.
Dangers Near/Expulsion Afar
Make sure to resolve the Dangers Near/Expulsion Afar portion of the attack after crossing through.
The Demon Tablet will then target the top three enmity players for Occult Chisel, an AoE tankbuster. Tanks should break away from the raid to ensure no one else gets hit, and are free to stack on top of each other provided they have a


 Invulnerability.
Demonograph
The boss will cast Demonograph of Dangers Near/Expulsion Afar, raising into the air and creating three tower AoEs on each side. At least four players must be within a tower to successfully soak the damage. If not, the tower will explode, dealing heavy raidwide damage and applying a stack of  Thrice-come Ruin.
To resolve this, the raid will split into their individual parties, using their assigned waymark to find their tower:
- A/1 - Front left (facing the boss).
- B/2 - Back middle.
- C/3 - Front right (facing the boss).
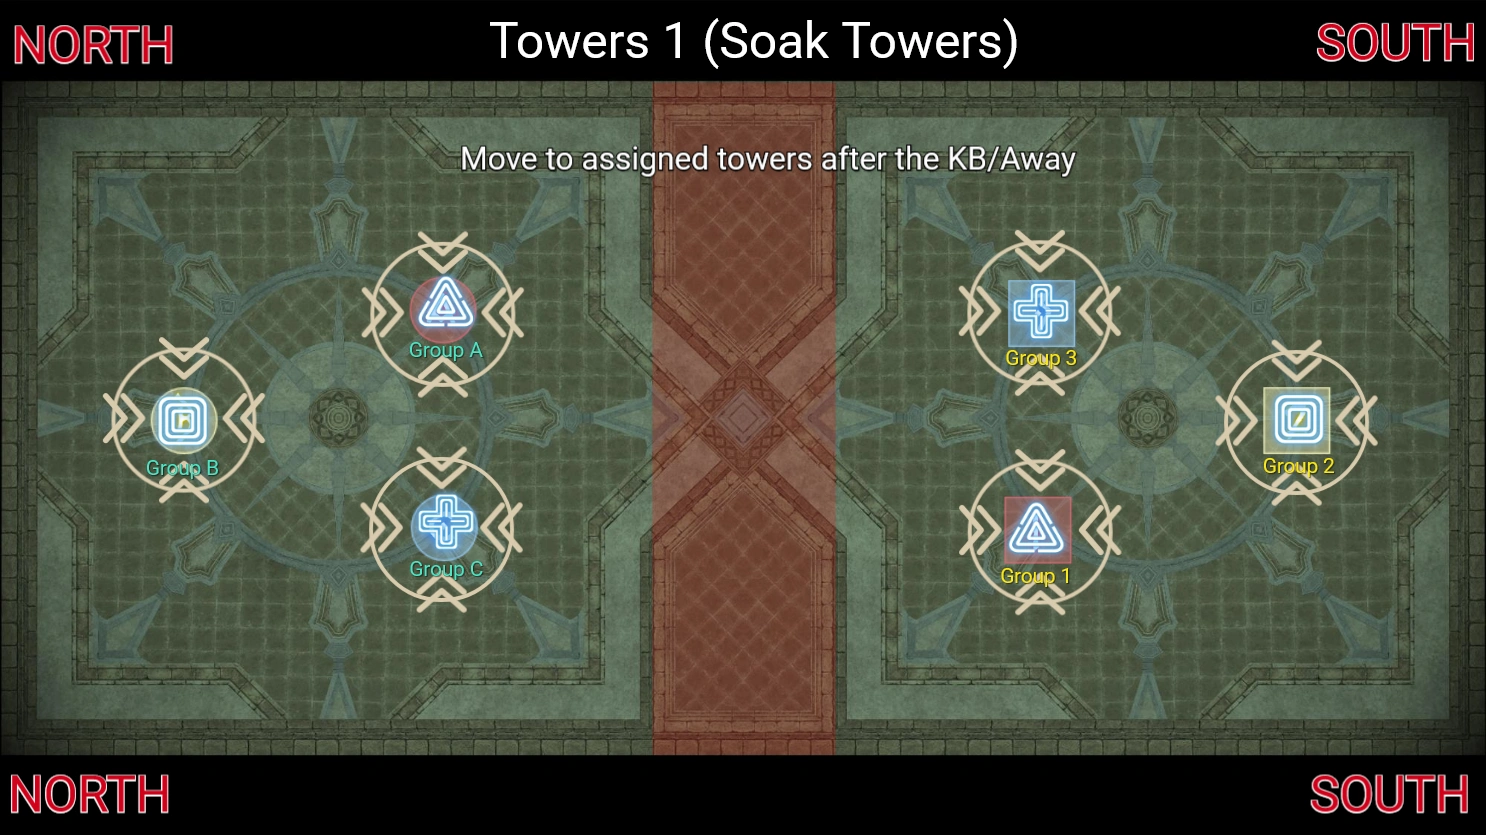
Dangers Near/Expulsion Afar
Make sure to resolve the Dangers Near/Expulsion Afar portion of the attack BEFORE positioning to soak the towers.
After the towers resolve, the Demon Tablet will cast Rotate Left/Right, rotating its body by 90° and knocking away any players caught within its axis of rotation. Looking towards the boss, players should move in the opposite direction of the castbar.
After its first rotation, he Demon Tablet will cast Rotate Left/Right again, while it's rotated 90°. Players should follow the same logic as before, but also ensure they are on the backside of the boss before it rotates. Anyone in front of the Boss after its second rotation will be hit by a persistent AoE that also inflicts a stack of Thrice-come Ruin.
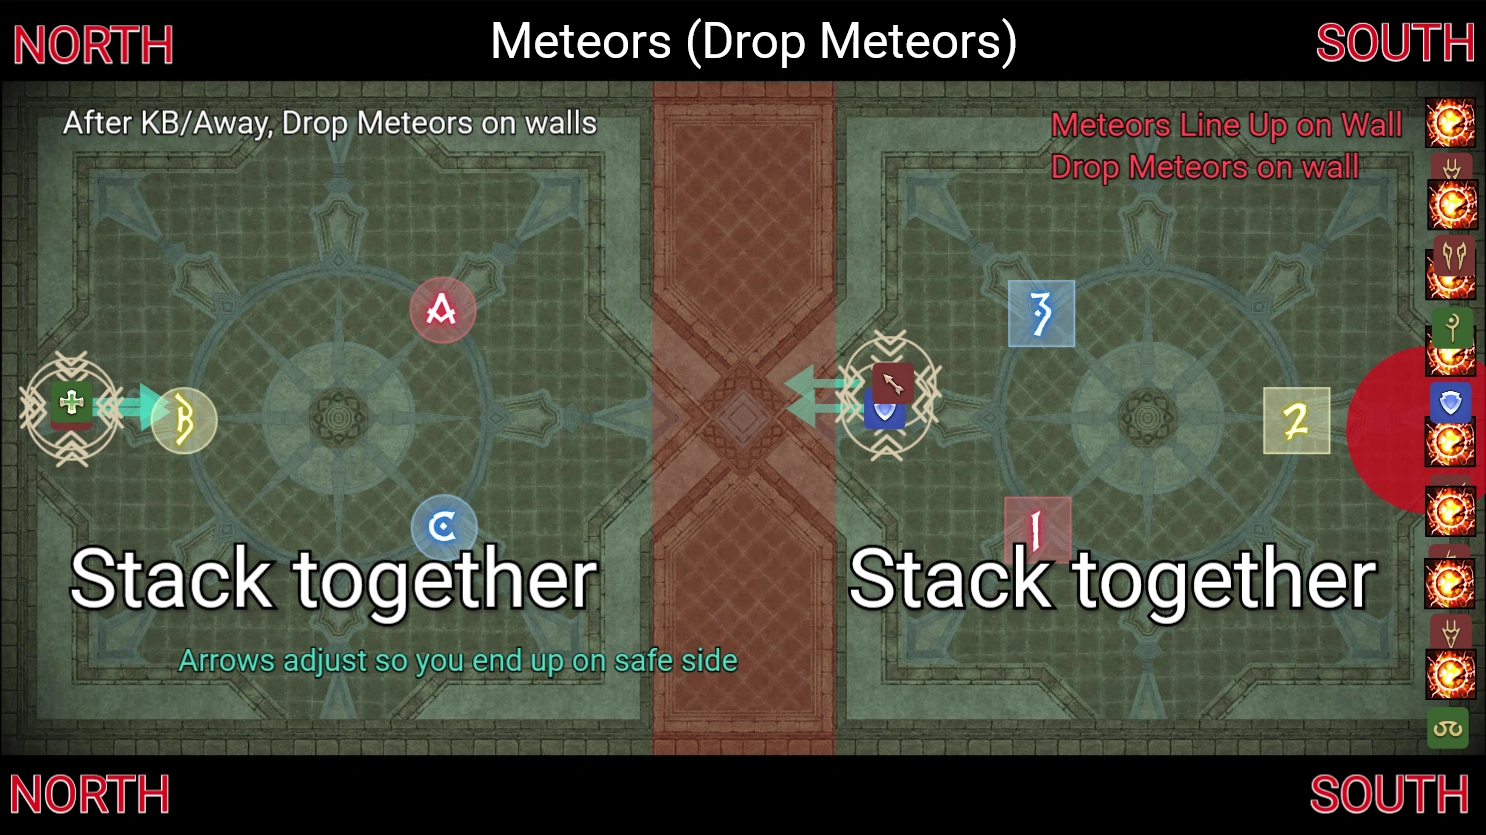
Cometeor
The Demon Tablet will begin casting Cometeor of Dangers Near/Expulsion Afar, raising into the air and targeting random players with markers. These markers are:
- 4 Stack markers, with trajectory indicators. 2 will be pointing North and 2 will be pointing South.
 Eight Meteor markers, which place a massive telegraphed circle AoE at the player's location when the debuff expires.
- 1 fixed Meteor marker at the very North or South edge of the arena.
This mechanic is resolved in 2 parts. First, all marked players must move to the correct side of the arena:
- Stack players should move to the side that makes their trajectory arrow point towards Demon Tablet.
- Meteor players should move to the side with the fixed Meteor marker.
- Unmarked players should move to the side without the fixed Meteor marker.
Dangers Near/Expulsion Afar
Make sure to dodge the Dangers Near/Expulsion Afar portion of the attack BEFORE resolving the next part of the mechanic.
After the cast resolves, players should get ready to resolve their assigned mechanic:
- Stack players on the non-fixed Meteor side should stand along the back wall, to get sent along their half.
- Stack players on the fixed Meteor side should stand close to the boss, to get sent over to the safe half.
- Meteor players should stand at the back wall of their half, letting their AoEs appear before joining the Stack players on their side.
After the AoEs resolve, the boss will cast Rotate Left/Right again twice. Players should follow the same logic as before.
The Demon Tablet will then begin casting Summon, raising into the air, creating a telegraphed AoE under itself and summoning 2 Summoned Demons and 1 Summoned Arch Demon on each side. Each party can use the same designation as the Demonograph towers to find their add.
Time Mages
Each Summoned Arch Demon will spawn with a defence increasing buff.  Time Mages will need to remove this buff with Occult Dispel.
Gravity
The Demon Tablet will cast Summon again, this time summoning 2 Gargoyle Statues on each side. Later on, these will be levitated and then dropped, creating a large circle AoE at the impact point and leaving 1 corner of each side safe.
The boss will then cast Demonography again, this time creating 6 towers on a single side of the arena, 3 of which are floating in the air.
Finally, the Demon Tablet will cast Gravity of Dangers Near/Expulsion Afar, levitating the statues and any players standing beside them shortly after the cast finishes. Players can use the same Colour designation as their Demonograph towers to find which tower they will soak. However, since all the towers are on one side, all players crossing over should also stand next to the statues to levitate up.
Dangers Near/Expulsion Afar
Make sure to dodge the Dangers Near/Expulsion Afar portion of the attack BEFORE positioning next to a Gargoyle.
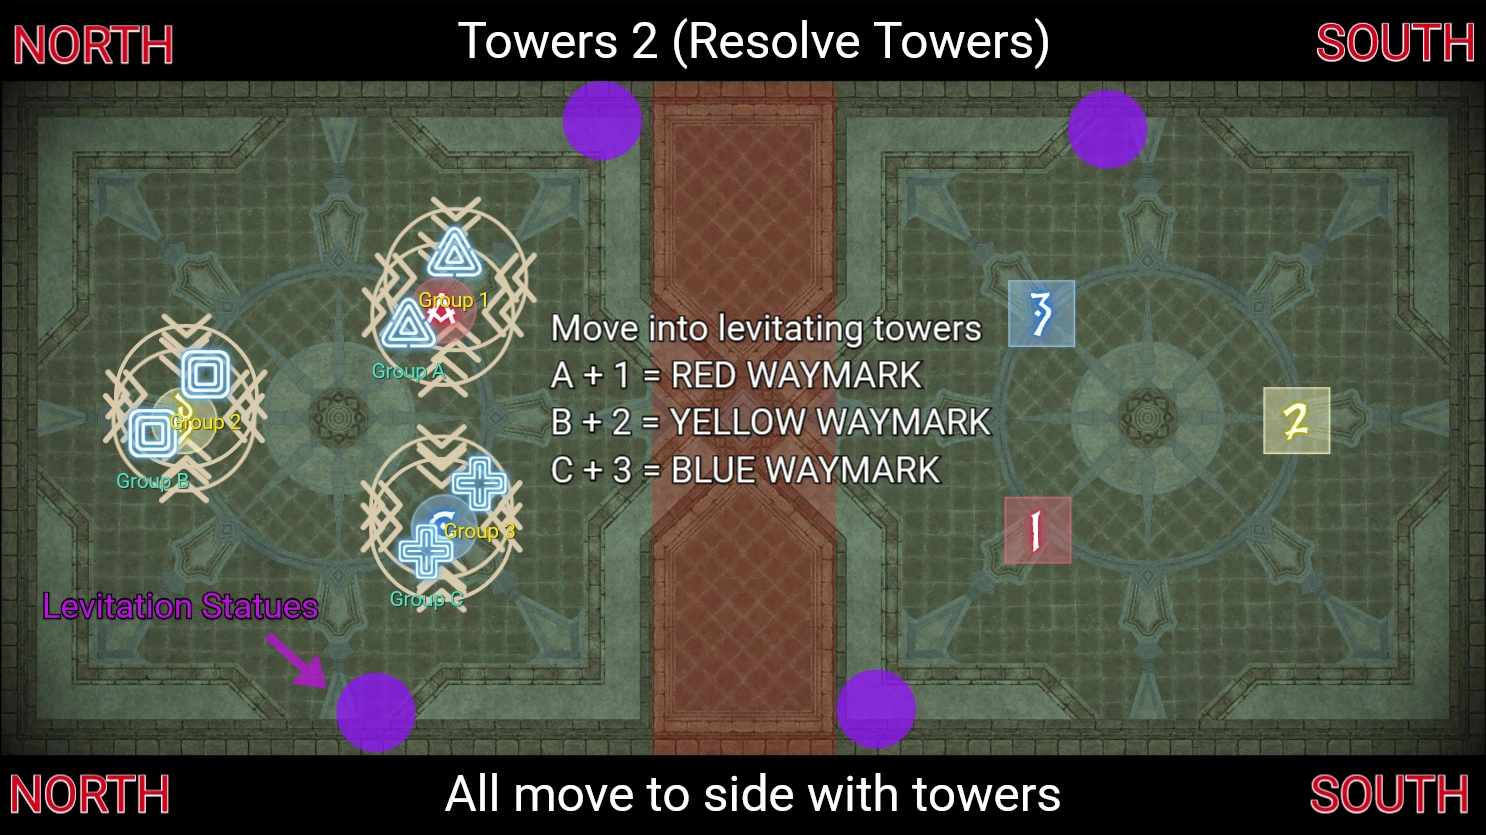
After the stacks have resolved, everyone should move to the safe corner away from the dropping Gargoyle Statues.
There are no new mechanics from this point onwards. Demon Tablet will use the following sequence of attacks, before casting a hard enrage at 6:40:
- Rotate Left/Right
- Rotate Left/Right
- Cometeor of Dangers Near/Expulsion Afar
- Ray of Dangers Near/Expulsion Afar
- Occult Chisel
- Demonic Dark II
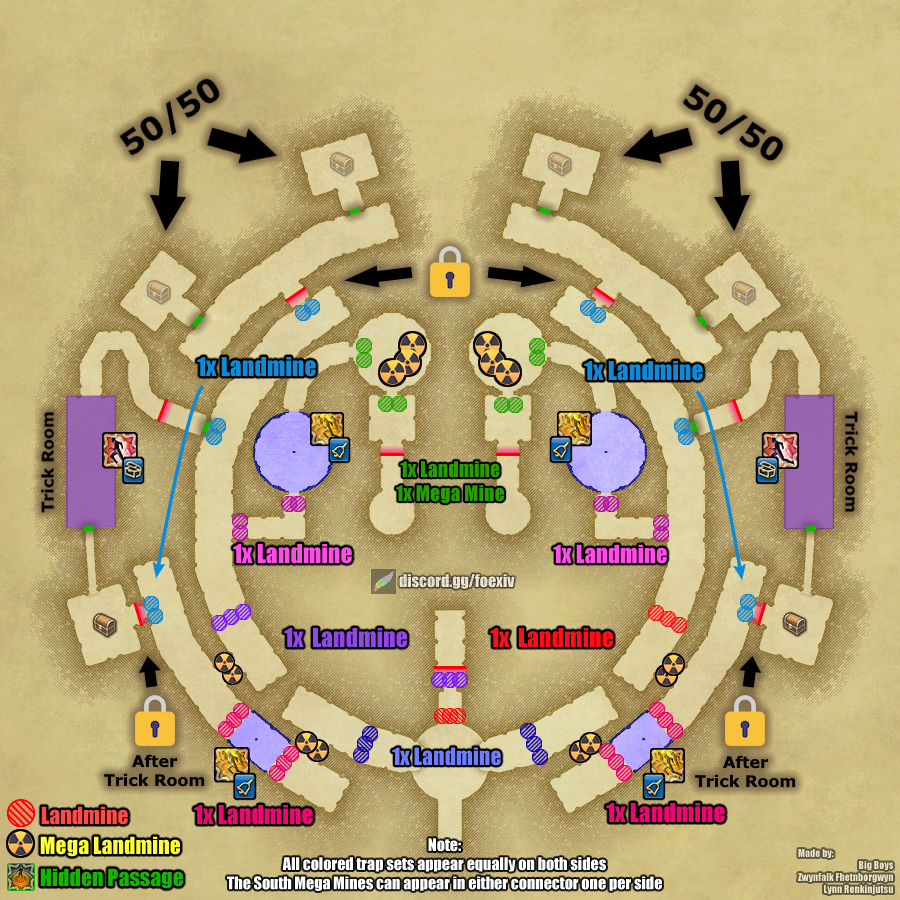
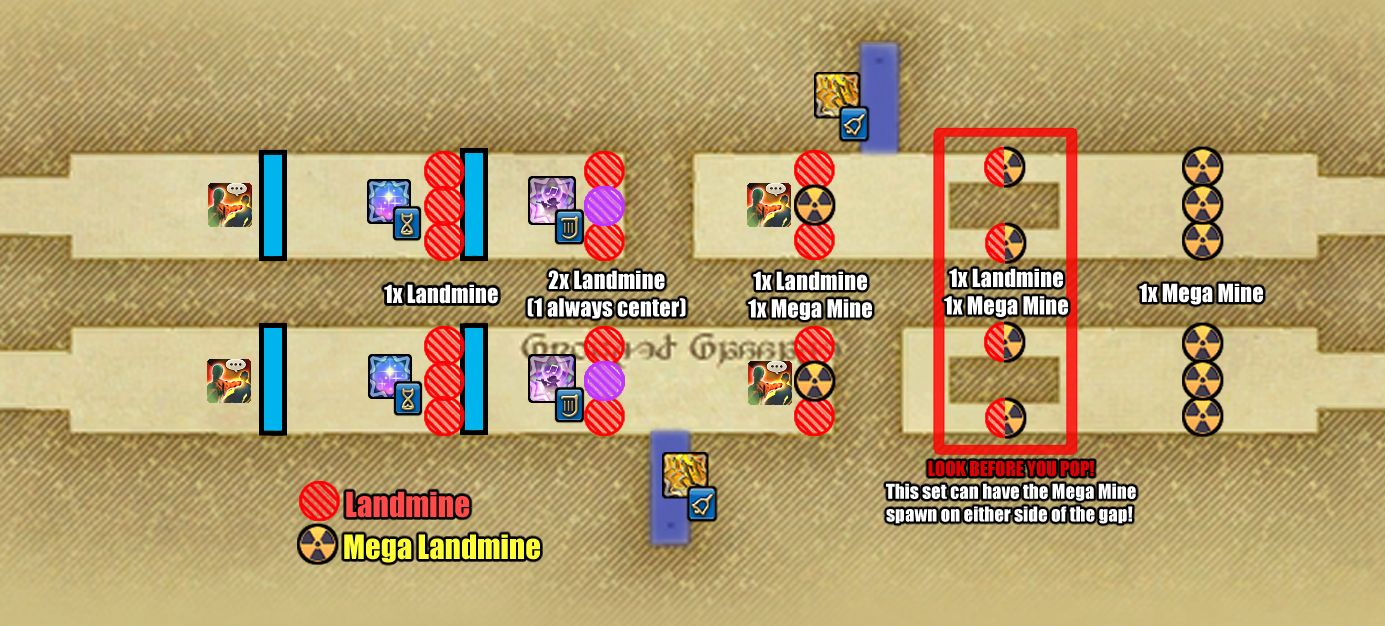
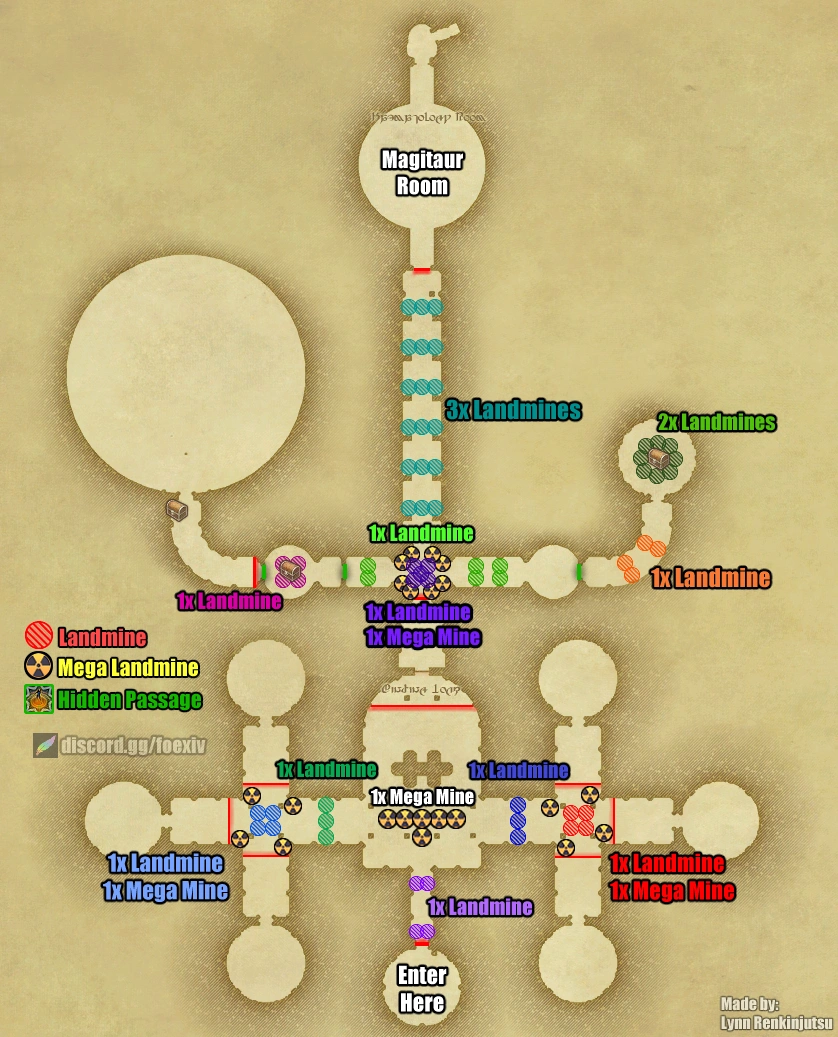
Hallways
HallwaysThe Hallways are the first set of trash encounters in The Forked Tower: Blood. It features optional loot, only obtainable with a  Phantom Thief and multiple hidden traps sprinkled throughout.
There are two types of hidden traps, both of which are can only be uncovered with Phantom Thief's Trap Detection.
| Exploding Trap | Mega Exploding Trap |
|---|---|
 |  |
| Explodes in a small area around itself when detonated, killing any nearby players. | Explodes in a massive area around itself when detonated, killing any surrounding players. |
Navigating Hidden Traps
As a general rule, most traps are walked around, unless a Tank
or Phantom Ranger has communicated ahead of time about detonating them.
Additionally, there are roaming trap that looks like green orbs floating along the walls of the Hallways. Players that step inside are afflicted with  Silence for 1 minute.
Lightning floors also appear throughout the Hallways, connected to an orb that when interacted with, will disable the trap. Anyone that steps on the floor while it is active will be afflicted with a  bleed debuff that deals fatal damage. These require a
  Phantom Geomancer to use Suspend on either themselves or a party member, negating the effects of the lightning floors on the chosen player.
Navigating Lightning Floors
Tanks can also use an
Invulnerability to ignore the bleed debuff, giving them enough time to interact with the orb and disable the trap.
This is only viable for the lightning floors in the Hallways.
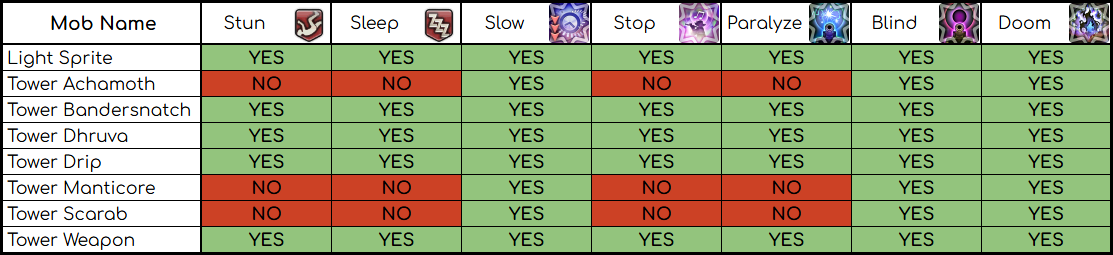
Below is a table noting some mobs and their dangerous casts, a table detailing which mobs are susceptible to which statuses and a detailed map of the Hallways themselves, including traps and hidden rooms only discoverable though the Phantom Thief's Trap Detection.
| Enemy | Attack |
|---|---|
| Tower Manticore | Left/Right Hammer - Late-telegraphed cleave AoE depending on the castbar, will hit the opposite side shortly after. |
| Tower Scarab | Rhino Guard - Grants itself an  evasion buff. Phantom Time Mages must use Occult Dispel. evasion buff. Phantom Time Mages must use Occult Dispel. |
Phantom Time Mages
All trash mobs should be Slowed with Occult Slowga. This drastically increases the window of time given to dodge their AoEs.
Boss 2 - Dead Stars
Boss 2 - Dead StarsThe Dead Stars are considered the first big wall of the raid, with mechanics that can easily wipe the group from a single player's mistakes. It has a hard enrage at 7:00.
To start, all players should group the trio of bosses in the middle to deal as much cleave damage as possible before they split up for the rest of the fight.
When they do split up, each boss will cast Decisive Battle, a large PB-AoE that also inflicts each surrounding player with  Phobosic /
  Tritonic /
  Nereidic Gravity, ensuring they can't deal damage to any other boss while all 3 are present. To evenly split up the raid, each party will target the following:
- A/1 - Phobos (Green)
- B/2 - Triton (Red)
- C/3 - Nereid (Blue)

Tethers
Sometimes players may be tethered to entirely different bosses from those they're attacking, including the current Main Tanks.
Ensure that the upcoming conal tankbusters are resolved before changing targets.
Shortly after, each boss will cast Slice 'N' Dice a conal tankbuster on the highest enmity player.
Each boss will then jump towards each other, casting Three Body Problem. Each time this happens, one of the Dead Stars will interrupt the cast, jump into the middle, and transform the other two bosses, beginning a mini-phase.
After each mini-phase, the previously transformed bosses will jump to an edge of the arena and target the traitorous Dead Star with Vengeful Fire/Blizzard/Bio III. These are wide conal AoEs only leaving a safe spot between the 2 previously transformed Dead Stars.
They will then tether to each player again and return to their area, each casting Delta Attack, a repeated heavy raidwide, followed by Fire Strikes, a line stack AoE that also inflicts players with a  Magic Vulnerability. After Snowballs, this attack is also combined with a Slice 'N' Dice.
Slimes
Slimes - Pocket GuidePhobos transformes the other 2 Dead Stars into untargetable slimes.
Phobos begins with Primordial Chaos, a raidwide that inflicts every player with 1-3 stacks of either  Nova Ooze or
  Ice Ooze. Players will need to remove their debuff before the end of the mini-phase or they will die.
Phobos will then begin casting Frozen Fallout, commanding the slimes to jump around the arena four times. To remove a stack of Ooze, players must be hit by a jump of the opposite element. Once players have removed their stacks, they should instead look towards dodging both slimes. During the cast, players should sequentially keep track of which spots will be hit by a jump they want and which spots will be safe after removing their stacks.
Slime Jumps
Each jump will always land at an inter-cardinal, and a slime will not jump to a spot it has previously jumped to.
Additionally, the final jumps will always leave an entire cardinal of the arena safe.
After the 4th jump, Phobos will cast Noxious Nova, a light raidwide that will kill all remaining players with an Ooze. This will also transform Triton and Nereid back into their original selves.
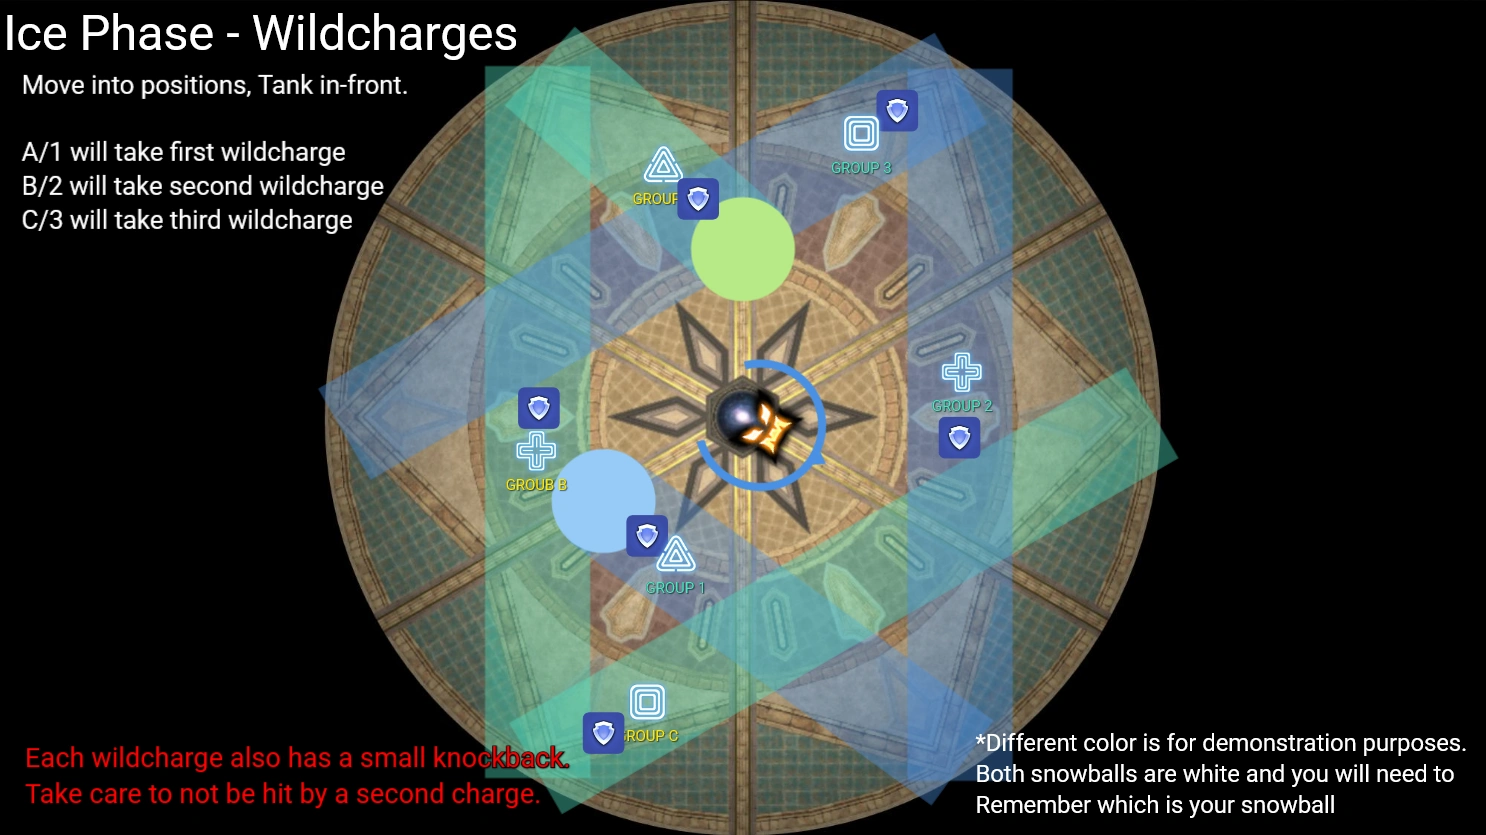
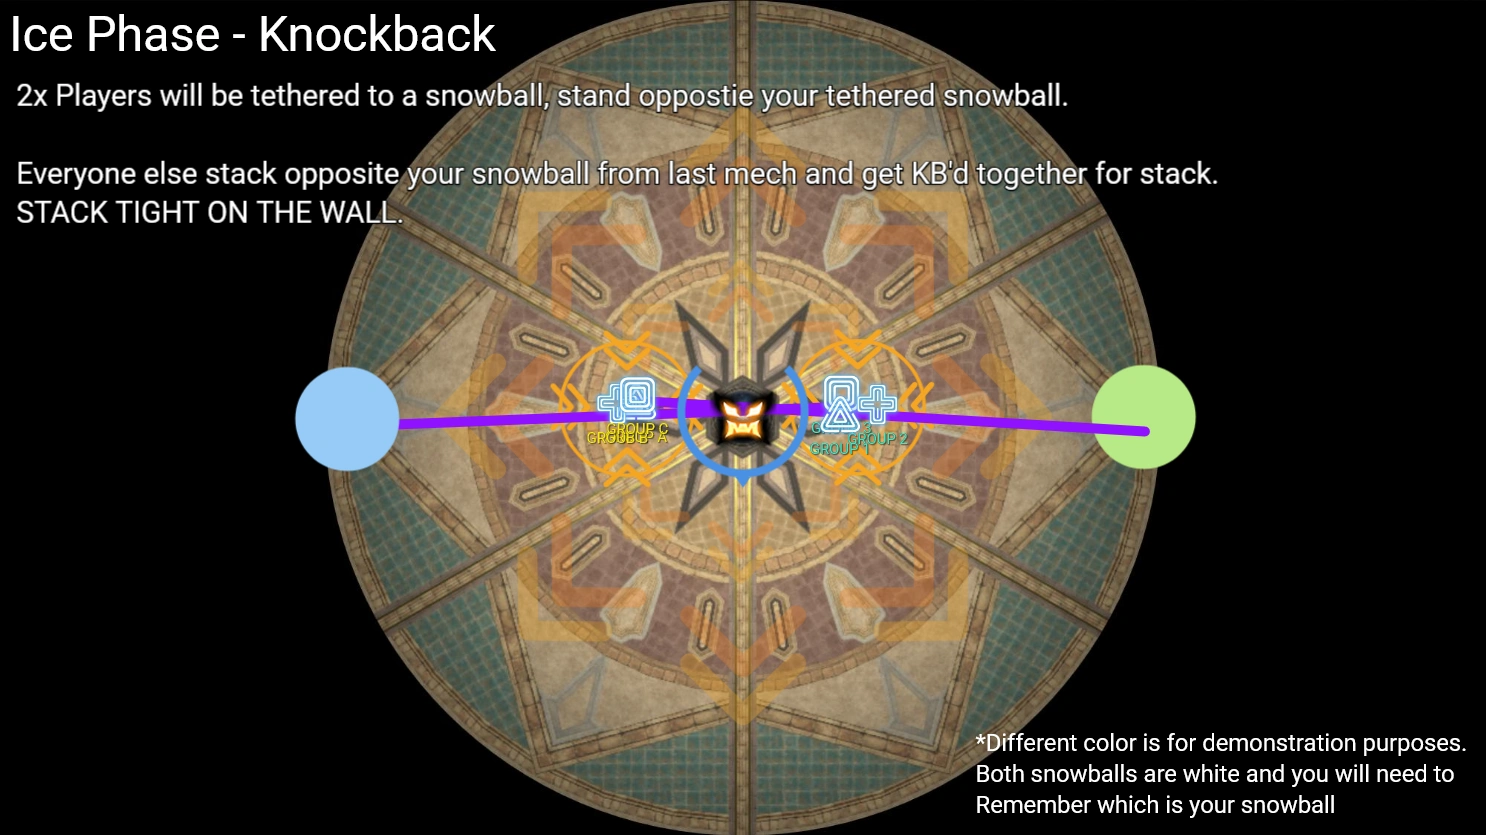
Snowballs
Nereid transforms the other 2 Dead Stars into targetable snowballs. Each snowball has 4 stacks of  Icebound Buffoonery, an invinciblilty buff that must be removed to destroy the snowballs before their hard enrage at the end of the mini-phase.
Nereid begins with Snowball Fight, commanding the snowballs to charge 3 times around the arena. Each charge is a Wild Charge, a line stack AoE that deals additional damage to the player closest to the enemy. Each charge also inflicts a  Physical Vulnerability, preventing players from taking additional Wild Charges. At least 4 players need to be in a single Wild Charge to remove a stack of Icebound Buffoonery from the snowballs.
To resolve this, each party is designated to soak a certain Wild Charge from the snowballs:
- The North snowball's Wild Charges will be soaked by A -> B -> C, in that order.
- The Southwest snowball's Wild Charges will be soaked by 1 -> 2 -> 3, in that order.
Wild Charges
Tanks should ensure they are at the front of the Wild Charges ready to bear the brunt of the damage.
Tanks,
 Phantom Knights and Phantom Samurai can ignore the Physical Vulnerability and use their Invulnerability, Pledge and
  Shirahadori respectively to soak another Wild Charge.
After the 3 charges, Nereid will begin casting Chilling Collision, a knockback originating from itself, while the snowballs will tether to a random player and begin casting Avalaunch, a proximity stack AoE that will also remove a stack of its Icebound Buffoonery should at least 12 players share the damage. Everyone should stand on Nereid's hitbox, with tethered players standing on the opposite side of their tethered snowballs, and non-tethered players standing on the opposite side of the snowball they soaked previously. After the knockback, all players should stack at the wall to reduce the damage from the proximity tether.
If done correctly, the snowballs will have no stacks Icebound Buffoonery remaining, and players can destroy them before they finish casting **Self-Destruct", their hard enrage, freeing Phobos and Triton in the process.
Fireballs
Triton transforms the other 2 Dead Stars into fireballs which jump away.
After the fireballs jump away, 2 sets of arrows will appear in the arena opposite of each other. They will travel a short distance counter-clockwise before casting Elemental Impact 3 times, becoming targetable upon the 1st cast. Eventually, they will cast a hard enrage, requiring players to destroy the fireballs before this happens.
To ensure even numbers for each fireball. The raid will split into 2, with the Letter Alliance looking for arrows in the Northern half of the arena, and the Number Alliance looking for arrows in the Southern half of the arena.
Arrows
In one particular pattern, the arrows can spawn Northwest and Southeast and "cross" into the other half of the arena. Players should still follow the arrow beginning in their half.

Elemental Impact is comprised of two components:
- A tankbuster tower that must be soaked, inflicts a Magic Vulnerability each hit.
- 2 wide conal AoEs, each targeting a random
Healer and
DPS, inflicts a
Magic Vulnerability on each hit.
To resolve this, each fireball should have:
DPS standing along the wall
Healers standing to the side of the fireballs
- 1
Tank soaking all 3 hits with an
Invulnerability.
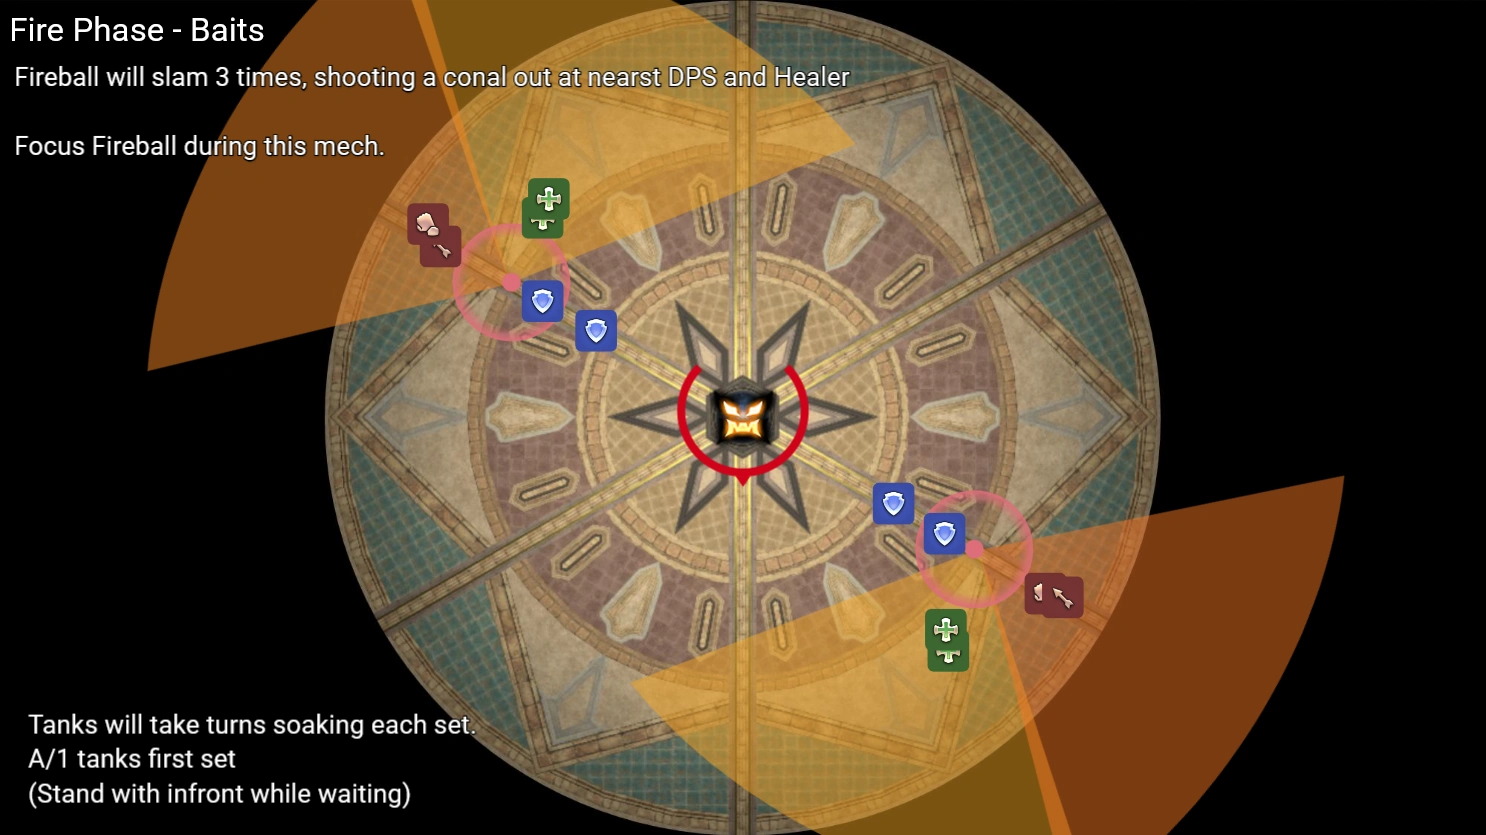
After Elemental Impact casts 3 times, the fireballs will target random players for a large baited AoE while Triton besgins casting Flame Thrower, a line stack targeting a player on each side. To ensure all players are grouped up for the stack while minimising movement, all players will stack with the DPS at the wall after the 3rd hit, and travel around the fireball clockwise.
The cycle will repeat once again before the fireballs begin casting a hard enrage.
Tankbuster Towers
The 1st set should be soaked by Tanks in A/1.
The 2nd set should be soaked by Tanks in B/2.
Tanks in C/3 should be on standby, ready to cover any empty towers if needed.
Enrage
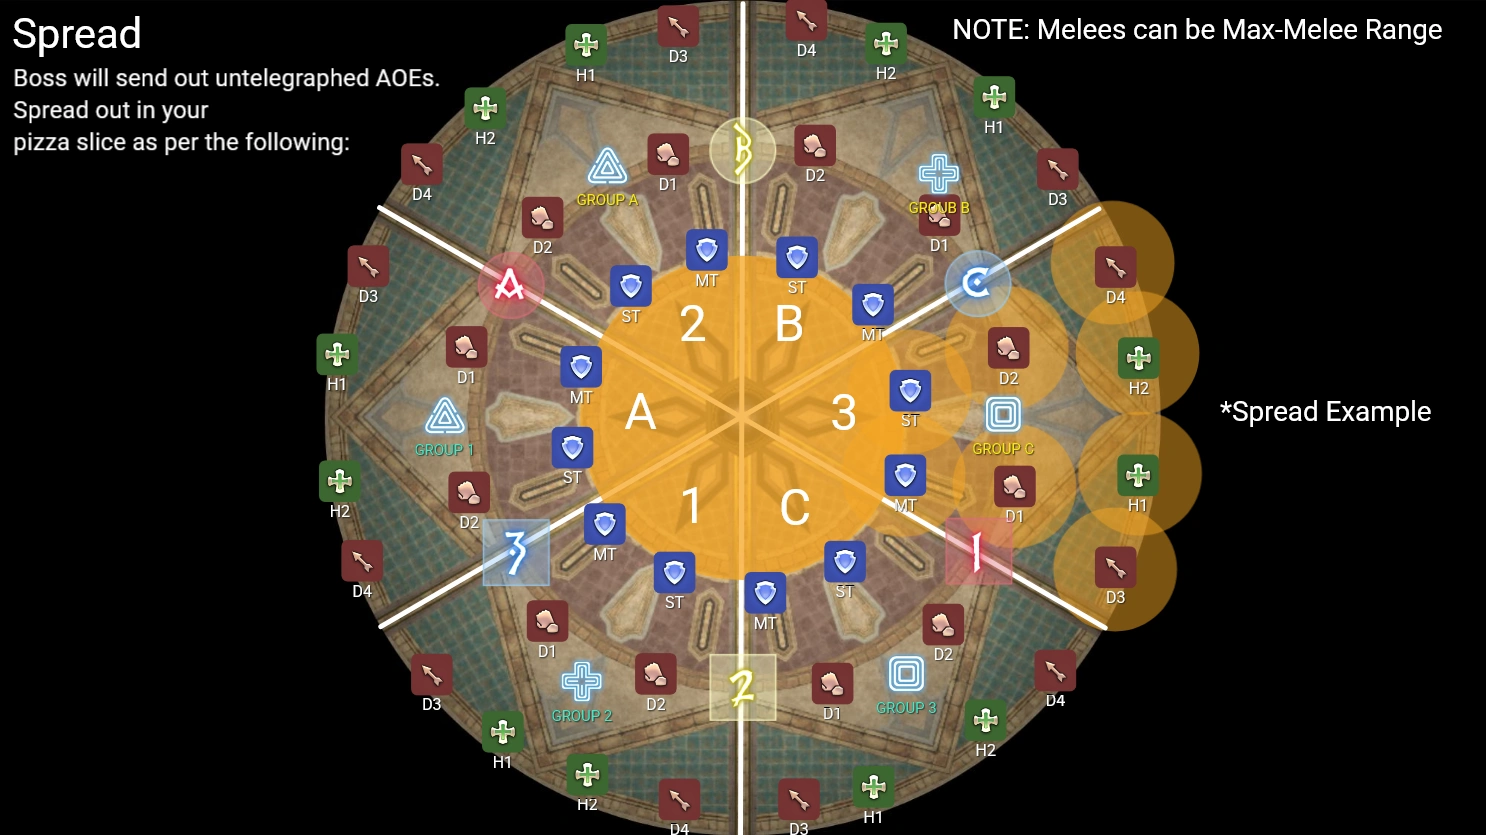
After all 3 mini-phases the Dead Stars will cast Six-Handed Fistfight, dealing heavy raidwide damage, creating a persistent circle AoE in the middle and using the following cycle of mechanics twice before hard enraging:
- Collateral Damage - Telegraphed conal AoEs targeting 3 slices of the arena, then the other 3.
- Spread AoEs - Untelegraphed spread AoEs, hitting several random players at a time.
Each slice of the arena is assigned to a party, as shown in the image below.
Bridges
BridgesThe Bridges are the second set of trash encounters in The Forked Tower: Blood. Similar to the Hallways, the Bridges feature hidden traps, lightning floors and dangerous adds that must be handled in certain ways.
WARNING
The following Occult Actions are required:
| Phantom Job | Occult Action | Usage |
|---|---|---|
| Time Mage | Occult Dispel | The Tower Abyss enemies grant themselves the  Magic Damage Up buff requiring players to remove it to survive the following raidwide. Magic Damage Up buff requiring players to remove it to survive the following raidwide. |
| Bard Oracle |  Romeo's Ballad Romeo's Ballad  Cleansing Cleansing | The Tower Idol enemies can only have their enrage cast interrupted through the use of the Stop debuff inflicted by Romeo's Ballad and Cleansing. |
| Geomancer |  Suspend Suspend | There are lightning floors on both sides that must be navigated through to open the way forward. |
The Bridges are divided into 5 waves, each with a collection of enemies with the potential to wipe the raid should they be given the chance.
| Wave | Attack |
|---|---|
| Wave 1 & 4 - Tower Bhoot | Paralyze III - |
| Wave 2 - Tower Abyss | Dense Darkness - Grants itself a Magic Damage Up buff. Phantom Time Mages must use Occult Dispel. Diffuse Darkness - Heavy raidwide. |
| Wave 3 - Tower Idol x6 | Ancient Aero III - Enrage.  Phantom Bards must use Romeo's Ballad when all 6 are casting. Phantom Bards must use Romeo's Ballad when all 6 are casting. |
| Wave 5 - Tower Progenitor/Progenitrix | Close/Far Call to Detonate - Drag them Far/Close from each other respectively, or repeated near-fatal raidwides. Bombshell Drop - Spawns tethered Lava Bombs that move towards the enemy, near-fatal raidwide damage if they make contact. Targeted Stack AoE - Stack. Massive Explosion - Enrage cast that starts as soon as 1 dies. Keep them within close HP of each other. |
When the 1st set of adds are pulled, a fire floor will slowly chase the raid. Players standing in these recieve a non-lethal  burns debuff.
While dealing with these enemies, each side of the bridge will glow with 4 line AoEs. These are Wild Charges that inflict the first player hit with a  piercing vulnerability.
Wild Charges
Tanks should ensure they are at the front of the Wild Charges ready to bear the brunt of the damage.
Phantom Samurai can ignore the piercing vulnerability and use their Shirahadori to soak the Wild Charge.
Boss 3 - Marble Dragon
Marble DragonThe Marble Dragon focuses primarily on dodging and heavy damage, punishing players for slow movement or poor mitigation. It has a hard enrage at 6:30.
WARNING
The following Occult Actions are required:
| Phantom Job | Occult Action | Usage |
|---|---|---|
| Bard Oracle | Romeo's Ballad Cleansing | The Ice Sprite adds can only have their movement towards the boss interrupted through the use of the Stop debuff inflicted by Romeo's Ballad and Cleansing. |
The boss begins with Imitation Star, a heavy raidwide that inflicts a  Bleed.
The Marble Dragon will then face towards a random player and begins casting Draconiform Motion, an untelegraphed front and back conal cleave. Players must move to its sides to dodge the attack. The boss will combine this attack with future mechanics to punish early movers. To resolve each instance of this, players should always stay at the North and South of the Marble Dragon if they aren't required to move.
Imitation Rain is a light raidwide that creates multiple puddles within the arena. There are 3 types of puddles, each with different AoEs:
- Flat - Will detonate in a large circle AoE shortly after freezing. Any nearby puddles hit by its AoE will also freeze.
- Spiked - Will detonate in a line AoE from each spike shortly after freezing, creating a "+" shape. Any puddles hit by its AoE will also freeze.
- Tower - Will detonate in a stack AoE when frozen. At least 4 players must be in the tower or it will detonate for a heavy
 bleed, scaling with the amount of players missing.
In the 1st pattern, Flat and Spiked puddles will spawn in a horizontal line along the North and South of the arena.
Imitation Icicle will create 2 ice-aspected circle AoEs on the floor, freezing any nearby puddles when it resolves. Players must first bait a Draconiform Motion, before moving to the wall with the ice-aspected AoE closer to it. Once players are at the wall, they can dodge the exploding puddles safely by crossing from one side of the purple waymark to the other.
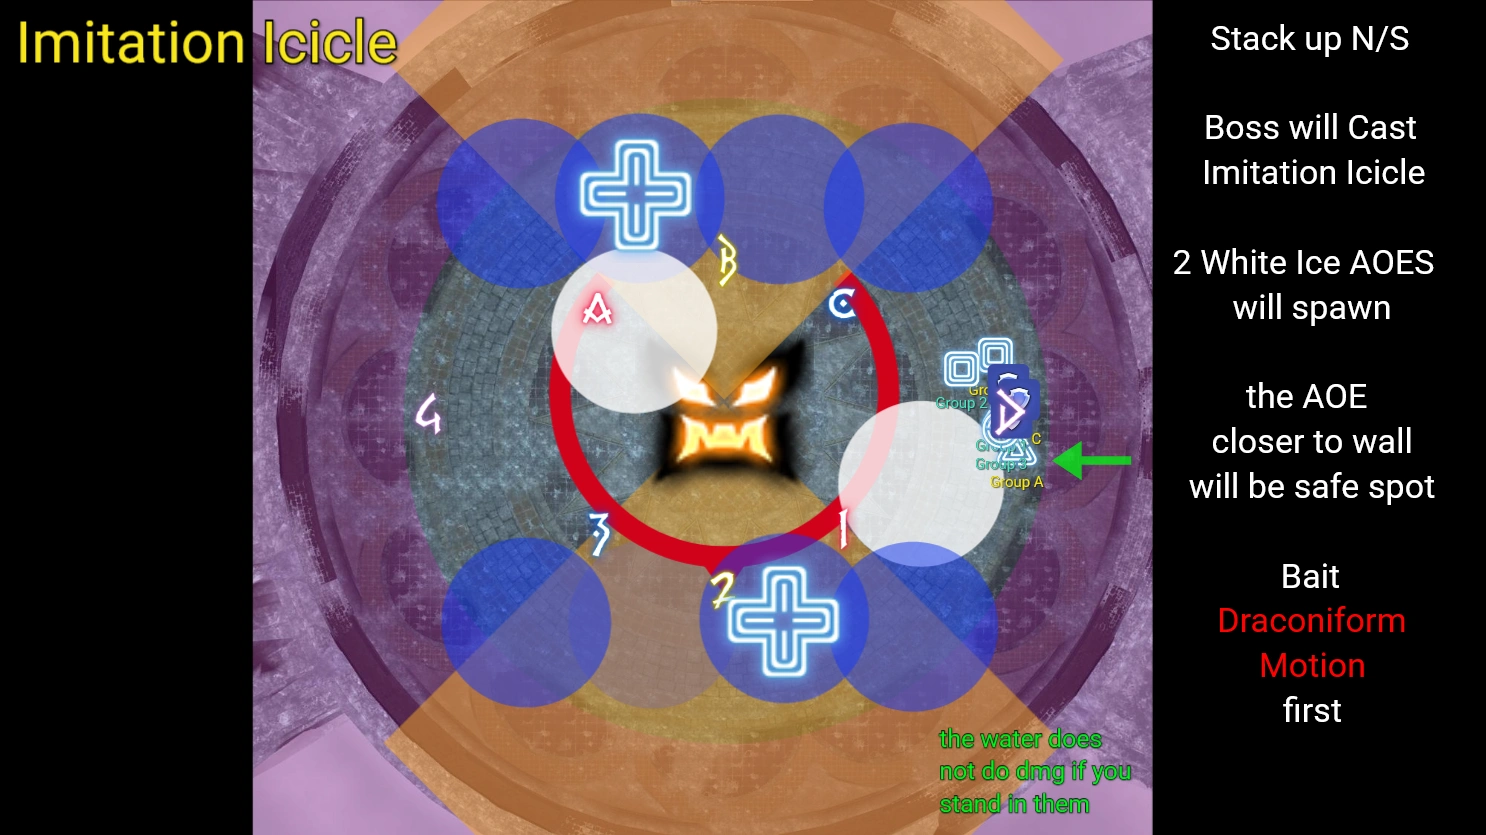
Afterwards, the boss will target the six highest enmity targets for Dread Deluge, a heavy tankbuster that also inflicts  Dropsy, a heavy bleed.
Dropsy
The damage of Dropsy takes mitigation into account when first applied. The more mitigation used for the initial hit, the less it will hurt.
Frigid Twister
The Marble Dragon will use Imitation Rain again, creating more puddles in a hexagon pattern, and cast Frigid Twister, spawning two Frigid Twisters on the East and West of the arena. These Frigid Twisters will travel around the arena either clockwise or counter-clockwise, freezing any puddles it comes in contact with.
Finally, the Marble Dragon will jump to the middle and begin casting Draconiform Motion again.
There are 2 potential patterns, depending on which puddles the Frigid Twisters freeze first. Bait the Draconiform Motion, then:
Spiked First
- Stay within the middle Spiked Puddle or move to a purple waymark at the wall.
- Move to the corner where the outer Spiked Puddles detonated.
Flat First
- Move to the Spiked Puddles in the corner.
- Move to the purple waymark at the wall when the middle Spiked Puddle detonates.
After any of these patterns, players should ensure they move out of the way of the Frigid Twisters approaching them.
Afterwards, the Marble Dragon will follow up with another Dread Deluge before beginning its next phase.
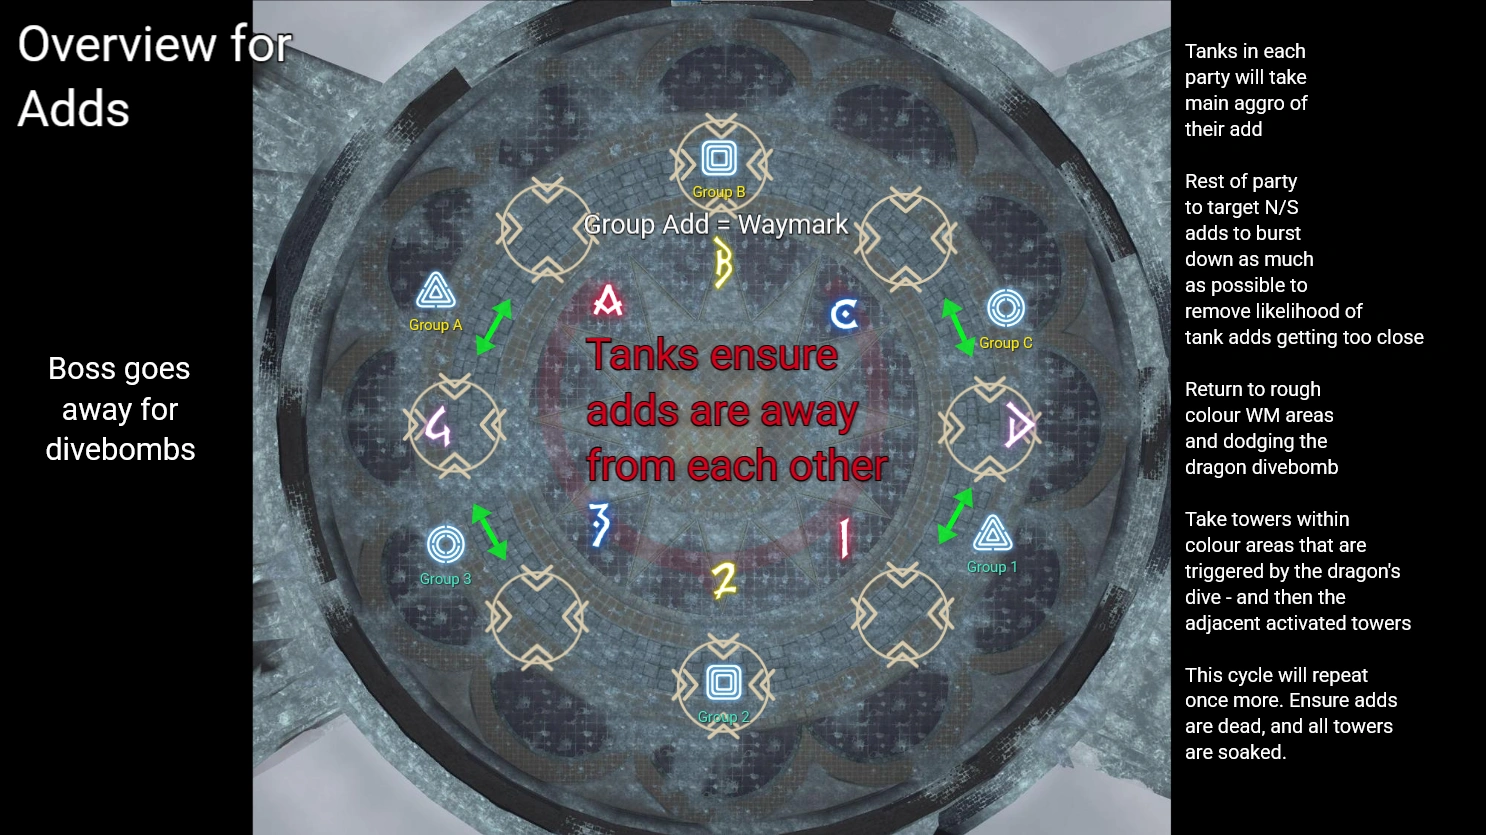
Adds
The Marble Dragon will jump back to the middle and begin casting Withering Eternity, leaving the arena when the cast finishes and summoning 6 Ice Golems.
These Ice Golems gain a  Vulnerability Down buff when in close proximity of each other, and will cast Frozen Heart if not defeated in time, granting themselves a
  Physical Damage Up buff dealing fatal damage to anyone they auto attack.
 Tanks can use their
Invulnerability to extend their time alive if this happens.
Additionally, the Marble Dragon will use the following cycle of attacks twice before returning:
- Imitation Rain - Spawns 1 Spiked Puddle in the middle and 3 Tower Puddles along the wall, opposite of each other.
- Frigid Dive - Dives through the middle of the arena, freezing the Spiked Puddle and 2 Tower Puddles. This dive will kill any players hit.
- Puddles AoE 1 - The Spiked Puddles and the 2 Tower Puddles hit will detonate. The Spiked Puddle will freeze the reamining 4 Tower Puddles.
- Puddles AoE 2 - The remaining 4 Tower Puddles will resolve.
Upon returning, the Marble Dragon will summon 6 Tethered Ice Sprites that travel towards the boss, rendering itself  Invincible while it casts Withering Eternity, an incredibly heavy raidwaide. Players must defeat the Ice Sprites before they reach the boss, they are susceptible to Stop, inflicted by Phantom Bard's Romeo's Ballad and
  Phantom Oracle's Cleansing.
To resolve the entirety of the Adds phase, parties will resolve their Ice Golems, Towers and Ice Sprites at the wall near their waymark. Parties A/3 and C/1 should be mindful that any Tower Puddles at their closest West and East respectively becomes their priority to fill.
Ice Golems
Letter Alliance players should burst down the North Ice Golem and Number Alliance players should burst down the South Ice Golem to free up some room for the remaining Ice Golems at the inter-cardinals.
After Withering Eternity, the Marble Dragon will repeat the Imitation Rain sequence shown at the start of the fight, this time debuffing some players with  Throttle, killing them if not cleansed before the timer expires, and
  Wicked Water, trapping them within a Gelid Gaol when hit by an ice-aspected AoE. Players can cleanse the Throttle by being hit and frozen by a detonating puddle. Once the Gelid Gaols have formed, other players will need to destroy them and break the frozen players out.
The Marble Dragon will end with Imitation Star again before beginning its final new mechanic.
Frigid Twister 2
Similar to Frigid Twister, the Marble Dragon will use Imitation Rain, this time spawning 2 Flat Puddles on opposite cardinals, 2 Spiked Puddles on the other opposite cardinals and finally 6 Tower Puddles in the middle, laid out in either a horizontal or vertical rectangle. The boss will also cast Frigid Twister, then jump to the middle again and begin casting Draconiform Motion.
To resolve the Tower Puddles, Parties A, C, 1 and 3 have fixed positions, and will always soak the inter-cardinal towers. Parties B and 2 will flex, soaking any North/East towers and South/West towers respectively.
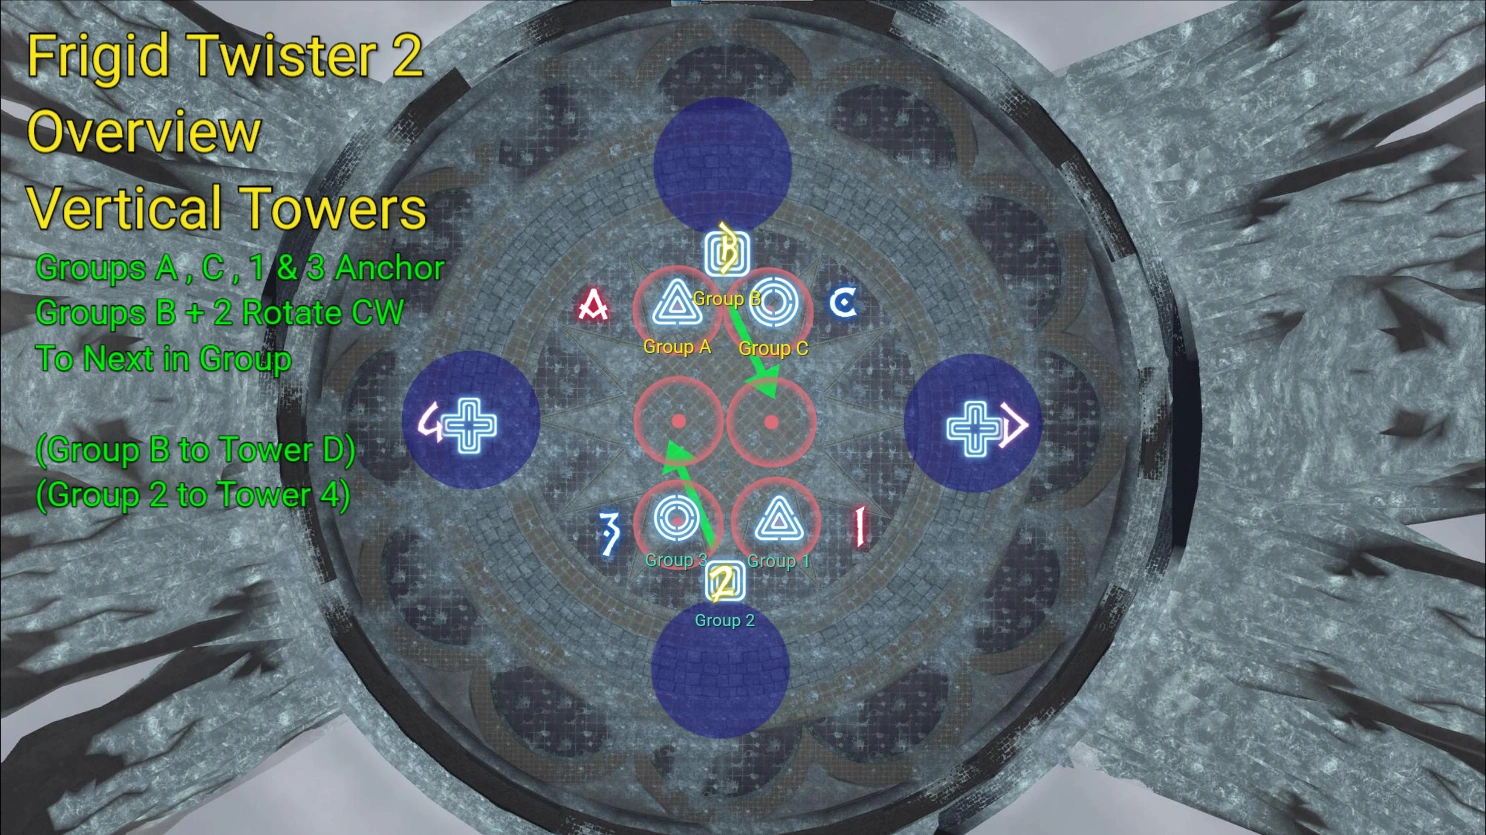
As the Frigid Twisters travel around the arena, players will need to dodge the 1st set of detonating puddles, then soak their towers, then dodge the 2nd set of detonating puddles.
The cycle of Draconiform Motion -> Detonate -> Tower -> Detonate will repeat again. After dodging the 2nd set, players should remain at the cardinal they finished at until the Marble Dragon begins casting Draconiform Motion again.
The Marble Dragon will finally cast another Imitation Star and Dread Deluge, before hard enraging at 6:30.
Lockwards
LockwardsLike the Hallways and the Bridges, Lockwards combines hidden traps and deadly trash with a small puzzle segment players can choose to solve correctly or skip. Phantom Time Mages should remember to slow any enemies here.
WARNING
The following Occult Actions are required:
| Phantom Job | Occult Action | Usage |
|---|---|---|
| Time Mage | Occult Dispel | The Guardian Knight enemy starts the fight with an  Invulnerability buff requiring players to remove it to damage it. This buff is refreshed occasionally. Invulnerability buff requiring players to remove it to damage it. This buff is refreshed occasionally. |
| Samurai Cannoneer Oracle Gladiator |  Iainuki Iainuki  Phantom Fire Phantom Fire  Phantom Doom Phantom Doom  Finisher Finisher | The Guardian Berserker enemy takes heavily reduced damage, and can only be killed by instant death effects. |
| Thief |  | The Guardian Weapon enemy has a damage buff that can only be removed by stealing its weapon. |
| Enemy | Attack |
|---|---|
| Guardian Wraith | Scream - Huge untelegraphed PB-AoE, inflicts anyone hit with  Terror. Terror. |
| Guardian Berserker | Vulnerability Down - Can only be defeated through instakill actions like Phantom Oracle's Phantom Doom, Phantom Samurai's Iainuki and  Phantom Cannonner's Phantom Fire. Phantom Cannonner's Phantom Fire. |
| Guardian Golem |  Inflicts Toxic Minerals to nearby players, becoming a cleansable Doom when the debuff expires. Inflicts Toxic Minerals to nearby players, becoming a cleansable Doom when the debuff expires. |
| Guardian Knight | Invincibility - Can be dispelled by Time Mage's Occult Dispel. Buster Knuckles - Telegraphed PB-AoE followed by a late-telegraphed Donut AoE refreshing Invincibility. Line of Fire - Untelegraphed Line AoE in the direction it's facing. |
| Guardian Bats | Evasion - Have innate evasion, can be ignored with Phantom Samurai's Zeninage, Phantom Ranger's Phantom Aim and Limit Break. |
| Guardian Weapon | Armed to the Teeth - Massive damage buff, must be removed by Phantom Thief's Pilfer Weapon. |
| Master Lockward | Untelegraphed Raidwide - Uses at low health. Use mitigation. |
In the middle of the area, there is a large mechanism that is disabled. Surrounding the mechanism itself are 6 pillars, each corresponding to a room and each with a red ring around one of its levels.
Upon defeating a Guardian, the button at the back of its room may be pressed. Each player on a button will lower its corresponding pillar at the mechanism by 1 level. Players will need to coordinate to line up the red ring of each pillar with the base of the mechanism. Once all red rings are lined up, the mechanism will activate and all players can return to the middle to begin the Authentication Process.
During the Authentication Process, waves of 3 Lockwards will spawn in and walk towards the mechanism, attempting to disable it via Cunning Keywork, an interruptible cast. Players will need to interrupt and kill each Lockward until the Authentication Process is complete, shortly after the 4th wave.
To resolve which party interrupts each Lockward, parties A/1 will handle the West Lockwards, parties B/2 will handle the Middle Lockwards and parties C/3 will handle the East Lockwards.
The general order of interrupts for the Lockwards themselves is:
- Letter Alliance MTs
- Letter Alliance Phys. Range
- Number Alliance MTs
- Number Alliance Phys. Range
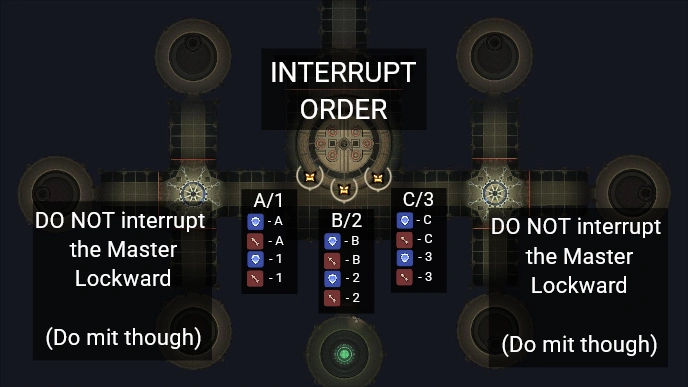
If choosing the do the puzzle correctly, a Master Lockward will spawn on the 8th wave, casting its own interruptible attack. Players must NOT INTERRUPT this add as it will provide additional authentication when it resets the mechanism. Players will then need to re-activate the mechanism and hold out until the 4th wave as usual.
When doing the puzzle correctly, players will receive 5 additional Sanguinite near the map room and the room itself will light up. Activating the orb will spawn a Sanguine Recluse somewhere in South Horn, and players must divulge the location to those outside of the raid, usually via shout chat.
The Sanguine Recluse cycles through the following attacks:
- Tartarean Flame - A late-telegraphed Donut AoE.
- Tartarean Thunder - A large late-telegraphed PB-AoE.
- Cryptcall - An extremely fast telegraphed frontal cone AoE, inflicts a cleansable Doom to anyone hit.
Defeating the Sangune Recluse will provide all players that participated in killing it 2 Sanguinite. Players inside the raid will recieve an additional 5 Sanguinite after Magitaur.
Boss 4 - Magitaur
MagitaurMagitaur is the final boss of The Forked Tower: Blood. It features several mechanics that can quickly wipe the raid, and a hard enrage at 8:00.
WARNING
The following Occult Actions are required:
| Phantom Job | Occult Action | Usage |
|---|---|---|
| Berserker |  Rage Rage | The Universal Empowerment Conduit will inflict anyone hit with Hysteria upon death, being enraged nullifies this. |
Magitaur will begin the fight with Unsealed Aura, a raidwide. While casting this, players should move to their designated square where they will be resolving most mechanics, shown below.
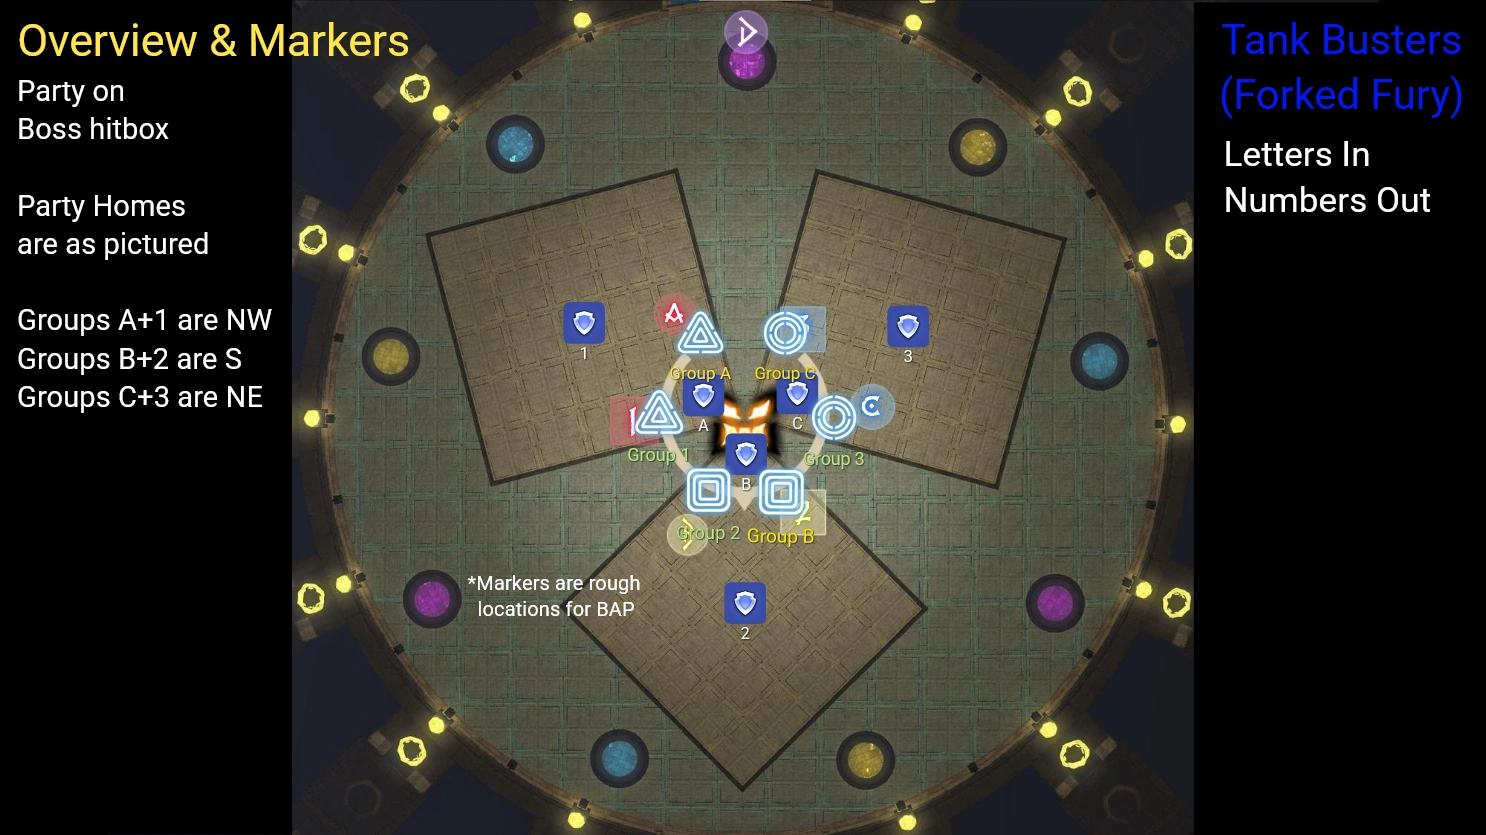
The boss will then use  Unseal, creating a glow around one of its held weapons and augmenting its auto attacks to deal heavy damage and target the 2 closest or furthest players in each square depending on which weapon is augmented.
- Axe (Yellow) - Targets the 2 closest targets in each square.
- Lance (Blue) - Targest the 2 furthest targets in each sqaure.
Tanks should move close or far accordingly to bait the auto attacks. Everyone else should remain on the boss's hitbox.
Assassin's Dagger
Assassin's Dagger - Pocket GuideMagitaur will begin casting Assassin's Dagger, sending out 3 telegraphed line AoEs that hit the same location twice before rotating. While this mechanic has no "correct" resolve besides dodging the attacks, most raid groups will use BAP Waymarks, placed specifically to minimise the movement required for this mechanic. Players can simply stand on an appropriate waymark to the left of the AoE while the daggers rotate, until the following attack requires them to move:
| Critical Axeblow | Critical Lanceblow |
|---|---|
| A large untelegraphed PB-AoE, additionally hitting any area that isn't a square. The safe spot is at the far corner of a square. | An untelegraphed Donut AoE, additionally hitting any area that is a square. The safe spot is close to the boss, in between the squares. |
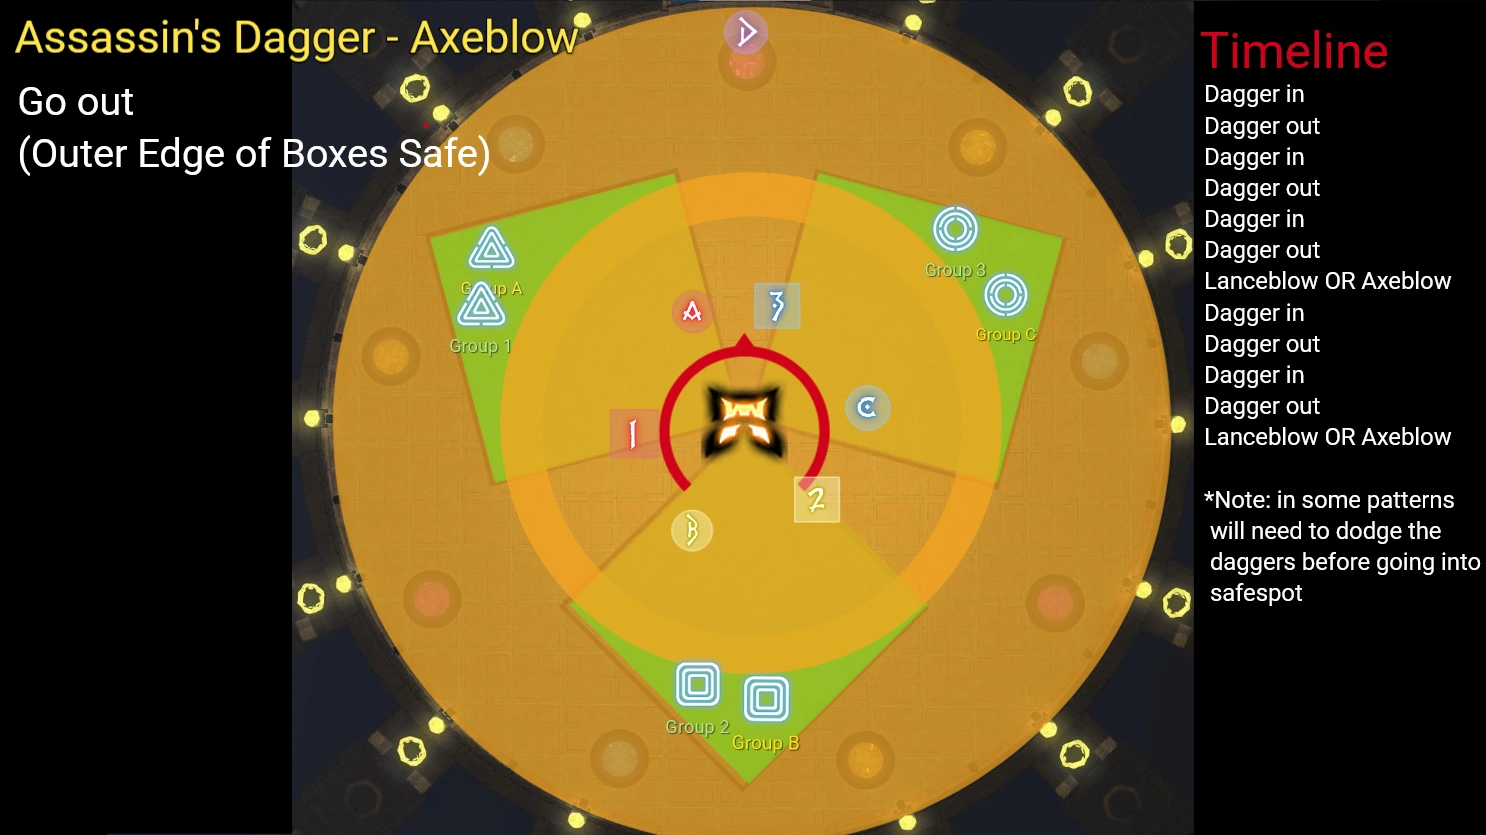 | 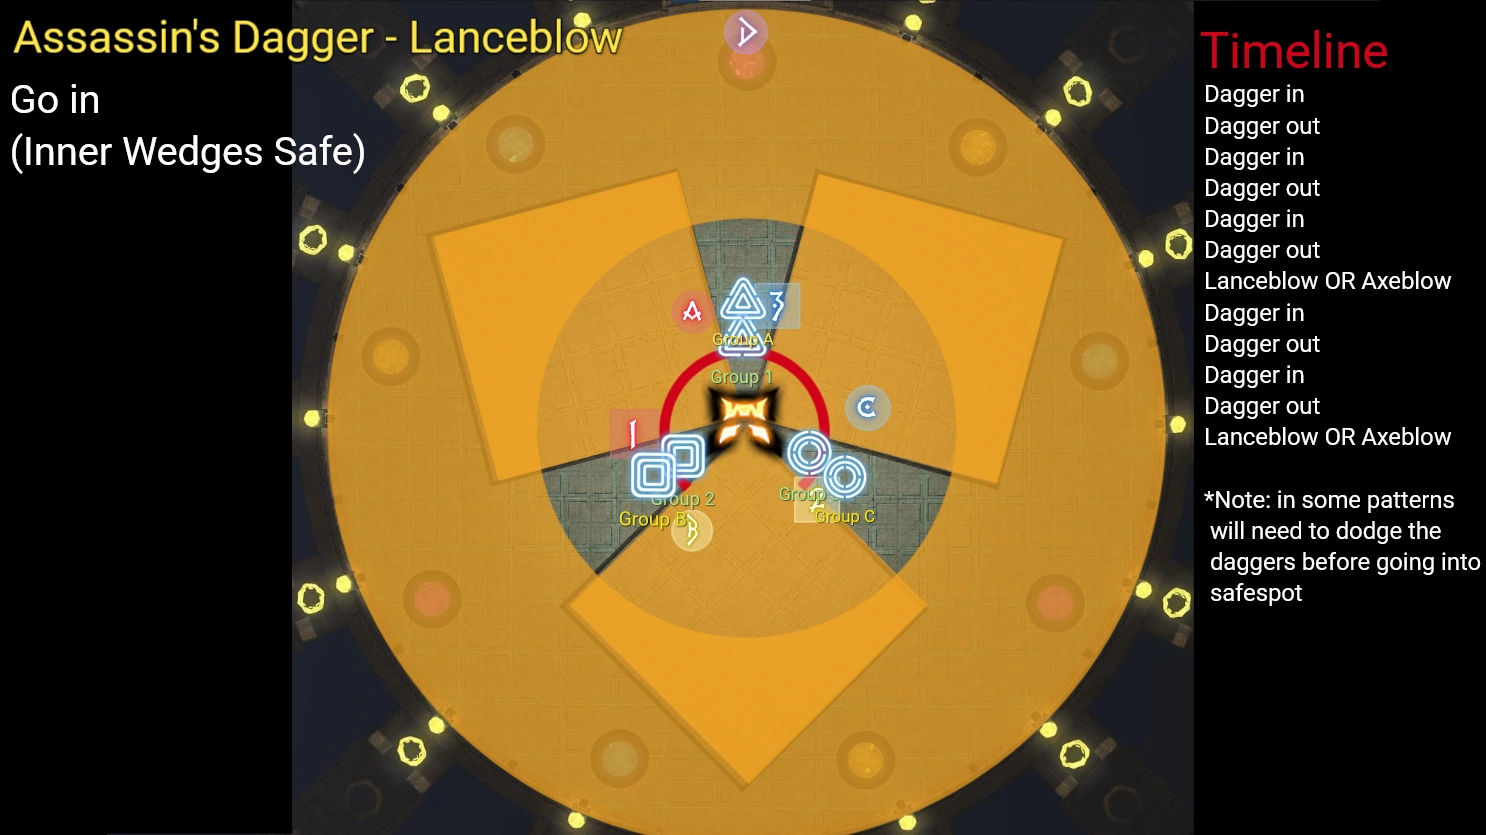 |
Players will need to read the castbar and navigate to the correct spot, while staying mindful of the daggers still rotating around the arena. The daggers will stop rotating when the second cast of Critical Axeblow/Lanceblow finishes.
Magitaur will then cast Forked Fury, a tankbuster targeting the closest and furthest player in each square. Letter Tanks will bait the close hit, while Number
Tanks will bait the far hit.
After Forked Fury, the boss will then use 2 more augmented auto attacks, Tanks should position to soak these again.
Magitaur will then begin casting Aura Burst/Holy, a raidwide that will deal lethal damage should any relevant Conduits remain upon the castbar finishing. Depending on which weapon was augmented, players will want to destroy:
- Axe (Yellow) - The yellow Axe Empowerment Conduits.
- Lance (Blue) - The blue Lance Empowerment Conduits.
When these Conduits are destroyed, they will target the 2 closest players for near-fatal damage. Tanks should stand under the Conduits, ready to press an
Invulnerability or Phantom Guard before the Conduits are destroyed.
Additionally, 1 purple Universal Empowerment Conduit will appear that also needs to be destroyed. When this Conduit is destroyed, it will fire a line AoE at the closest target, inflicting anyone hit with Hysteria, forcing them in random directions until the debuff falls off or they die. A  Phantom Berserker will need to place themselves between the purple Conduit and the wall and use Rage, destroying the Conduit and negating the Hysteria debuff.
If all relevant Conduits are destroyed, Aura Burst/Holy will only deal heavy raidwide damage.
Sage's Staff
Magitaur will cast Sage's Staff, spawning 3 Staves in the arena. These Staves will target the closest player for a line stack AoE. Before this resolves however, the boss will use Critical Axeblow/Lanceblow. Players must dodge the Axeblow/Lanceblow, then huddle up in the very middle of the arena, under the boss, to share the damage. This attack repeats once more, this time using the opposite Axeblow/Lanceblow to before.

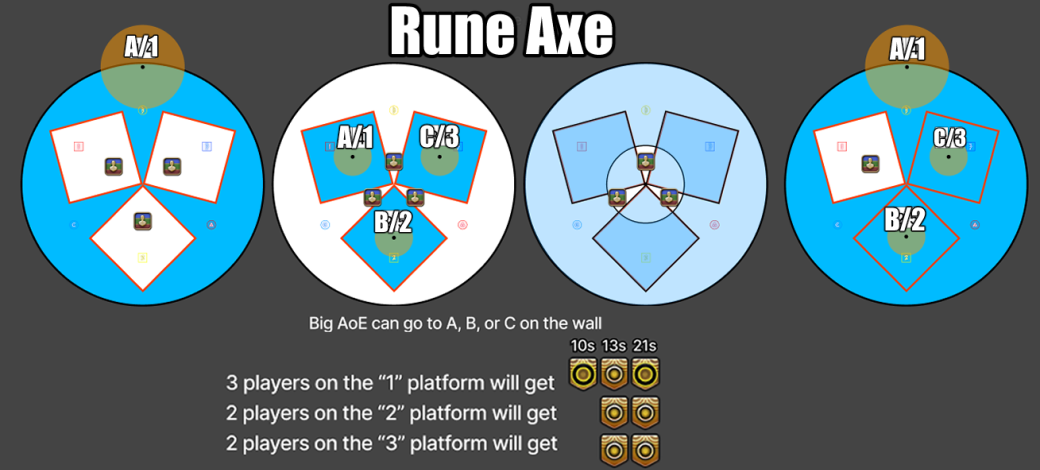
Rune Axe
Rune Axe - Pocket GuideMagitaur will begin this set of mechanics by first casting Unseal. This Unseal is guaranteed to augment the Axe, so Tanks should prepare by standing close to the boss in their sqaure. Magitaur auto attacks 3 times before casting Rune Axe. Players should stay in their home square until the cast finishes.
Rune Axe will randomly inflict a certain amount of players in each square with the following debuffs:
| Party | A/1 | B/2 | C/3 |
|---|---|---|---|
| 10s | |||
| 13s | |||
| 21s |
When any of these debuffs expire, a targeted AoE around the player will detonate. This inflicts heavy damage and a stack of Thrice-come Ruin to any other players standing in either the AoE itself or any flooring the AoE is touching.
As there are 2 types of debuffs, players will need to position correctly to avoid the AoEs as they expire:
Prey: Greater Axebit players should stand at the very wall of the arena, next to a purple Universal Empowerment Conduit, ensuring they don't overlap their AoE with any Square Flooring.
Prey: Lesser Axebit players should stand in the very middle of their square, ensuring they don't overlap their AoE with the Non-Square Flooring.
Before the 13s set of Prey: Lesser Axebit debuffs resolve, Magitaur will cast Critical Lanceblow.
Prey: Lesser Axebit players should ensure they let their AoE resolve FIRST, before moving into the safe zone.
During the 21s set of debuffs, the Northwest A/1 Square will be safe for unmarked players to dodge into. Magitaur will also periodically target random players for moderate damage.
After all debuffs have resolved, all players should return to their home square. Magitaur will cast Forked Fury, followed by another 2 augmented auto attacks and finally an Aura Burst. Players must destroy the yellow and purple Conduits to prevent a raid wipe.
Magitaur will then use the Assassin's Dagger sequence again with no changes.
Holy Lance
Holy Lance - Pocket GuideMagitaur will begin this set of mechanics by first casting Unseal. This Unseal is guaranteed to augment the Lance, so Tanks should prepare by standing far from the boss in their sqaure. Magitaur auto attacks 3 times before casting Holy Lance. Players should stay in their home square until the cast finishes.
Holy Lance will randomly inflict 3 players in each sqaure with Prey: Lancepoint.
When Prey: Lancepoint expires, a targeted stack AoE around the player will detonate. Players inside the stack will be inflicted with a
Magic Vulnerability. Players outside the stack will recieve heavy damage and a stack of Thrice-come Ruin. This AoE will also detonate any flooring it touches.
Additionally, 12 Lances will fall into the arena, starting North on the non-square flooring and rotating clockwise. These Lances will detonate in the same order they dropped, inflicting a Thrice-Come Ruin to any players standing in the same flooring when it detonates.
As the Lances drop, Magitaur will cast Critical Lancebow, requiring players to dodge this attack before properly positioning to resolve the mechanic.
To resolve these sequences of debuffs expiring, as well as avoiding each Lance's detonation, Prey: Lancepoint players will plant directly in the middle of their square, while any party's square that is currently being detonated by Lances will instead use the non-square flooring to resolve their stack. The following sequence should look like:
| Party | A/1 | B/2 | C/3 |
|---|---|---|---|
| Lance 1 | Square | Square | Edge |
| Lance 2 | Square | Square | Out |
| Lance 3 | |||
| Lance 4 | Square | Square | In |
| Lance 5 | Square | Edge | Square |
| Lance 6 | Square | Out | Square |
| Lance 7 | |||
| Lance 8 | Square | In | Square |
| Lance 9 | Edge | Square | Square |
| Lance 9 | Out | Square | Square |
| Lance 11 | |||
| Lance 12 | In | Square | Square |
After the 10th Lance detonates, Magitaur will begin casting Critical Axeblow. Parties B, C, 2 and 3 can position after the final set of stacks resolve, whereas parties A and 1 must wait for the 12th Lance to detonate in their square before moving back in to dodge.

After Critical Axeblow, Magitaur will cast Forked Fury, followed by 2 augmented auto attacks and finally Holy. Players must destroy the blue and purple Conduits to prevent a raid wipe.
Finally, Magitaur will use one more Assassin's Dagger sequence, with no changes, before casting a hard enrage at 8:00.
Defeating Magitaur completes The Forked Tower: Blood. Congratulations!
First-timers can climb the stairs beyond the boss to find Entry #30 in the Occult Record, as well as claim their Demon Haul mount from the Achievements window.